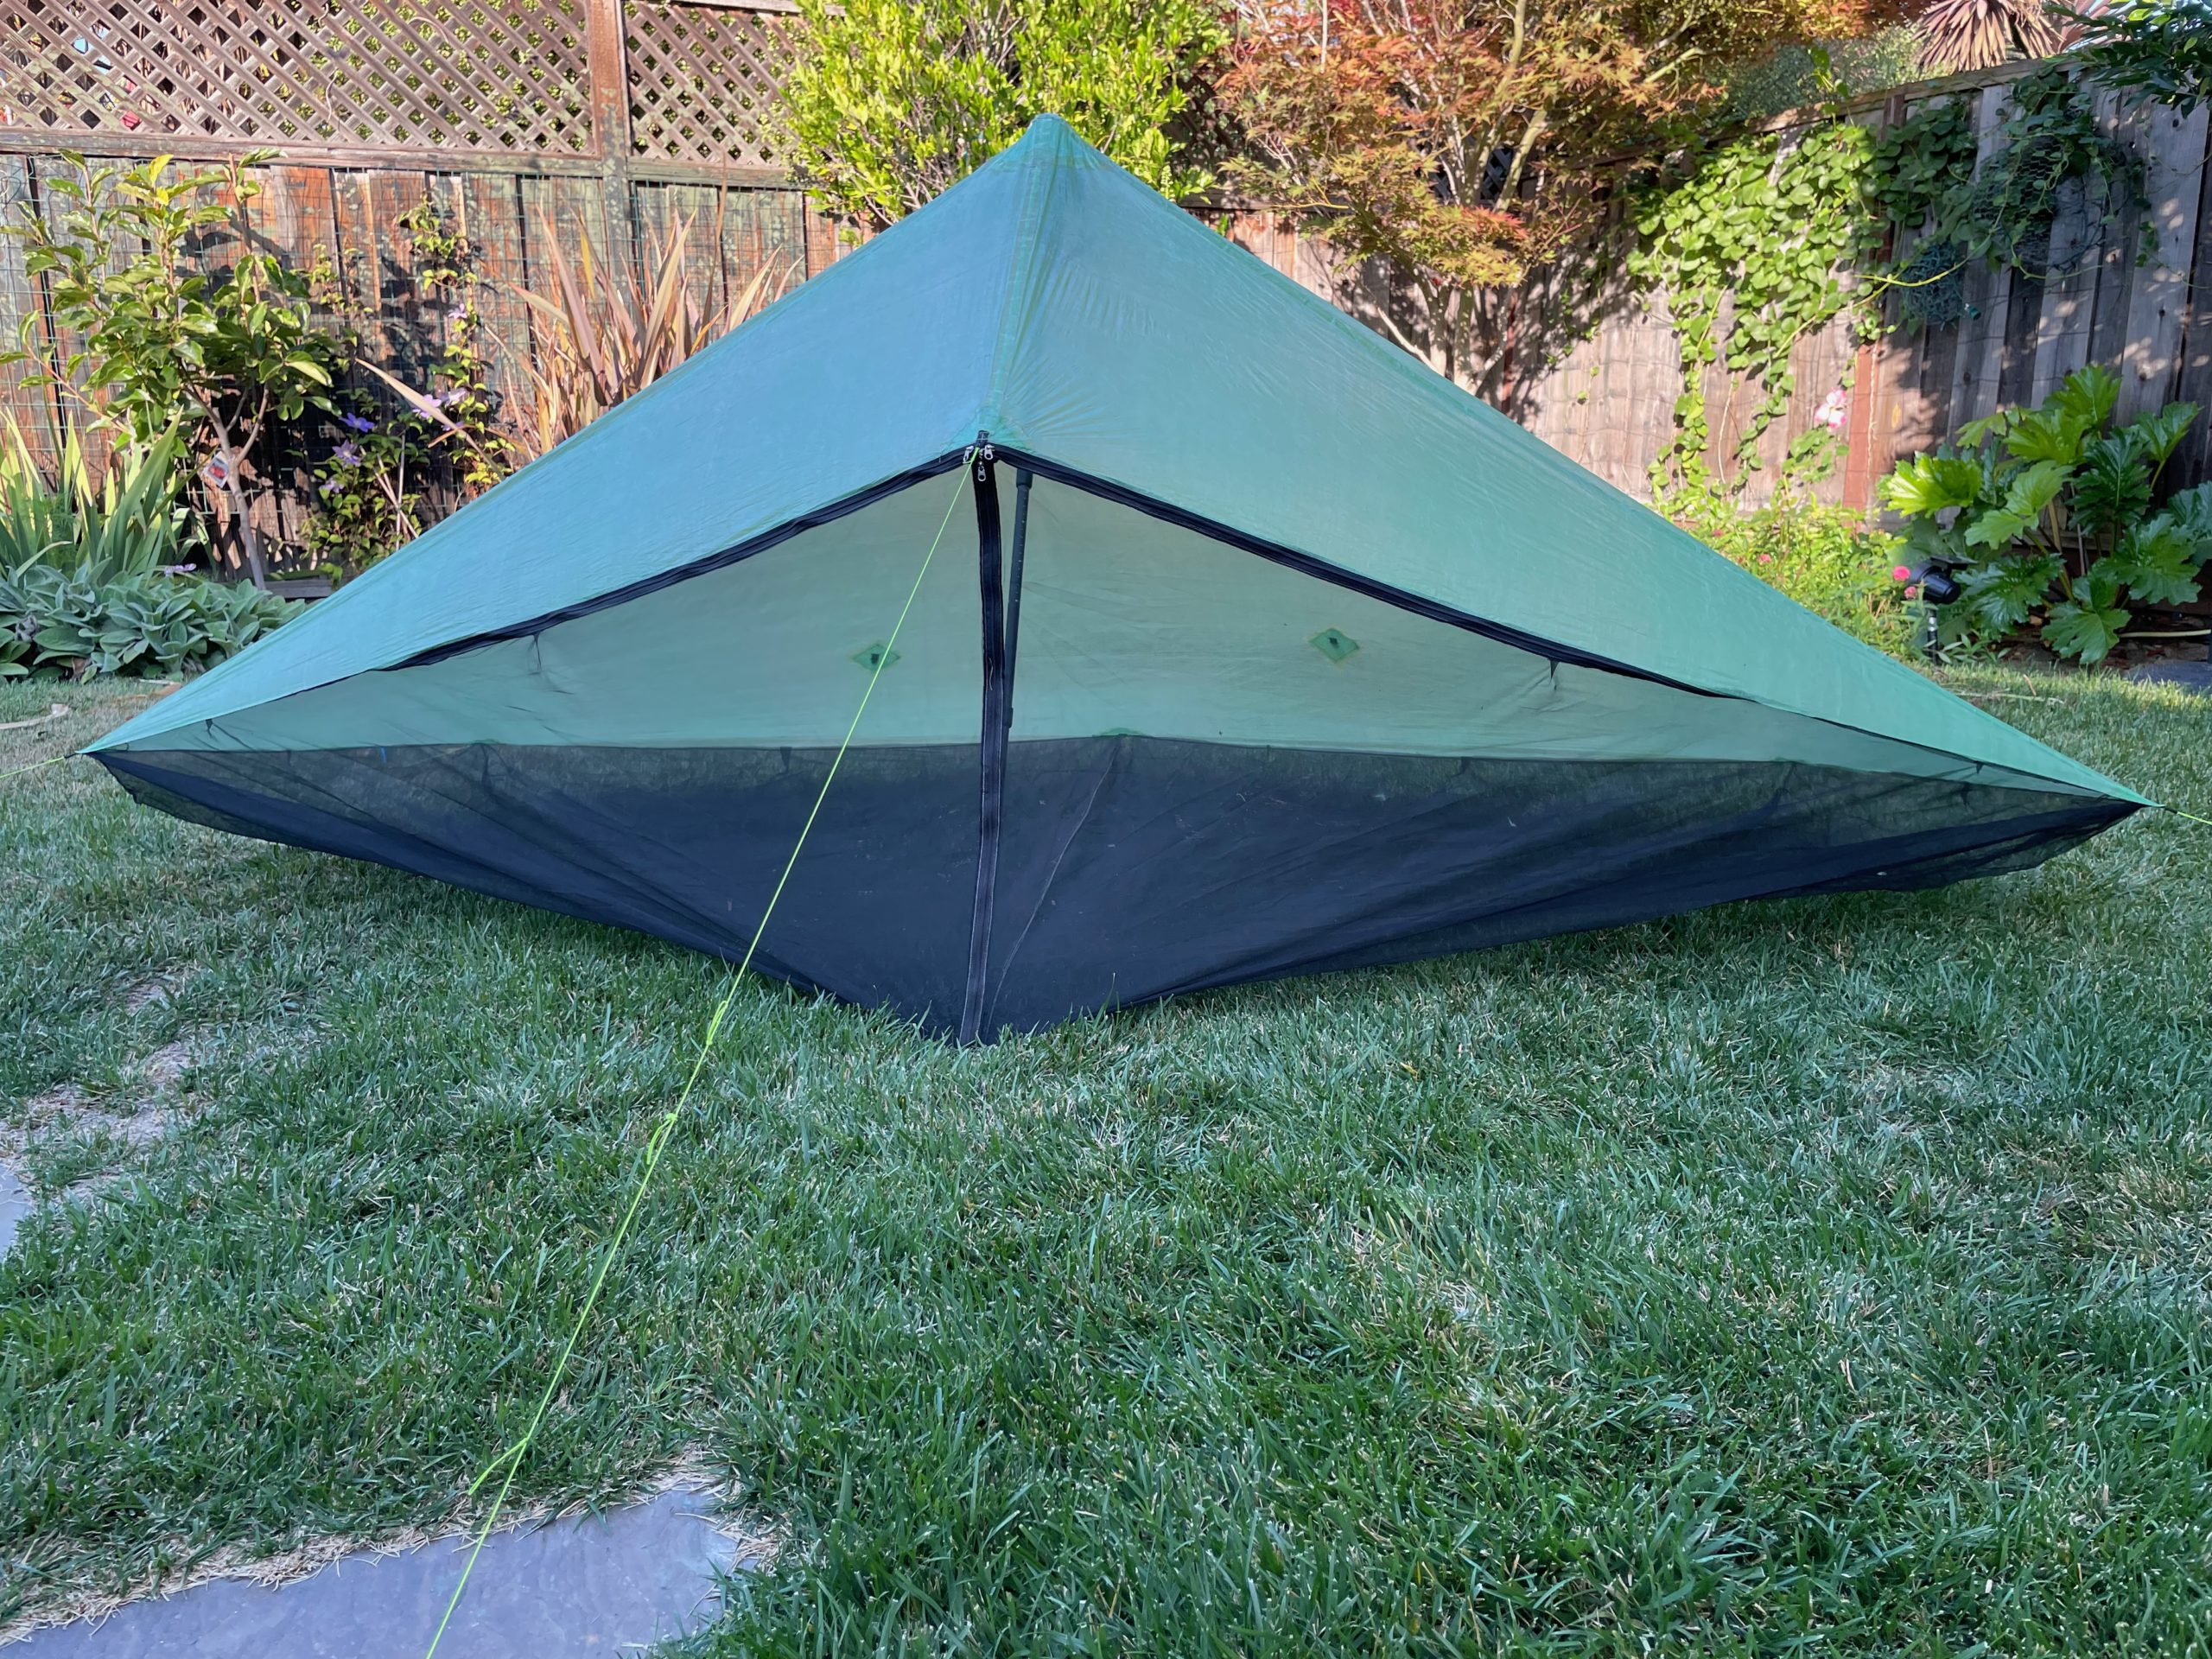
Tag: backpacking

  • ZPacks Hexamid

    Review ItemZPacks Hexamid
    Options: Cuben with Netting
    Manufacture Year: 2010
    Listed weight
    : Cuben shelter, guylines, and bag 8.9oz
    Weight as delivered: tarp+attached guylines 8.3oz
    MSRP: US$259, no longer made

    I have a first generation which uses three zippers that meet at the top peak. Joe has now switched to a single zipper to save weight and reduce the risk of zipper failure. The other major change is that the seams in the current generation Hexamid are primary joined by sewing rather than by taping.

    Summary

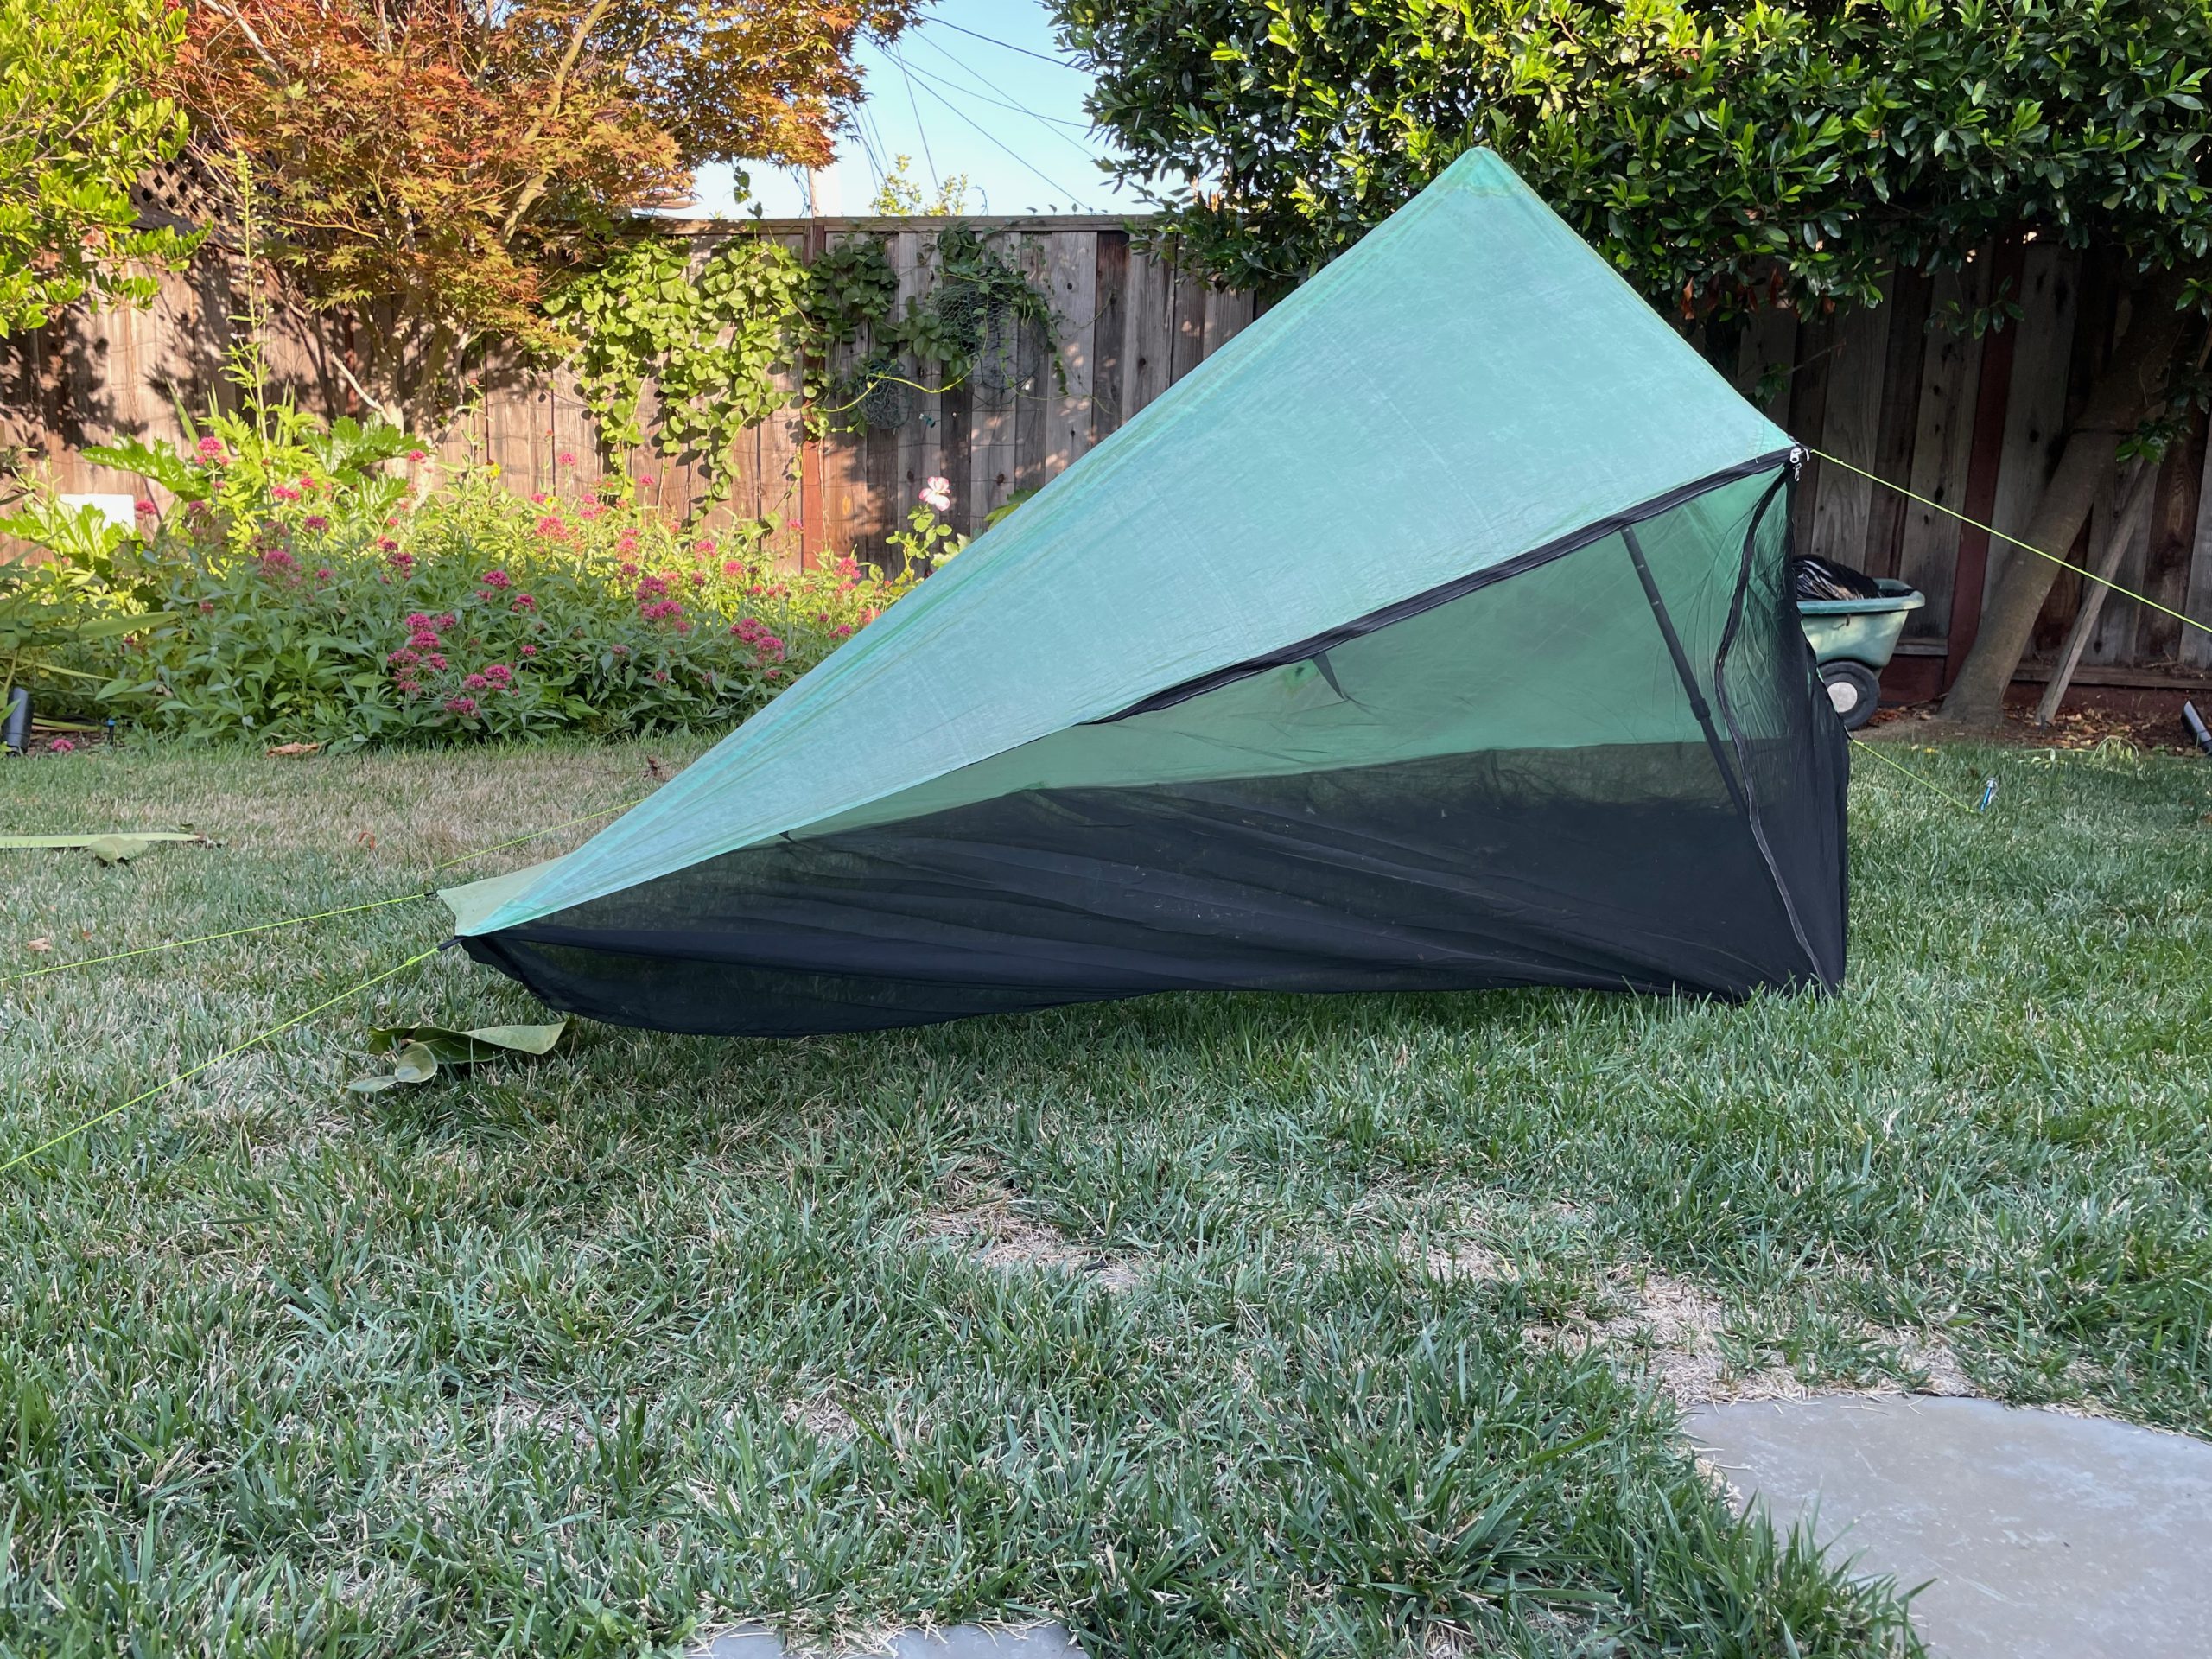
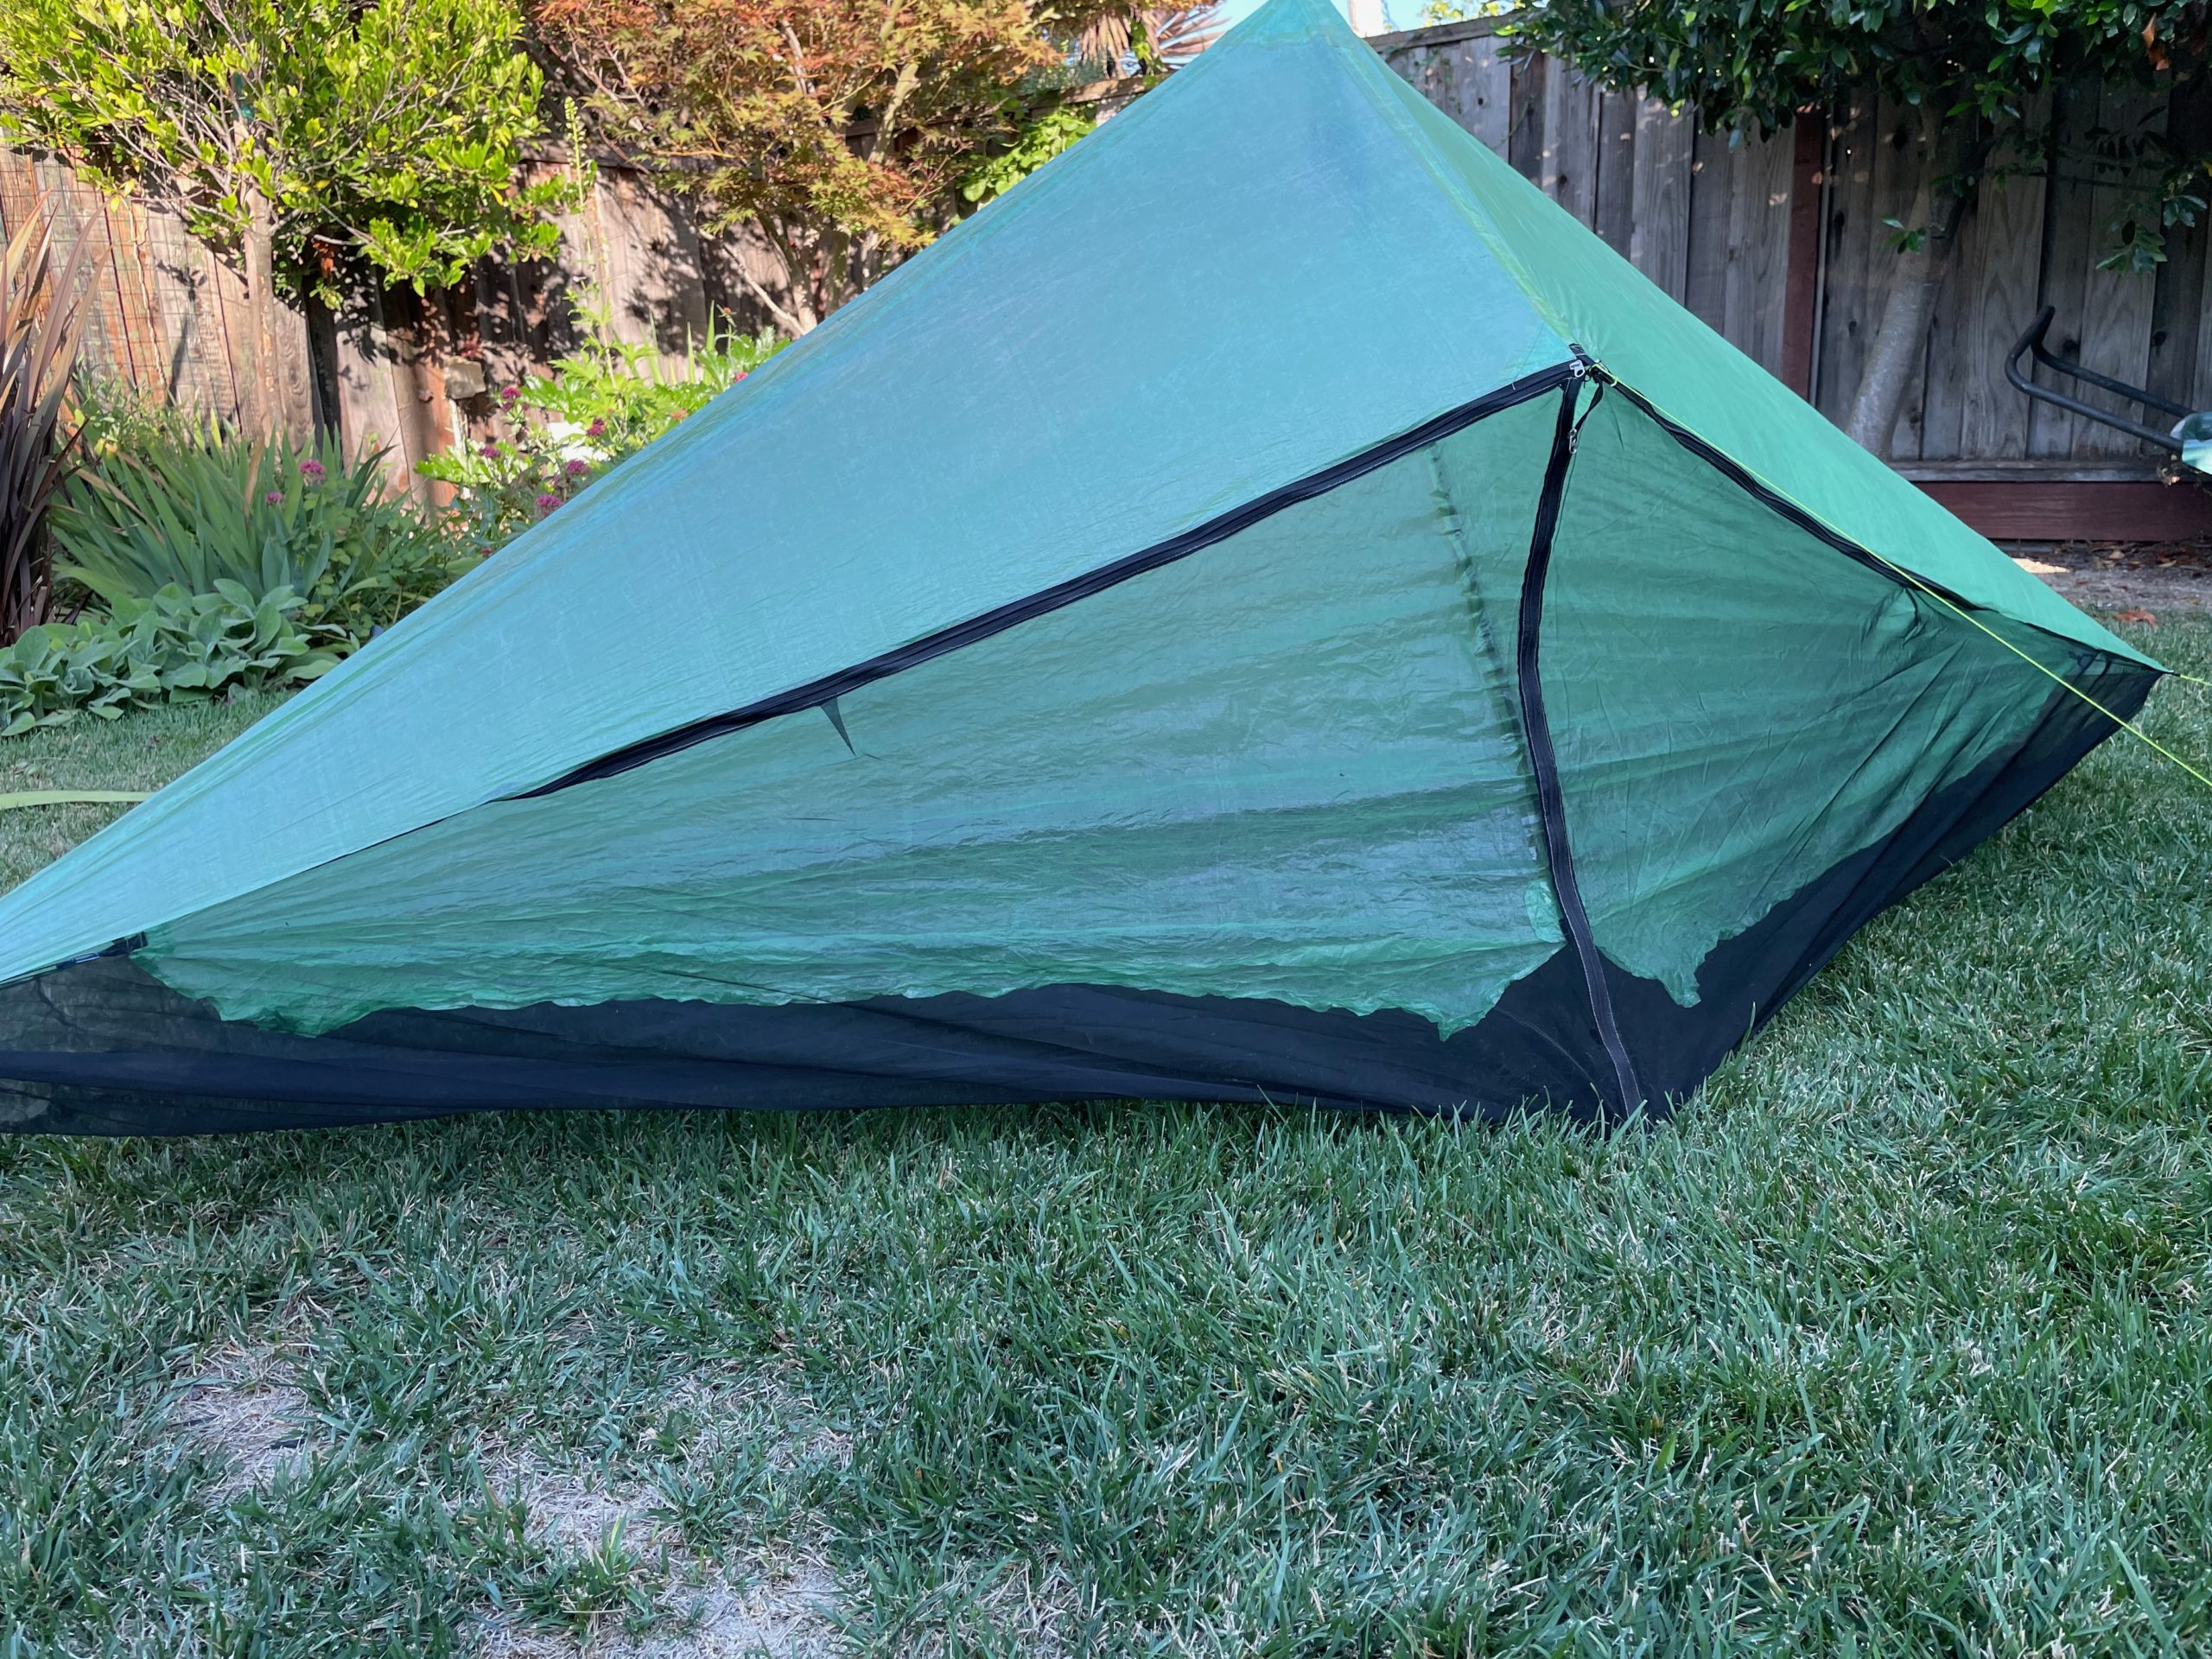
    The Hexamid, especially the Cuben + netting model, is an amazing light solo shelter which is fast and easy to set up with a taut pitch. There is adequate of space for one person and gear. While sharing a Hexamid would be possible, I would  only do so under exceptional circumstances because I think the roof slope doesn’t leave adequate space for the person furthest away from the door. Obviously, Joe found that it could work for couple on the second half of his five month CDT hike.

    Things that I liked:

    • Super-light weight
    • Fast, easy setup which results in a taut pitch which has been stable for me in >=35mph winds
    • Good ventilation
    • Plenty of bug free space

    Things I don’t like:

    • Entry is too low (28”) to enter without brushed against the top or crawling on the ground
    • In more extreme conditions not enough protection from side blown rain, though optional doors helps a lot.
    • No line locks.. but this is easily added by user
    • If you experience heavy mud or freezing temperatures the netting can get “stuck” in the ground.

    My total shelter weight is 17.8oz which includes the Hexamid 8.3oz, optional door 1.5oz, 8 stakes, 2oz, MLD SuperLite Bivy 6oz.  This weight doesn’t include 1 GG Lightrek 4 pole 3.9oz. In good weather and low bugs I cowboy camp using the bivy with the Hexamid staying in my pack.

    Description

    The combination of the ZPacks Hexamid product page, and Tony’s pictures from BPL Pt Reyes Trip (starts at picture #17) gives a pretty good feel for the shelter.

    I have a Cuben Hexamid with netting. Since I purchase my Hexamid, Joe has  added an extended beak which would be a good alternative to the door, and is now also selling a separate bug tenting with the tarp. While I might have preferred the extended beak, I still prefer the netting being fully integrated with the tarp rather than separate because it provide more bug free space.

    There is also an optional 1.5oz “door”. In mild conditions I started using the Hexamid with a Gossamer Gear Polycro groundsheet (1.3oz) which I  place inside the shelter on top of the netting. I eventually switched to using a MLD Superlite Bivy with eVENT foot which weights 6oz. I am using the bivy to help keep the foot of my quilt dry (more on this later), to control drafts in colder conditions, and generally keep my quilt contained.

    Field Conditions

    In the first three  years I used the Hexamid in a variety of conditions. From near sea level on the California coast, to 12k ft in the Sierras. I got caught by in a couple of unexpected snow storms. Temperatures have ranged from 15-85F, with a significant number of the nights above dew point which is pretty unusual in my experience. There were a number of nights below dew point so I can talk about condensation. Wind conditions have varied from between completely calm, to clocked at 35mph as the wind was slowing down… I am sure it was quite a bit higher that that at it’s peak. The shelter saw number rain storms, included a three day storm which dropped more than an inch of water in an hour, and a few moderate hail storms.

    Performance

    Overall performance is quite good considering this is a extremely light weight three season shelter. The netting floor is a surprising idea. Placing a ground cloth over the netting does indeed seem to work if you keep the ground cloth away from the edges. The water runs down the netting on the outside of the ground cloth providing good protection. The one issue that needs to be managed is that wind blown rain that can come through the netting and pool on the top of the ground cloth. I would not want to use this shelter in a real rain storm without some sort of supplemental protection, especially if the wind shifted so it was blowing toward the door rather than the back of the Hexamid.  I think could stay dry without supplemental protection when awake, but experience has shown me that I move too much while asleep. I am sure I would wake up with the foot and maybe the head of my quilt soaked if I faced a heavy rain while I slept. Using either a  bivy, the optional door, the optional extended beak, or maybe ground cloth with bathtub side and an elastic strap to keep a bag/quilt inside the ground sheet would have worked.

    Ease of Setup

    This is an easy shelter to pitch. Just follow Joe’s video of setting up the Hexamid. I found that after three attempts I could set up the Hexamid more quickly that Joe does on the video. The only slightly tricky part was getting the pole properly adjusted. The first two times I went to set up the Hexamid I didn’t pull the pole quite forward enough. It’s important for the bottom of the pole to be directly under the front corner of the beak.

    There are three supplements I would recommend. First, as Joe recommends, you need to leave approximately 8 inches of slack between the front two guylines. Rather that having to approximate this each time, tied a knot at that exact point.  This way I pull the shelter tight, and then drive the stake in at the knot location. Second, I often camp places that are extremely rocky which makes placing stakes challenging.  Fixed guylines aren’t ideal. You can retying the staking loop on each trip that needs a varied lengthy, pre-tie a few loops at different lengths, or purchase a set of  mini line locks.  Finally, I would recommend doing a small shock cord loop for the two pullout for the middle of the shelters walls to insure you don’t over tension them.

    Condensation

    For whatever reason, many of my trips stayed above dew point, so most night I didn’t have condensation. I did see a number of nights below dew point, but even then, the condensations seemed lighter that I am used to. It seems like Hexamid is a bit less prone to condensation that other shelters I have used. Is because Cuben is less prone to condensation that Sil Nylon or Spinaker?

    Rain Protection

    A storm was rolling in just as the Hexamid arrived at my home. I set it up with the door facing the direction the wind would be blowing on the theory that this would provide me information about performance in the worst case which can happen if the wind shifts once the shelter is set up. I found the rain protection surprisingly good the first two nights. The first night got some rain, the second night got several hours of hard rain with winds averaging 10mph. While the rain did come through the netting, I found the space from the ridgeline back stay dry. The first night I placed the leading edge of a polycro ground cloth a few inches closer to the door than the top ridge. There was no noticeable moisture accumulation on the ground cloth. The second night the ground cloth was still dry, but the the foot of my quilt did get slightly damp when the wind picked up a bit. The surface dried completely in an hour or so in 50F, 80% humidity so it didn’t get that wet. I expect that if I had deployed the optional door, that the foot of my quilt would have been dry.  The third day we have some wind gusts than were around 15 mph which drove rain through the netting on to the top of the ground cloth near my head which accumulated a small puddle. Neither  me nor my quilt got wet because we were on top of my pad. I believe if the ground cloth’s leading edge was was under the ridge line rather than pushing under the beak that I wouldn’t have had any accumulation on top of the ground cloth.

    I moved the ground cloth so it’s leading edge was at the ridgeline.  The netting that was formerly under the ground cloth as well as the ground underneath was almost completely dry  in a couple of hours. It seems to me that having a netting floor to help manage moisture might work well.  The third night we had some good  gusts. I don’t know wind speed  but I am sure it was more than 20mph and some very hard rain for around 20 minutes. The rain reached slightly beyond the ridge line and got the edge of my quilt wet. I wish I would have deployed the door. The fourth day and night I deployed the door. We have some very hard rain with wind gusts over 30mphs. I had no problem staying dry though I had to be careful with me feet because the Hexamid narrows at the ends. Based on this experience, I would highly recommend the optional door for more severe weather conditions. Note: One of the biggest challenges I had was because I used a quilt which drapes over the side of the pad.

    After 4 days in the rain I shook the Hexamid out and weighed in. It weighted 15.5oz… nearly doubling it’s weight from accumulated water. After hanging two hours in a 55F garage at a 60% humidity the Hexamid was still slightly damp to the touch, weighting 10oz.

    On the next several rainy trips I had issues using a flat ground cloth. I couldn’t seem to find the right placement. Either the ground cloth extended too far so water pooled on top of it, or the ground cloth didn’t extend far enough, and my quilt would end up getting wet because there was no ground cloth between it an the wet ground. This included one of the trips where I did use the door to get more space toward the front of the Hexamid. I think a big part of this is that I use a quilt which I leave spread out in warmer weather to ventilate. If I had consistently used the straps on the quilt or being using a traditional sleeping bag, I think I could have found a placement of the ground cloth which would have worked in all by the worst storms.

    One thing that helped was  making a very shallow “foot pocket” by forming “corners” and slightly raising the side of the polycro with tape. This was helpful because the shape of the Hexamid has the edge of the tarp coming in significantly near the front and back corners. I might be a bit more sensitive to this than some people because my quilt has a very light shell that doesn’t have the best DWR finish. After two years with a number of rainy trips I decided that I was not having fun with my improvised bathtub floor ground sheet. I stayed dry, but keeping my quilt dry was hit or miss. It never got so bad that I was concerned for my safety, but it was troubling.  I considered switching shelters or getting one of the custom ground sheet. In the end I decided to get a DWR bivy because there have been a number of trips using the Hexamid, and using other shelters that a bivy would have been helpful, especially on colder trips when the wind got under my quilt. I now have a MLD Superlite bivy with an eVENT foot and don’t bother with a groundcloth. The bivy also makes it really easy to cowboy camp in good conditions.

    Wind Performance

    There were several trips where the Hexamid faced 15-20mph continuous wind, and >35mph peaks. Hexamid did fine.  When staked firmly, the shelter stayed in place with very modest flapping. In the strong winds there was some flattening of the back wall, but not so much that it caused any problems. There was one trip where winds exceeded 40mph for more than an hour. I only have a few inches of deflection. Several of the light weight tents looked like they lost 1/3 of their volume.

    Bug Protection

    Provided a roomy, bug free space with great ventilation.

    Construction & Durability

    The Hexamid is well construction. All the seams were taped, the sewing was even, I didn’t find any frayed edges. While well constructed, the Hexamid was not up to the class leading constructions of the Cuben shelters from Mountain Laurel Designs. Ron Bell of MLD has noted that he switched to a special tape that was significantly better than the traditional sealing tape. Besides being more UV resistant, the MLD tape doesn’t seem to stick out as much. When the Hexamid arrived, a piece of the tape for the peak had partially separated from the shelter. A bit of pressure and the tape was re-affixes, apparently no worse for the wear. In 2022 this shelter had around ~80 nights of use, many more nights in the pack because I cowboy camp whenever it’s possible. The shelter still looks to be in fine shape.

    I have some concerns about the fabric swatch that you set the tip of the pole into. Joe reports that it did not wear out or get a hole after 5.5 months of use. I am very surprised.  Being a cautious person, I put a rubber cap on my pole tip to protect the fabric. This might not be needed. Joe also pointed out that putting a small hole wouldn’t be a big deal because your ground cloth provides protection from moisture, not the netting floor.

    I do have a small tear in the floor mesh.  The tear wasn’t from the typical source. It’s torn because I grabbed the floor with a gloved hand and thought it was a piece of clothing which was partially stuck under my pad. I jerked hard, heard a rip, and realized that it was the floor, not my shirt.

    Joe has switched from taping the seams to doing a double stitch and letting owner seam seal. Time will tell how this effects durability.

    Sold in 2022 when I thought I was done with solo trips because I am mostly doing trips with my wife, and when it was just me I wouldn’t mind the extra weight / volume of our Durston x-Mid Pro2. Hmm… the might have been a mistake. The Hexamid was still usable but there were some places where the cuben was showing signs of wear I missed suggesting a limited lifetime left.

    Customer Service

    My order was processed quickly, and Joe was able to accommodate a “ship by” date so I could take it on my next scheduled outing.

    Compared To / Other Options

    There are a number of ultralight shelters which might be interesting to someone considering the Hexamid. Additionally, some people will find the combination of a tarp and either a bivy or nest (net tent) effective. The shelters I think are more closely related to the Hexamid with bug netting are listed below.

    Gossamer Gear Whisper: Whisper is a palace with super easy entry and exit compared to the Hexamid. Whisper has perimeter bug netting which you combine with a ground cloth. I like being able to pack the groundcloth separately and to be able to replace it when it wears out. Requires two poles. This is the shelter I am now using on solo trips. So far all the trips have had gentle weather so can’t report of it’s performance in storms.

    HMG Mid-1. One person pyramid with integrated bug netting and floor. A number of extra tie-outs for want facing more severe weather. 16.8oz. If I didn’t have the Whisper, this is the most likely shelter I would purchase for my use cases. I found entry / exit easy, not phased by some minor storms (haven’t see in serious storm), strait forward pitch.

    ZPacks Plex Solo Lite. I think of this as a refined version of the hexamid. Slightly taller (36″ entry), floor, integrated bug netting. Similar pitch characteristics.

    MLD SoloMid or MLD DuoMid + MLD Mid Inner Tent. More versatile and much better in harsh weather with more room inside the tarp at nearly twice the weight and expense. The solo innernet provides a smaller space than the inside of the Hexamid. I don’t have experience with the duo innernet, but expect that it would feel more roomy than the Hexamid sleeping on the diagonal. If I still did winter trips this would be on my short list of shelters to replace my Hexamid.

    Tarptent Aeon-Li provides a more livable and storm worthy shelter than my original Hexamid with a smaller pitching footprint and a bathtub floor which removes the need for using a bivy… but means cowboy camping is out. Downside is that the stays would require me to pack it vertically in my pack.

    Meadow Physics Abode is a streamlined Hexamid with perimeter netting (you do your own floor). It pitches a bit tauted than the Hexamid so should be good in the same conditions I used the Hexamid. Love the simplicity and the lack of a zipper means that it’s lighter with nothing to fail… but it also means the entry is just 18″… too low for my taste.

    SMD Deschutes Plus: Updated Wild Oasis. Slightly cheaper than the sil-nylon, netting version ofthe Hexamid. Not as bugproof as the Hexamid since a groundcloth is laid over the netting without being fully sealed. I borrowed the Wild Oasis from a friend and only used it two nights. The Wild Oasis is a bit more temperamental to set up than the Hexamid, and I found it felt a bit cramped. No personal experience with the Deschutes.

    SMD Gatewood Cape + Serenity NetTent. Provides rain gear/pack cover in addition to shelter. The NetTent has less space than the Hexamid. The Gatewood Cape/NetTent has an advantage that you can use the items separately. The combination of Gatewood Cape and NetTent was more expensive and heavier than the Hexamid when I purchased it, but I believe is a reasonably good deal now. I tried using the Gatewood Cape. I found it a bit unwieldy as rain gear and a bit small for my taste as a shelter.

    LightHeart Shelter (my review of a prototype): Twice the weight and more expensive buys you a larger living area in a true double walled shelter which can give you almost 360 visibility on the nights you don’t need the fly extended. There is also an option with an awning which would be a real plus when facing extended rain.  I had some issues with this shelter being blown down in heavy winds. Attaching the spreader bar to the tent fabric should prevent some of the issues I saw.

    Other Reviews

    Bushwalker Hexamid Review which goes into even more depth than my review about manage in wet conditions

    My recommended shelters for general information and other options.

  • Shelters

    Shelter selection should be based on how much room you need and the conditions you expect to encounter (rain, snow, wind, bugs, blistering heat, etc). For example, if you only camp in mild weather it would be silly to buy a mountaineering tent designed for expeditions since it will be more expensive, heavier, and not be as well ventilated as a shelter designed for three-season use. If you are camping in the Canadian lake district in June, taking a tarp without any bug protection would be stupid. If you are above tree line in the winter, it would be suicidal not to take a four season shelter designed to handle high winds and snow load. A corollary is that there isn’t one shelter which is perfect for all conditions… so if you adventure out in all seasons you might want to think about owning at least two different shelters.  The issues I consider when looking at a shelter are:

    • appropriate protection in view of the conditions expected
      • ability to handle snow loads (sidewall angle / material)
      • blocking spin-drift (solid walls, if not snow skirt)
      • ventilation (summer want a lot, winter I don’t want ventilation other than high vent)
      • if double walled can outer wall be set up first
      • bug protection
    • user friendly / low hassle
      • ease of a basic pitch
      • ease of a storm worthy pitch
      • ease of entry (I like side rather than front entry)
      • need to tighten at night? (DCF, spinnaker set and done, SilNylon stretches)
      • how careful do you need to be when moving (e.g. single or double walled)
    • how much visibility of your environment
    • usable space (sloping sidewalls can limit this) given number of people. See Andrew’s article about calculation usable space and the related space spreadsheet and the nice visualization at fitmytent.com
    • footprint size (smaller for more usable space good)
    • weight
    • how it looks (I like clean lines)
    • lifetime (a discussion about the lifespan of DCF)
    • cost

    The weighting of these factors varies person to person. In fact, my weighting of these factors depends on where I am going to use the shelter. I have noticed that some people tend to gravitate to shelters that are as open as possible. They want to be as fully connected to their environment as possible. I often see these people using flat tarps. Other people want their shelter to be enclosing and protective. Walls and floors are important. While I have used a flat tarp and cowboy camped, I find that I often like some sense of boundaries, especially on solo trips. I know that I could easily live without my “walls”, they can give me a psychological comfort that makes the trip more enjoyable.

    Quick Recommendations

    I am often asked to recommend a free-standing, two man, three season shelter with two doors.  The Durston Design X-Dome 2 is I think best option today. Just 2.7lbs, the space is very usable, easy to pitch, and remarkably weather resistant (especially if you use trekking poles for extra support). The Slingfin Portal-2 is another excellent 2 person which can easily handle 3+ season conditions. For light weight, free standard, 4 seasons, the Slingfin Crossbow 2. Big Agnes Copper Spur 2 Platinum and MSR Hubba Hubba are a bit heavier, not as protective in storms, but can be found in bring-and-mortar stores. A good “budget” tent is the $199 REI Trailmade-2. If the free-standing requirement is removed I strongly recommend selecting one of the better ultralight tarp-tent shelters. My first recommendation would be the Dan Durston’s X-Mid 2P is a versatile shelter is valued priced at $289. Want a do everything shelter that can be used in all four seasons, can be used by two but light enough for solo use? Check  out the MLD DuoMid XL plus their inner-net.

    My Choice of Shelters

    I have used tarps and tarptents on the majority of my trips for the last 20 years. Since 2022 I have used a Durston x-mid pro2 for most of my trips: it is light enough for solo use and large enough for trips with my wife or a friend. Stable enough for 3+ seasons, can be opened up for decent ventilation in warmer weather, and easy to pitch if you use a few tricks. Very livable space. For many years I used the predecessor of ZPacks Plex Solo which was called the Hexamid (my review) for 3-season solo trips in California. I recently started using a Gossamer Gear Whisper for solo trips in similar conditions.

    Options

    Cheap

    Nothing can beat the price / performance of a sil-poly flat tarp. For completely cheap use a 3 mil plastic sheet. Set a line up which will be the ridgeline. Tie some guylines to the four corners using a sheet bend knot, and stake the corners out. If you want a double wall tent, look for a closeout of a better brand such as Sierra Designs, MSR, or REI at places like Sierra Trading Post. I generally don’t recommend buying used tents unless you know it was well cared for and it is in good shape. Waterproof coating can degraded, fabric can weaken due to extended exposure to UV, and improper care can result in mildew and the PU coating disintegrated due to hydrolyzing.

    Classic Scouting / Club Tents

    There are a few manufacturers who seem to have captured a significant portion of the “club” market. By this I mean organizations which have a stock of gear which is loaned, or rented at low cost by their members. Clubs typically look for low cost options which can stand up to people who don’t treat the gear carefully. The two largest supplier to clubs seem to be:

    • Alps: I have no personal experience with Alps, but have a number friends who have used them.  Alps seems to be commonly used by the boy scouts and budget conscience folks. They seem to be better made than wal*mart / target / etc specials. They are not as light or as well made as many higher end tends made by companies like Sierra Designs. You should never pay suggested retail price for Alps tents. A bit of careful looking should lead you to prices around 60% of MSRP which makes it a good price / quality ratio.  Full price is cheap, but not a good value.
    • Eureka!: In the 70s, 80s, and maybe later, the Timberline was “the” standard tent used by many boy scouts troops, YMCA outdoor programs, etc for backpacking. They weren’t the lightest free standing tents, but they were value priced and fairly durable. I still have fond memories of timberline tents even though there were better shelters, even then. I have been much less impressed with Eureka’s dome tents, having seen a number fail in strong winds.

    Other Information

  • Boots or Trail Runners

    When I started hiking as a child everyone knew you should wear hiking boots, ideally made in Italy with Vibram soles and leather.uppers. Only stupid people wore tennis shoes while hiking, though often they were brought for river crossings and for relaxing around camp. This is still a common view in the general public.

    When I join traditional hiking or backpacking groups, I often encounter people who think I am irresponsible for wearing trail runners, and that I am crazy when wearing minimalist shoes or sandals. I try to explain that I have literally walked thousands of miles in my minimalist shoes without a problem and that there is some good science suggesting a “barefoot” approach is smart… but people are still concerned.

    These days trail runners are the most common footwear worn by people who finish long hikes like the Appalachian Trail, the Pacific Crest Trail, or the Camino De Santiago. Trail runners are simply running shoes that have soles designed to have good traction on trails rather than paved streets. They have many of the same properties of our camp shoes: light weight, comfortable, and more breathable than our boots. They are optimized for comfort rather than protection. I have come to love using trail runners and no longer even own a pair of boots.

    Ankle support?

    Trainrunners don’t provide what most people think of as ankle support… but most boots aren’t significantly better.  Boots typically prevent excessive forward / reverse motion which trail runners do not provide. But in most cases it’s lateral motion that results in ankle injuries. Most boot provide little protection from lateral motion. If the boot doesn’t feel like a ski boot or a mid-calf military jump boot, than it’s most likely not giving you full ankle support.

    What most boots and trail runners do provide is a good traction, a heel cup and foot bed which provides a good foundation for your foot, making it less likely that your foot will end up at a bad angle.

    Wearing boots provide a sense of invulnerability, which can lead to excessive carelessness about foot placement. Wearing trail runners tends to make people aware (at least at an unconscious level) of the conditions they are walking on. The combination of higher situational awareness, better tactile feedback, and more agile feet, make it easier to place feet and enables people to recover a bad placement before full body weight is applied.

    Traction

    I have found that in nearly all conditions trail runners provide traction which is good as, if not better than classic, Vibram soled hiking boots. The situations where I have found hard Vibram soles to provide better traction have been where I needed a hard edge and/or lateral stiffness so I could drive the edge of my boot into the ground. For example, when going across a steep hill that doesn’t have a trail or descending some scree fields. In most cases I think the best way down scree is to go strait down (sort of like a cross country skier).  When you need a better bite uses your heels rather than the sides of your shoes. I think Vibram might have a slight advantage on wet granite.

    Sole protection

    Most hiking boots have a heavy, protective shank. If you come down on a pointed rock the pressure is spread over the entire foot. With trail runners, the pressure isn’t spread as evenly, so you can “feel” the rocks you step on. In theory, this could lead to bruising you feet which wouldn’t been good.

    I have never bruised the soles of my feet wearing trail runners… but I suppose this could happen to people going over very jagged conditions who have sensitive feet. If bruising is an issue, there are optional “rock guards” which can provide added protection.

    Top Protection

    On well established trails or hiking in areas that have fairly spare vegetation (high alpine, etc) protecting the tops of your feet isn’t that important. In many cases the added ventilation offsets any lack of protection. Additionally, people wearing lighter weight shoes tend to be a bit more aware of foot placement which reduces potential issues further.

    There are some environments where the tops of the feet need more protection than the average trail runner. Places that have extremely broken ground with sharp rocks can tear apart the tops of most trail runners, if not hurt the wearer’s foot. Likewise, travelling through areas that have dense stands of plants that have sharp or pointy edges can go right through light uppers. In these cases it is wise to go with a more protective “upper”. While I haven’t experienced this, I understand there are some places (like the Australian outback) where there are snakes that can bite through most shoes. The final situation where I think this concern could be justified is when doing trail work or engaged in other activities that use large, heavy, sharp tools.

    Blisters

    Blisters are caused by friction or extended pressure on the skin. One of the common problems is footwear which is too tight or crowds the toes together. Historically boots had wide toe boxes and shoes didn’t. Thankfully there are now a number of companies which make shoes that have recognized the advantage of a wide toe box.

    Another common cause of blisters is friction. This is much more common in boots because the uppers tend to be stiffer than trail runners. When you walk the boots will be unyielding which will put pressure on specific areas of a person’s foot. It’s common for blisters to appear in these locations. It is also likely that with the boot not yielding that a person’s foot will slide a bit inside the boot. This creates friction. Worse, most boots don’t let out moisture out which makes the friction worse. The best solution for this is using two pairs of socks with part of the sock with the most texture facing the shoe and foot, and the smoothest part between the socks so the rubbing isn’t directly on your foot.

    Comfort Normally Rules

    I mentioned that when I join more traditional groups there are people who are concerned when I am wearing trail runners. On the beginning of the trip, these folks are wearing heavy duty hiking boots. Ironically, during the trip they will develop blisters which become so painful they can’t put on their boots. What do they do? They finish the hike in their water shoes, sandals, crocs, or tennis shoes. I try not to point out that by wearing my trail runners I have avoided the crippling blisters while having footwear with good traction.

    Foot Freedom and Energy

    I find that boots with stiff soles makes it harder to enjoy the environment I am in. I like “feeling” where I am rather than being protected for it. I also love a sense of freedom, and not feeling weighted down. When I switched from heavy hiking boots to lighter shoes I noted that I had more energy at the end of the day. Later, I discovered several papers which examples this:

    for every 1 lb of footwear, it’s like carrying an extra 6.4 lb of weight on your back

    [Legg SJ, Mahanty A. Energy cost of backpacking in heavy boots. Ergonomics.1986 Mar;29(3):433-8.]

    Trail Runners vs Heavy Hiking Boots

    People often talk about how trail runners are “disposable” and how hiking boots will last forever. My experience was that I got around 3000 miles before I needed to at least re-sole, if not replace my boots. Frank Revelo recorded his experiences with 15 pairs of Belleville Boots concluding he could get at least 2000 miles from each pair.

    Area  Trail Runner  Heavy Duty Hiking Boot
    Shoe Weight18oz70oz
    Equiv work for this Weight on Back7.2 lbs28 lbs
    Cost$75$200
    Service400-750 miles3000+ miles
    Cost/Mile10-19 cents<6 cents
    Break In PeriodPractically NoneOften 100+ miles
    Foot ProtectionModerate to GoodExcellent
    Moisture ManagementMost are fairly breathable.  Your feet will get wet.  They will also dry in a few hours of hiking.  Gore-Tex trail runners are available.Most are highly water resistant or waterproof.  If they do get wet they stay wet for a long time.  Feet tend to be slightly damp because when they are sweating, it is hard for the moisture to escape.
    InsulationTypically no insulation on top.  Many models have some amount of mesh which helps keep feel cool and well ventilated. The soles though (often made from light weight foam) tend to be more insulating than heavier boots with dense soles.Tends to be warm on top.  Thick leather or material, and typically thick sock to protect your feet from the boots.  In cold weather good.  It hot weather you feet sweat and swell which encourages blisters to develop.

    Reasons for Boots

    As mentioned above, I don’t use boots anymore, but I do believe there are a limited number of situations where boots are the best footwear. There are times when the ankle support of a jump boot is needed, when feet need to be protected from a hostile environment. Crampons typically work better on boots than lighter shoes. Finally, it is possible to complete an extended trip with a single pair of boots. This is important it you are in locations with replacing trail runners every 500 miles will be difficult. Some people think heavy boots are best in cold conditions because they are insulated where trail runners are not.

    Hiking Shoes

    A compromise between trail runners and boots are hiking or approach shoes. They tend to have the thick, stiff soles of hiking boots, but lighter weight and more breathable uppers.

    So what’s your choice?


  • Feet in Snow and Cold

    In colder weather, people often struggle with their feet getting cold.  There are a number of reasons for this

    • Feet are the furthest point from your core which is generating heat.
    • Feet are subjected to conductive cooling through the soles of your shoes/boots.
    • Feet sweat a lot.  Many people’s shoes hold in all the moisture.  Wet moves heat much more quickly than dry.
    • Tight fitting footwear (often caused by extra thick socks) constrict blood flow.

    While there are a number of issues which make keeping feet warm enough challenging, there are a number of approaches which have been proven to be effective.

    Vapor Barrier Socks

    VP socks can be used with any of the below footwear options. I have found VB socks a huge win once the temperature is below around 10F. Warmlite and  RBH Designs make vapor barrier socks.  The cheapest vapor barriers can be plastic bags. Bags holding sandwich bread or provided at some office buildings for wet umbrellas are an ideal shape, though you should expect them to last just a day or two before you rub a hole in them.  Small Mylar cooking bags are a bit more durable, but are hard to find in the right shape. My first attempt using vapor barriers was a pair of liners, a bread bag, wool sock, another bread bag to keep my wool socks dry, and then boots. Dave from owareusa suggested that rather than sliding the outer bread bag in and out, to put your insole inside the outer bag… leaving the bag in the shoe. He noted that he gets 5 days out of the bag then rather than a day or two. Haven’t tried this yet, but it makes sense. For the last couple of years I have used a pair of RBH insulated vapor barrier socks and trailrunners. This has been good for me down to 0F without any problems.

    Trailrunners and Water Protective Socks

    This is the approach I most often use.  On most trips I have found that waterproof socks and trail runners (goretex oversocks + trail runners + gaiters) worked well in 20F conditions, even in deep snow. I recently went on a trip that this didn’t work well. For some reason my feet felt cold and damp. Even though it was moderate weather and only dropped to 28F, my feet were freezing but my socks didn’t leak. Other people have reported good results using neoprene socks. In the winter of 2007/8 I picked up a pair of Inov-8 RocLite 390 GTX to try out. These boots plus my vapor barrier socks kept my feet warm down to 0F.

    Hiking Boots & Socks

    A classic approach to keeping feet warm are thick wool socks and a water”proof”  hiking boot. The boots protect against external moisture and the socks provide insulation. A slight variation on this theme are boots which have additional insulation. Socks are periodically changed and dried (place over your shoulders under your jacket, around a hot water bottle, or over your stomach while you are in a sleeping bag.) Hiking boots typically have a hard sole, with an aggressive trend which provide good traction except when facing extremely icy conditions. One thing to watch out for is that the boots will absorb some water, and in colder conditions the boots will then freeze. It takes a lot of work to thaw solidly frozen boots. Don’t let your boots freeze. My favorite light weight, insulated boot today is the Keen Growler.  I think this is a good option for -20F through 20F.

    Synthetic Boots w/ Foam Insulation

    There are two different types. Some are designed for hardcore mountaineering, and have hard, plastic exteriors. Others are primarily designed for protection against the cold such as those made by Baffin and will be softer. This approach will keep feet quite warm. The synthetic materials doesn’t absorb water, so the only moisture problem will be what your feet produce. In extreme cold (< -20F) I think this is the best solution.

    Mukluks

    Traditional Inuit footwear made from animal hides. Steger Mukluks seems to be one of the best regarded manufacturers. Mukluks don’t have high traction soles which are needed for walking on ice, but if you are on ice, you already have crampons (stand-alone or part of your snowshoes), so not having this on your shoes should work just fine.

    Overshoes

    NEOS, Forty Below, Outdoor Research’s Brooks Range can be an effective way to keep feet warm in very cold conditions. When using overshoes, you typically are wearing some sort of footwear inside the overboot which  provide a good footbed. Some people don’t wear shoes inside the overshoes, but rather use them as sort of a high tech mukluk. I found overshoes in basic cold (>=0F) to be overkill, and more bother than they were worth. In extreme cold I can see whether they could be quick useful.

    Booties

    Once you are in camp, it is often useful to have comfy, insulated footwear.  There are a variety of companies that make down or primaloft booties including GoosefeetWestern MountaineeringFeathered Friends, etc.

  • Feet in Wet Conditions

    One of my footwear posts.

    In general you want to keep your feet dry.  There are a variety of ways you feet can get wet. The most dramatic are river crossings, followed by rain, snow, and slush. The final issue is sweat from your own feet (feet can dissipate up to 2 cups of water in a day). There are several approaches people use in an attempt to keep feet reasonably dry: There was an article at BPL about spring footwear that is appropriate for cool, wet conditions when there is a real risk of the temperature dropping from cool to cold.

    If you feet are exposed to water (which moves heat 27x more efficiently that air) for an extended time, you run the risk of trench foot. Typically trench foot occurs when feet and continuously wet, in cool to cold conditions. The symptoms of trench foot are numbness, pain, and swelling. I have read that theoretically it is possible to get trench foot after just 12 hours when feet are in 61F temperatures. In practice, if you can dry / warm up your feet overnight it’s unlikely to be an issue. I have experienced, and know many thru hikers and outdoor folks who have had there feet soaked and cold all day. Unpleasant, yes, but no trench foot when they dried their feet at end of the day.

    “Quick” Dry

    Use footwear which is highly breathable and quick to dry (sandals, water shoes, or trail runners with a lot of light-weight mesh) on the assumption that their feet will get wet, but then will dry. Shoes will often dry overnight. When it is cool and high humidity shoes will still be damp in the morning unless they absorbed very little water. It’s no fun to put on damp shoes in the morning, but that’s life sometimes. Wet trail runners being worn while active without additional external moisture will mostly dry in a reasonable amount of time thanks to body heat plus the pounding of the feet which drives out moisture. In many cases the footbeds often soak up water. If the cushions / footbeds in your shoes are removable, make sure to tend them out and dry them separately.

    There was some data about time it takes for a variety of different types of trail runners to dry in the open air in the forum posting about Inov-8 & Timberline Delerion (and other fast drying shoes) and a second posting of fast drying shoes.  Bottom line is that shoes in a cool location take a long time (>15 hours) to fully dry. On the other hand, shoes can dry significantly in just a couple of hours if you feet are active and you don’t have external water sourced to deal with or if the shoes are sitting in bright sunlight. BPL did a nice article about water weight gain and loss in lightweight shoes. There are a number of light weight trail runners that will absorb between 15-30% water weight after being soaked, and be down to 4-10% weight gain after a couple of hours of use. So it is possible to soak your shoes in the mid-afternoon, get them mostly dry by the end of the day, and see them fully dry over night.

    It should be noted that in some environments that “quick” dry will never dry. Some of our friends down under report that between rain and river crossings their feet are wet until they go to bed. What they have reported as that so long as they are using light weight, flexible, highly breathable trail runners which fit well, and a good pair of socks that they have avoided blisters. In these sorts of conditions some people have had very good experiences coating feet that are going to be continuously wet with Hydropel.

    Comfortable While Wet

    Another approach is to have footwear that keeps feet comfortable, even if they are continuously wet. This requires providing an environment where there is no binding or hot spots. The classic way to do this is with neoprene socks. They can keep feet comfortable because they stay in place around the feet and the friction is on the outside, they keep trail dust from getting through to the skin avoiding the “sandpaper” experience than can come from mixing water crossings with dusty trails, and with the appropriate thickness can insulate.

    Recently I have been using xotoes socks (on third pair >3000 miles total) without blisters in both dry and wet conditions including a month of 16 miles days wearing sandals and trips where my feet were soaked all day in a pair of Inov8 Trailfly G 270 trail runners. One trip I was walking in a river (slot canyon) for a couple of days, on another crossing rivers every 10-30 minutes for several days.

    “Waterproof” Socks

    I have found waterproof breathable socks such as Rocky Gore-Tex oversocks are more breathable than “waterproof” boots when worn inside highly breathable trail runners or sandals. I have also found these socks to be more waterproof than the boots and that I can dry the gore-tex socks over night. Skinskiz are similar, but are not nearly as good as the Rocky Gore-Tex. When wearing waterproof socks you don’t need to worry about your shoes getting wet, because you feet are protected inside the sock. They also keep your feet clean… often mesh trail runners let a lot of small dirt particles in. It’s possible to seal the top of the socks so they can be submerged and keep your feet dry. My experience is that unless it’s cool (say below 40F) gore-tex socks are too warm and my feet sweat more than the socks can breath. I take great enjoyment walking around town when it is cold and rainy. The city “sense” is different. I will often do this wearing waterproof socks and sandals.

    “Waterproof” Boots

    One of the most common approaches is the use of waterproof boots.  For example, boots with Gore-Tex liners or leather boots with Snowseal or Nikwax to the outside of your footwear.  While these approaches will keep external moisture at bay for a time (my experience is for a few days at best). Once the inside of boot gets wet, it stays wet for a long time. Alas, while good at keeping external water out, they also tend to hold water in.  You feet will stew in the sweat they generated. Waterproof boots are useless when crossing water because the water will flow in over the tops.

    Extra Shoes / Barefoot

    Some people focus on dealing with external moisture when fording streams, walk through the surf, or otherwise immerse feet in water. The most common approach is to carry a spare pair of footwear such as sport sandals like Tevas which often add 1.2lb to your load or the slightly lighter Crocs. Some people use minimalist shoes or sandals mentioned above for water crossing. There are a number of companies that make socks with some sort of grippy “sole” such as Grip Socks which is an option. The lightest options (and one of the cheapest) I have found are nylon mesh pool shoes which provide modest protection to the soles of my feet and some slight traction. I have known people who wear just socks but I don’t think that makes a lot of sense because their traction is worse than bare feet and they offer little real protection. Some people do water crossings by taking their shoes off and going barefoot. This is a low weight option, but runs the risk of bruising or cutting your foot. I do go barefoot for crossings when the crossing is the only reason my feet would be wet and I am confident that the riverbed doesn’t have a lot of sharp rocks.

  • Goto Backpacking Gear

    Thought it would be interesting to see how my primary items have changed over time:  I am ignoring items that were used briefly or for testing purpose. For a while I was regularly purchasing new gear and trying it our. When I found something that was “better” than what I was using, I would potentially hold on to the old item for my “loaning library”, or see it to fund my gear habit. In recent years I have been slowly giving away / selling items I was holding as “loaner”. What I still own is bolded.

    Packs

    Something like 18 packs tested but not considered “goto”. Never became go-to but I used the SMD StarLite and Gossamer Gear Whisper a fair bit. LuxuryLite was the most innovative pack I owned for a bit but didn’t work for me.

    • Kelty Model “B” Pack… 1972-1978
    • JanSport D3 (replace destroyed pack)… 1978-2000
    • Gregory Forester (wanted something more comfortable)… 2000-2001
    • GoLite Speed Pack (looking for something lighter)… 2001-2002
    • Granite Gear Vapor Trail (more comfortable, became a loaner after I purchased the Gorilla and was gifted to someone in need)… 2002-2014
    • Osprey Aether 60 (Volume / comfort for heavier / longer trip, adjustable so good loaner until given to friend’s son)… 2002-2020
    • Gossamer Gear Gorilla (lighter, smaller – the right volume for me, and support business I believed in, gifted to a friend)… 2009-2025
    • Hanchor Tufa (works a bit better for combining urban and back country trips. If under packed can smush into a personal item sizer)… 2023-
    • Durston Wapta 30 (light, water proof, carry on compliant, super comfortable for me up to 15lb, really convenient usage while moving)… 2025-

    Sleeping Bags

    Often borrowed by dad’s down bag which was made by L.L. Bean. For cold (<0F) winter trips borrowed a friend’s Warmlite sleeping bag or rented bag. My family had several other sleeping bags which were used by members of my family, and I experimented with a BPL cocoon synthetic quilt as a stand-alone and over-quilt for a year or so.

    • White Stag Synthetic Bag… 1972-1977
    • North Face Cat’s Meow (old bag lost loft)… 1977-1985
    • North Face Cat’s Meow (old bag lost loft)… 1985-1988
    • North Face Cat’s Meow (old bag stolen)… 1989-2002
    • Marmot Arroyo (old bag lost loft)… 2001-2002
    • NuntakUSA Ghost (Lighter and warmer than Arroyo) 2003-
    • Western Mountaineering Versalite (for winter trips and loaner… sold because I no longer regularly doing trips below 20F)… 2004-2020

    Shelters – Solo

    • MSR Zoid 1 (my first solo tent)… 2001-2001
    • Brawny Poncho Tarp (lighter for solo trips)… 2002-2004
    • Gossamer Gear Spinnshelter (better storm protection)… 2004-2008
    • Gossamer Gear The One Version 1 (more space, bug free)… 2008-2010
    • ZPacks Hexamid (lighter, packed smaller, easier for me to pitch)… 2010-2022
    • Gossamer Gear Whisper (easier entry, separate floor, smaller lighter than using X-mid Pro 2 for solo trips)… 2024-

    Shelter for 2

    Either used larger shelters (below) or borrow shelters for hardcore snow trips. Favorite snow shelters I borrowed were Warmlite, Hilleberg, and Bibler. Snow trips ended because my wife doesn’t enjoy them and I don’t enjoy solo snow trips.

    • Boy Scout Voyager Tent (both original canvas and later nylon versions)
    • North Face Tuolumne Tent with snow tunnel entrance A frame front pole, I rear pole… 1974-1982
    • … see below, used larger tents for awhile…
    • Six Moon Designs Original Europa (lighter shelter to share)… 2002-2002
    • Tarptent Squall (more ventilation, better / faster pitch)… 2002-2005. One of the most elegant shelters I have used. One of the shelters I most miss.
    • SD Lighting (sometimes wanted freestanding)… 2004-2007
    • Tarptent Squall2 (replaced Squall… more room than the Squall for two people)… 2005-2008
    • Tarptent Double Rainbow (more protective than squall, lighter than lighting… sold Lightning, Squall2 became loaner)… 2007-2014
    • MLD SuperFly (lighter weight, better in shoulder seasons… sold Squall2, Double Rainbow became loaner)… 2008-2014. I miss this shelter, though the X-mid Pro 2 is move versatile and just slightly heavier.
    • BA Copper Spur 2 (Wanted free standing, easy setup when loaning)… 2014-2022
    • Durston X-mid Pro 2 (Save weight, light enough I could get by with just one shelter?) 2022-

    Large Shelters

    • Sierra Designs Three Man Hex Tent (dad’s.. so I couldn’t always use it)… 1970-1985. I loved this tent! So many good memories.
    • Eureka 4 man Timberline “Free Standing” A-Frame
    • Largish “Patrol Tarp” 1976-1988
    • Sierra Designs Stretch Dome (wanted more space than NF Tuolumne, specially in winter)… 1982-1988
    • Sierra Designs 3/4 Season Convertible 3 Person Nightwatch (Stretch Dome stolen)… 1988-2002
    • 4 Person Free Standard Car Camping Tent made by Moss (family car camping replacing Nightwatch which was delaminating)… 2001-2011
    • GoLite Hex3 (group backpacking)… 2003-2008
    • GoLite Shangra-La 4 (more room, easier setup for groups)… 2009-2016
    • MSR Carbon Reflect 3 (free standing, smaller footprint)… 2012-2022. Not Needed… kids no longer come with Jackie and me.

    Group Stove

    • Svea 123 – 1969-1978 (dad’s)
    • Gerry Mini Canister Stove when Svea 123 was not avail – 1976-1978
    • MSR X??- 1978-1989
    • MSR ???  had a plastic fuel tube (replace stolen stove) – 1989-2000
    • MSR Whisperlite International  (MSR ??? recalled, tube unsafe) – 2000-2005
    • Snowpeak GS100 (easy to use, light weight, low carbon monoxide)… 2002-
    • Coleman Xtreme (winter and bigger groups… until fuel no longer made)… 2005-2011

    Solo Stove

    • Several homemade and a few “commercial” Alcohol Stove starting with the Photon… 2002-2004
    • Ion Alcohol Stove (more fuel efficient and less hassle, but slow)… 2004-2009
    • UL Caldera Cone (easier to use and faster than Ion, normally esbits)… 2009-

    Pots

    Some experimenting with small pots and Mug over the years, but never for an extended period of time.

    • Boy Scout Mess Kit with mini pot (used Troops cook kit)… 1974-1978
    • MSR Alpinelite Cook Kit (First multi-person cook set)… 1978-2001
    • MSR DuraLite (car camping, Alpinelite lost)… 2001-2021
    • Evernew .9L pot (lighter weight)… 2001-2009
    • Evernew 1.3L pot (group backpacking trips and now used car camping)… 2002-
    • MLD 850ML Pot/Mug (more compact than .9L with Caledra)… 2009-
  • Backpacking on the Cheap

    Every year I help organize several backpacking trips for the communities I participate in. Typically we will have several first time backpackers. I often get the question “What should I buy?” Everyone expects the first thing I will suggest is a good pair of boots which isn’t the case. I typically ask people if they already have footwear that they can comfortable walk in all day which has reasonable traction. Most people do so there is nothing to purchase. The next thing they expect me to suggest is getting a new backpack. I typically recommend the backpack to be last item purchased. My advice is to defer as many purchases as possible until they know this is an activity they really like, and they know what sort of backpacking they want to do. What follows are my recommendations about how to minimize the money you spend on backpacking equipment. Ultralight backpacking doesn’t have to be expensive with everything made from materials like DCF, Ultra, Titanium, Merino Wool, and other luxury materials.

    Learn

    I have a number of notes about backpacking on this site which includes a list websites to visit and books you could check out at the library. All my Recommended Outdoor Gear pages recommend low cost options. While dated, there is a nice chapter entitled “Ultralight, Ultracheap” at the end of the document  Lightweight Backpacking 101. There have been a number of online forum threads which discuss a gear list which are light and cheap: pmag’s budget backpacking, BPL ultralight / ultracheap challenge (and other threads about cheap gear lists), dirtbag like a pro, and $200 /20lb Philmont Challenge. More recently there was a $100 list, and many threads on reddit: two examples: cheap gear and <$1000.

    Use Common Items

    When possible use items that you already own rather than purchasing something new for backpacking.  For example, you might have sports oriented clothing like soccer or bike jerseys which make good hot weather hiking shirts, running shoes with good soles can often be used rather than purchasing expensive hiking boots, etc. Ziplock makes some nice “disposal” bowls which work great on the trail or the containers provided by take-out restaurants.  Be creative.

    Delay Purchase – Rent / Borrow

    Delay the purchase of items until you know you really want to commit yourself to backpacking.  What should you do in the mean time?  Check to see if you have friends who would be willing to lend you gear. Try to rent gear from local outdoor outfitter. For example, stores like REIsports basement, online rental companies like outdoorsgeek.com, nearzero.co, gearo.com, or adventure travel companies like Outback Adventures rent a wide variety of equipment. If you are in school, see if you have an outdoor club which loans out gear. For example, Stanford’s Adventure Outdoor Gear rents many items at prices below any of the commercial outfits. Even after you decide that like backpacking, you should think about the frequency that you take trips -vs- the cost of renting gear.

    Buy the Right Items

    When you do buy gear, make sure that you buy the right products for your needs.  Otherwise, you end up having to buy the same type of item multiple times before you get the right one.  So, make sure whatever you purchase is a quality product  because no only will this be cheaper long term, but it will save you from the unhappy experience of having  your tent, backpack, stove, etc fall apart miles from the trailhead.  [I can tell you from experience that this is no fun!]  Quality doesn’t necessarily mean “name brand” or expensive, but you tend to get what you pay for, especially when it comes to sleeping bags.

    I would also recommend buying only what you need. When you start looking at bargain sites it’s easy to get excited about some item that is deeply discounted.  If you don’t need that item though, even highly discounted is taking away money that would be better spent on your most critical items.

    Assuming you have comfortable shoes, I would recommend a sleeping bag be your first purchase for three reasons (1) it will be useful whether or not you commit yourself to backpacking, (2) a good light weight sleeping bag is one of the best long term purchases you can make (3) a good night sleep can make a huge different in how you enjoy backpacking.

    Homemade

    You can save significant money by making your own gear.  In particular I would suggest using an alcohol stove unless you are doing snow camping.  I would also think seriously about making a sleeping quilt (down or APEX) rather than purchasing a sleeping bag. There are lots of sites that have designs and materials for MYOG / DIY projects. For example:

    Most backpacking forums (backpackinglight, whiteblaze, etc) have MYOG or DIY topic areas.

    Used / Swap

    There are a number of “Used” or “Swap” areas on the various backpacking community sites and at  geartrade.com. While it’s sometimes hard to find light weight backpacking equipment, you can sometimes get lucky on craigslist, thrift stories and on ebay.

    Look for Good Bargains

    When shopping for gear, start by looking at  Sierra Trading Poststeep and cheapcampsaver.com. Mashdrop was great but it seems like they are just doing electronic these days. The frugalhiker blog highlights good value from aliexpress. Decathlon provide good value: 100 are cheap, 500 have good ROI. Most of the big retailers like Campmor and REI have a “on sale” section. The key with any of these bargain sites is to be patient and not to buy things just because they are “cheap”. Only buy what you need. For people in the SF bay area I would recommend checking out The North Face Factory Outlet in Berkeley, and the Patagonia Outlet in Santa Cruz, especially just before labor day and memorial day when their already discounted prices drop another 40%.

  • Backpacking Resources

    Part of Mark’s Backpacking Guide

    Getting Started

    Individuals’ Notes / Sites

    • Andrew Skurka – An accomplished long distance hiker who works as a guide and educator. His website has a number of excellent articles.
    • pmags – Paul Magnanti. Paul comes from the dirt bagging tradition, e.g. be thrifty and focus on the experiences in the field, don’t over optimize and don’t waste your time and money trying to fine “the perfect”.
    • Hiking Life – Cam Honan’s guide to hiking with good details about hiking all across the world. Cam is one of the most accomplished long distance hikers
    • Paul’s Wagner’s Backpack the Sierra – Mix of trip reports / route recommendations, practical tips, etc. Not excessively focused on gear.
    • Frank Revelo’s Biking/Hiking pages. Humble, thoughtful. One of the most pragmatic, almost stoic approach I have seen.
    • Nick Gatel’s PopupBackpacker balanced posts by someone with decades of experience
    • Adventure Allan by Alan Dixon.. a long time contributor to BPL website. Somewhat gear centric, but also some good material on technique as well.
    • Deputy_Sean from /r/ultralight
    • SGT Rock Going Light: and other pages. Gear reviews are somewhat dated but a good bit of practical advice. Was quite influential in the early 2000s. Made the most fuel efficient alcohol stove I ever used.
    • Erin & Higs: have some great trail journals about treks in Alaska
    • TrailQuest Ultralight Hiking Page: Notes from Brawny from the early 2000s.  Somewhat dated, but there is still useful content.
    • Yogi’s pages… best known for her PCT guide.
    • Doing Miles… Amy and James have a number of nice trip reports
    • GearSkeptic… I generally don’t like videos but this is one of the exceptions. Good analysis using experimental method. Occasionally I think his lab experiments don’t capture some of the nuances of in the field use, but still extremely valuable.
    • slowerhiking… a lovely site by an Austrian couple who has been backpacking for decades
    • Hiking in Finland: Hendrik Morkel site with a European take (gear and trips).
    • Section Hiker: Philip Werner is one of the more prolific blogs about light weight backpacking. I don’t always agree with Philip analysis, but a worthwhile site.
    • Cleverhiker by  Dave Collins which is primarily a gear review and trip guide site. Doesn’t have the depth of experience many of the above sites have, but typically has decent survey of gear.
    • Freedirtmonger:

    Books

    • Lighten Up! Complete Ultralight Backpacking by Don Ladigin is the best book to help someone who is a traditional backpack thing about lightening their load. If I could write well, this is exactly the sort of book I would hope to write. Rather than getting bogged down in specific products which would become dated, Don looks at general principles which are easy to apply.
    • The Backpacker’s Handbook by Chris Townsend (now in 4rd edition) is the best general book I have found. Balanced and informative without being as voluminous as The Complete Walker. I wish I could find a shorter book that I could recommend.
    • Mountaineering: The Freedom of the Hills edited by Steven M. Cox, Kris Fulsaas is the classic guide to mountaineering. Pack full with useful information about mountain environments, snow techniques etc.
    • Hiking and Backpacking by Buck Tilton. Part of the Knack: Make it Easy series. Easy to follow with plenty of pictures. I tend to go a bit lighter weight than what this book discussions, but it’s a good, gentle introduction.
    • The Complete Walker IV by Colin Fletcher is the classic book, comprehensive, through. Great discussions about technique. Interesting discussions about gear. My only regret is that ultra-light gear (other than tarps) are not covered well.

    Online Communities

    • BackpackingLight.com. (BPL) In 2000 this was the best site for people who wanted information about light weight backpacking. In the last few years I feel like they have been stumbling a bit (ugly UI / too many ads, etc) as they have tried to figur out how to be profitable. This site has a mix of articles that are free and availible to a paid subscription, and a forum community which is free. This is one of the best places to learn about what is on the cutting edge of backpacking, be in new materials, gear, or technique. The subscription is worth it if you are in the process of trying to lighten your load.
    • WhiteBlaze.net… Dedicated to the Appalachian Trail, but there are sub forums which cover topics which are widely applicable.
    • reddit subreddits related to backpacking… useful because people can up/down vote postings which generally (but not always) brings the more useful information toward the top of the threads. A thread about good online resources.
    • Trail Journals: Community site where people who are hiking long trails keep journals / diaries
    • The Lightweight Backpacker Forums… one of the oldest forums focused on light weight backpacking. I fear they are mostly dead now.

    Orgs

    Research Articles

  • Food for Backpacking

    There is a saying that an army runs on it’s stomach. The same could be said for most backpackers and outdoor adventurers. For most, food is not only fuel for the journey, but also a source of enjoyment, comfort, and motivation.

    There is a wide range of approaches taken by people. Some people have strong philosophical beliefs which guide food selection like people who only bring “raw foods”, vegetarians, etc. Some people  prepare full gourmet meals including wine. Some people are completely utilitarian when it comes to food. They select food based on ease of preparation, caloric density, and maybe cost / calories. [Sidenote: I, and several people I know have done trips where most of the calories came from fat. At the time none of us were keto adapted, and were used to a more normal diet. These trips were unpleasant and we were rather constipated. I don’t recommend doing this without first becoming keto adapted.] Some people bring nothing but power bars, snickers, and energy jel so they can eat “on the go” and don’t have to stop to prepare food. I would encourage people to try the “trip diet” at home before trying it in the field to be sure there won’t be an unexpected consequences.

    You should know what sort of person you are, and select food that will help you succeed on your journey. Most people want tasty food, and often bring special snacks to celebrate accomplishments and reward themselves for hard work. Special food can take many forms. For some, it’s a special dessert for the end of the day, a bit of fruit fruits or vegetables, or maybe sardines or salmon roe on a cracker. I encourage people to take food that with enhance their journey.

    Most people end up cooking food. This makes sense because often the highest calorie density will be dried food that is rehydrated and cooked. I have other posts which discuss stoves and cookware that are appropriate when backpacking. In many locations, care must be taken when it comes to food storage.

    How Much Food

    Backpacking, especially when you are gaining a lot of elevation or needing to climb (be it going cross country, technical climbing, or jut crawling over deadfall) burns a lot of calories. I think Ryan did a good job covering this topic in his article How Much Food Should I Pack?.

    Most of us have enough fat stores that running a moderate calorie deficit on a typical trip. Under normal conditions (e.g. person is not in ketosis) people’s bodies can extract 30cal / 1lb of fat / day. So if you are carrying 30lbs of body fat, roughly 900 calories can be easily extracted by your body fat. I have read studies showing that when engaged in aerobic activity this number can be more than 4x this, and keto adapted people can pull enough to power themselves at any level of activity. (insert references).

    When you energy demand exceeds what is readily available and what you can pull from your fat, your body will catabolize your muscles, so you don’t want to run too deep of a deficit. On a longer trek people will get to the point that they will need to consume as many calories as they are burning. There are many thru-hikers who became so lean during their hike that their health decreased rather than improved from all their work.

    Food Selection

    The food people bring is extremely varied as is how the food is packaged. I know some people who just bring ready to eat food, others who bring canned food, some who carry MREs, and still others who only bring pre-packaged freeze dried food targeted at backpackers. [Many people repacking the pre-packaged freeze dried meals before starting their trip.] My suggestion is bring enough food to eat healthy (balanced meals) and try to minimize weight. The backpacker oriented freeze dried meals are easy and light, but you can make meals which are just as light (and cheaper) from your local grocery store.

    While I am not a fanatic about it, I tend to think there is some merit behind eating a low carb diet. One variant of this is Barry Sear’s Zone Diet 40% of your calories from carbohydrates (ideally complex like veggies and beans, not sugar or simple starches), 30% from protein, and 30% from fat.  People who are keto adapted can get away with carrying less food weight because fat has more calories / gram, and they are more able to harvest enough from body fat without impacting muscle.

    The amount of food people require is typically based body weight and activity level. You can calculate your Basal Metabolic Rate which is how many calories you burn doing nothing. Add to that how many calories you will burn due to your backpacking activity. Most people can metabolize around 20 calories for every 1lb of body fat / day without impacting muscles. I am somewhat keto adapted and seem to do better than that. People on keto diets and are fully adapted can fuel themselves from their body fat for extended periods of time. On days that I burn around 4000 calories, I have found 2200kcal enough food. Typically my daily food weighs  18-22oz / day

    I don’t vary what I take a lot.  Sure, I like gourmet meals at home, but when I am on the trail I am willing to eat more or less the same thing multiple days if the food is light and presents little hassle to make and cleanup. My typical three season meals are:

    • Breakfast: Historically South Beach or Zone Perfect bars. Still figure out what I like these days. In colder weather instant oatmeal cooked in the paper packet, maybe with some protein powder added.
    • Snacks/Lunch: Sometimes just eat bars, jerky, and trail mix as I walk. With others who stop for lunch I will typically do Low Fat Salami, Tuna, or smoked salmon, Tortilla, Mustard, with some hard cheese. Crystal Light Lemonade. Shorter trips carrots or other raw veggie. When going fancy various delicates in single serving containers from Cost Plus World Market.
    • Dinner: Couscous or ramen noodles, dehydrated meat or foil sealed meat, olive oil, crystal light lemonade and some dark chocolate or Ferrero Rocher for desert and mint tea. With others often hummus appetizer with veggies.
    • Snacks: Trail mix of edamame, goji berries, almonds, dried cherries, almond, dark or fudge m&ms

    As it gets colder I end up carrying more food (you burn food faster to stay warm).  On cooler trips I take 2500-3000Kcal, and even more in the dead of winter.

    When the weather gets hot, I often find my appetite will often drop off. I often bring no cook foods because I know I won’t be motivated to cook or eat. I will typically shoot for less “heavy” (e.g. hard to digest food), so the ratio of fat and protein to carbs goes down, increase the amount of fresh fruit I take, make sure I have ginger and lemon flavors things (seems to help restore my appetite). I sometimes  bring powdered shakes or a lemon flavored sports drink powder. It you are sweating a lot you need to restore you electrolytes. On trips I failed to do this I was struggling with my legs cramping, and extreme fatigue which cleared after I drank on electrolyte drink mix. Sometimes I will bring couscous which I rehydrate without cooking (needs more time than when cooking).

    Note: folks who do the long trails (like the PCT) will find that after a few weeks or maybe a month will have burned off all their excess fat. Once that has happened, most hikers find themselves eating significantly more than they expect.

    Breakfast

    My preference is to eliminate food preparation so I can get the day started quickly with minimal hassle and don’t have to unpack cooking gear. No mess breakfasts include:

    • 2 Zone Perfect Nutrition Bar 3.6oz [4 balance blocks, ~420 calories] Note: stay away from the bars which have yogurt or chocolate coating because these will melt.
    • 2 Nutra-grain bars – [2fat, 6crb, .5protein, 280 calories]
    • 2 Pop-tarts – [4fat, 8carb, 1protein, 420 calories]
    • 3 South Bar Cinnamon Raisin Bars, [5fat, 4 protein, 5 carb, 140 calories, ~420 calories]

    Many people like a hot breakfast to get them going in the morning. The single serving packets of oatmeal are actually big enough that you can add water to the packet, avoiding getting a cup or bowl dirty. 

    • 2 Oatmeal + Soy Protein Powder, 3oz, [2fat, 4carb, 4protein 302 calories]
    • 2 Oatmeal, 2oz [1fat, 4carb, 1protein, 200 calories]. Add nuts and fruit for extra flavor
    • 2 Flavored Oatmeal, 3.8oz [1fat, 8carb, 1protein, 380 calories]
    • Malt-o-Meal 
    • Powdered protein, Carnation Instant Breakfast, Ensure powders in drink.
    • Granola / Familia / Grapenuts + powdered milk (add cold or boiling water) 4oz [0fat, 8carb 2protein]
    • Freeze dried breakfasts
    • Add Hot Chocolate to any of the above meals 1.1oz [1fat, 3carb, 120 calories]
    • Add Tang / Cool-aid to any of the above meals [carb] or Crystal Light [no cal] 

    Of course if you are at a trailhead and have a cooler you can do all sorts of things such as:

    • Omelets
    • Pancakes
    • French Toast
    • Add sausage or bacon to above

    Snacks / Lunch

    In general I don’t do a big lunch… but eat smaller snacks through out the day’s hiking. In order of my likelihood of using:

    • “Dry” or smoked meats like salami
    • Sealed ready to eat meats: tuna, salmon, spam, etc
    • Jerky (typically beef)
    • PB&* (jelly, honey, nutela in separate dispensers).. or combined in  moose goo… the corn flour provides good mouth feel
    • Hard cheese: Parmigiano-Reggiano (parmesan), Grana Padano, Swiss Gruyere, Cheddar, Gouda, Monterey Jack, can be kept for weeks. Normally I put the cheese in a zipper lock bag, but for longer trips I have sometimes covered day size pieces of cheese in wax  to protect it. Some people will wrap the cheese in a cheese cloth lightly soaked in vinegar: the cloth will soak up oils that might come out of the cheese and the vinegar will keep mold at bay.
    • Individual serving sealed soft cheese: triangles (2oz, 70kcal, 7g fat, 2gm carb, 6gm protein), wine cheese (2oz, 160gram, 14gm fat, 2gm carb, 8gram protein) sold at better grocery stores and stores like Cost Plus.
    • Pita bread, Bagels, or Tortilla for making “sandwiches” with cheese, dried meat, or moose goo.
    • Cliff Bars, Quest Bars, Zone Perfect Nutrition Bars, Power Bars, Tanka Bar, custom designed Element Bars, etc. Caution: the yogurt and chocolate coated melt in heat, and most freeze really solid in cold. 
    • Pemmican
    • Dehydrated fruit (I particularly like dates, papaya, mango, pineapple, apricots & pineapple) 
    • Fresh fruit (apples and oranges are pretty durable) 
    • Trail mix / GORP (most are too high fat for my taste ).  Joel likes macadamia nuts, peanuts, cashews, blueberries, cranberries, banana chips, dark m&ms, dates.
    • Good Dark Chocolate (>=66% cocoa) – much more resistant to melting that cheap milk chocolate, and I think tastes a lot better
    • Just the Cheese Rounds
    • Pringles (in single serving containers), Fritos
    • Sunflower seeds 
    • Wasabi Peas 
    • Dry Roasted Edamame
    • Lipton cup of soap
    • Ensure Powdered Drink/Shake Mix or other powdered Sport Protein Shakes
    • Hummus to Go – 2.4oz, 70kcal, 4gm fat, 8gram carb, 4gm protein
    • Salmon Roe (less expensive than you would think)

    When I first started backpacking I love Kendal Mint Cakes and Space Food Sticks but haven’t taken them on trips in years.

    Dinners

    • Udon noodles – Similar to Ramen but noodles a bit wider and healthier, 3oz [1fat, 6carb, 1.5protein, 275 calories]
    • Ramen noodles 3oz [4fat, 6carb, 1protein, 360 calories]. Lots of ways to supplement to make tasty (ramen recipes)
    • Macaroni &Cheese… Kraft EasyMac works well, 2.1oz [1fat, 4car, 1protein 230 cal]
    • Hummus mix – 3oz mix [6fat, 5carb, 2.5protein, 450 calories]
    • Couscous – 2.8oz [2fat, 7carb, 1protein, 330 calories]
    • Osem Precooked Minute Pasta – 3oz [0fat, 7carb, 1protein, 307 calories]
    • Instant Mash Potatoes (Excel potato pearls and Idahoan brand seem well liked)
    • Tortillas + black beans 
    • Add foil sealed chicken, tuna, salmon, spam, etc to above items for additional protein
    • Add bacon bits to above for additional flavor
    • Add olive oil to above for extra calories
    • MREs 13oz [7fat, 16carb, 3protein, 1250 calories]
    • Tastybite (boil a bag meals which are tasty but somewhat heavy)… for example Chicken Moglai 9oz [10fat, 4carb, 8protein, 640 calories]
    • Hot breakfast foods like oatmeal 
    • Catch some fish, harvest mussels or crabs, etc (Some places this is reliable)
    • First day… let frozen meat thaw as you hike: steak or kabobs over a wood fire
    • Broccoli, Carrots, other durable veggies
    • Various fantasticfoods  and tasteadventure products
    • Nutri System meals
    • Freeze Dried dinner from Mountain HouseAlpineAire Foods, etc

    Lots of data in the Long Distance Hiking Food Resupply Tool spreadsheet and GearSkeptic’s Food spreadsheet

    For more ideas take a look at articles Freezer Bag Cookingwilderness Cooking,  the book Backcountry Cooking From Pack to Plate in 10 Minutes by Dorcas Miller.  Also be sure to check out Pack Light, Eat Right. If you are tired or raiding your local fast food joints for single serving condiments and other meal enhancers, check out Packit Gourmentminimus.biz or alltravelsizes.com. People who are trying to minimize weights often carry fat or protein filled foods and/or suppliment normal food with additives like olive oil, dried milk, and protein powder. You might also what to try some of the ideas in Vegetarian Cooking for backpacking.

    Power Chia Soak (Vegan) Recipe by Erik (~700cal)

    • 3 T Coconut milk powder
    • 3 T Rolled oats
    • 2 T Chia seeds
    • 2 T Hemp seeds
    • 2 T Shredded coconut
    • 2 T Freeze dried raspberries
    • 2 T Cacao nibs
    • 2 T Pecans

    Add H2O as needed. Can be eaten immediately or cold soaked until you get the consistency/texture of your preference.

    Cleanup

    I try to minimize how much cleanup I do. On longer trips and trips where the meal isn’t that messy (say ramon noodles) I will cook and eat out of my pot. When cooking messy meals, I sometimes  boil water in the pot, and then “cook” in a freezer bag which is inside a bag cozy. I eat out of the bag and then pack it out.

    On group trips I use a bowl which is open enough that I can “lick mostly clean”. Otherwise, I will typically using a small nylon scrapper to get an food chunks out of the pot. A bit of sand can work if you are very careful. Often times there still be a oily film on the items scrapped. Some people use hot water and soap, but I try to avoid that because if you don’t rinse well enough you can get diarrhea from ingesting the soap and because I don’t like adding soap, even biodegradable, to the water system. Once I have all the particular matter removed I boil a pot of water and make tea. The boiling sterilizes, the tea has tannic acid which helps cut the grease. You can use the tea-bag itself as a fragile sponge.


  • Cookware for Backpacking

    If you want to cook food, you need something that holds the water and/or food as you heat it up. They best cookware will vary depending on the size of a group and the type of cooking.

    My Choice

    When I am traveling solo I use a MLD 850ml titanium Pot/Mug. I use an Evernew 1.3 L when I am  cook in for two in the the pot, or for up four people if I am just boiling water which will be poured into an external bag to “cook” the food.

    Materials

    Cookware is typical made from aluminum, titanium, or steel. For backpacking, I would leave the steel at home… its heavy. Titanium will be  more expensive. For a given volume, aluminum is lighter, but titanium is stronger… so in theory you can use less of it. It seems in practice that at small volume (1L or less), titanium pots tend to be lighter than similar size aluminum pots, but as the volume of the pot increases (say to 2L or 4L), the pots end up weighting pretty much the same. My experience is that given similar size / weight pots, titanium will be more durable.

    If you are just boiling water, Titanium and aluminum works well, but if you are doing serious cooking you would want the more even heating of aluminum. With aluminum pots, I generally prefer hard anodized than those with non-stick coatings because they are more durable when scraped and scorched. Both hard anodized and the more traditional non-stick coatings prevent the nasty metal taste than comes from cooking tomato based products in untreated aluminum.

    Design

    Pots come in a variety of shapes. The wider to pot, the more heat will be applied to your pot rather than just going up into the air making wider pots more efficient. I found the Evernote low/wide 900ml pot was >=20% more fuel efficient that the second more efficient 600-900ml pot. The downside of wider pots is than if you are using a narrow pot stand, it can be tricky to set the pot down centered. Tall, narrow pots have a tendency to pack more easily and can double as cups,

    After a pot has been heated, you will need a way to handle it without burning your hands. One option is built in handles of some sort. I am a big fan of well designed built in handles. For pots larger than 2L I like a bail style handle which lets you suspend the pot as well as makes it much less likely that you tip the pot to the side. For smaller pots, I like fold away handles. I really like the silicon covered handles used by Evernew because they provide enough insulation that I have never burnt my hand. Some people express concern that the coating will burn, but I have not had a problem with this. On a single trip I melted a small section of the coating.

    Pots for Solo Trips

    My favorite pot today is a mug style MLD Ti Pot (no longer sold, but the Toaks 850ml Pot seems to be nearly identical): perfect for simple, solo cooking in the pot! The pot practically hold around 800ml which is plenty of room for anything I make for myself on a solo trip. There is room to boil water and to cook the food in the pot. Small mugs often required me to cook in freezer bags which is sometimes nice, but it’s good to have the option not to do this. This pot is one of the lightest on the market at 3.7oz including lid and handles. The lid has straining holes which can be useful when makes a variety of foods. This pot and can hold the UL Caldera, stove, eating utensils, lighter, and fuel for several days in a small, compact package. The pot is narrow enough for hot drinks not to slosh out as you drink from the pot, which often happened which I used larger diameter mug/pots. Drinking from a pot/mug directly can burn your lips if you try too soon after you have taken the pot off your stove. The Snow Peak HotLips Silicone Lip Protector have removed that problem for me. The only downside to the MLD 850 is that since it has a moderately narrow bottom, it is not as fuel efficient as the the next pot I will mention. The slightly less efficient heat transfer hasn’t been an issue because I can take care of aa my cooking needs using a single esbits fuel cube. The Evernew Ultralight Titanium 0.9 L pot is also a great choice, especially if you are going to do more than boil water, cook cous cous or  ramen. It is light weight, durable, has nice handles, has a small pouring spout which works “ok”, and is wide enough to you don’t lose a lot of heat up the sides. In fact, I have found the .9L wide pot to be the most fuel efficient of any <1L pot that I have tried, typically by 20%. The GSI Soloist looks like a very nice system which holds a cup, bowl, small fuel canister and stove. Another popular option are kettles made by MSR or Evernew or  If you boil water for bag meals, you could consider tea kettles from GSI and others which weights ~5oz and has a wide, fuel efficient bottom. Hardcore ultra-lighters often using mugs for drinking and cooking such as the a Snowpeak 600, Snow Peak Trek 700, or the IMUSA Aluminum Mug. It’s easy to burn your lips if you drink from the mug/pot you boiled the water in.  The lids on the Snowpeak mugs aren’t so great. but there is are aftermarket ultralight mug lids. It’s also possible to use larger beer cans as pots such as the 24oz Foster’s can.

    Pots for Two People

    I think a single 1.3 L pot such as the Evernew 1.3 L Nonstick Titanium Pot is ideal for 2 people who are traveling light. The GSI Dualist looks nice, coming with two bowls, two cups, and room for a large fuel canister and stove. Some people use larger pots such as the value priced Open Country 2L pot which can be used with larger groups as well. If you are doing fancier cooking, you might look at something like the nesting 1&1.5 L set

    Pots for Larger Groups

    Four people will typically want a 1.5 & 2 L nesting cook. There are a number of other nice sets made by MSR, GSI, Evernew. Many people automatically bring all the pots in their cooking set. If you plan your meals well you should often be able to do everything with a single pot… don’t bring the pots you aren’t going to use. If you have more than four people you could consider whether you want to use even larger pots, or break into smaller groups to avoid having to bring huge pots, and to boiling 4L+ on a single stove.

    Other Approaches

    I know some people who really like bring light weight ovens because it expands cooking options beyond what can be accomplished in basic pots. Alas, all the companies that used to make back country ovens such as bakepacker seem to have gone out of business.

    Bear Bowl is a successful crowdsourced project which has produced a “folding” cockpit. It’s an aluminum base with fiberglass sides which can be folded mostly flat. While these pots weight about the same as more traditional pots, having a 4L pot folding flattish could be quite useful on group backpacking trip. The smaller pots don’t make sense to me. Traditional pots aren’t that difficult to fit into a pack, and often the hard sides of the pot are used to protect more delicate things like the stove.

    Low Cost

    I don’t have a good recommendation for a great low cost pot because the two classic options don’t seem to be made anymore. The WalMart  grease pot has been the traditional low weight, low cost option among thru-hikers, ultralighters and dirtbags. There was a nice upgrade of this 3-cup pot sold by Anti Gravity Gear and then licensed by Open Country, but something went wrong and neither is available today.

    Eating Wares

    When traveling solo I eat out of my pot, use a MSR Folding Spork which packs inside my pot while still extend long enough to reach into my pot or a freeze dry cook bags. If I am on a group trip I typically bring a Guyot Designs Squishy Bowl because it fits with my stove and fuel canister inside my pot.

    I generally recommend solo trekkers to eat out of their pots to save both the weight of an extra container and to have one less item to clean. In groups, eating out of the pot is typically not appropriate. A minimalist approach in a group is to carry a single sierra cup, bowl or mug, and to drink and eat your meal in stages. Alternatively you could bring a large bowl (zip-lock 2 cup container makes a dandy backpacking bowl) and a light weight cup/mug. You will also need a spoon, though some people like a spork or foon (a spoon whose front is fork-like). I would recommend getting utensils made from Lexan because they are cheap, light weight, reasonably durable, don’t have a “taste” like steel, and won’t scratch pots like titanium. If you are using backpacker oriented freeze dry meals you might want an extra long spoon that lets you mix the food without getting you hand down into the bag. I would recommend avoiding the Light My Fire Spork. There are numerous reports of it breaking in the field.  I also don’t like the design, but that’s just me.

    There are plenty of “disposable” containers that get thrown out each day… you shouldn’t have a hard time finding something that with work for you. My favorite item are the disposable plastic bowl for single serving of noodles or soap. Cost is around $1 and you get food as well. These bowl are durable, very light (.2oz) and holds the right amount of food. Fast food restaurants have cheap, flimsy plastic flatware. If you are using these cheap utensils, take a couple in case one of them breaks. Two “disposal” utensils will often be lighter weight than one more durable item.