Tag: backpacking

  • Camino de Santiago

    [toc]

    The Camino de Santiago is an amazing experience for nearly everyone. For some, it’s a once in a life time experience. For others, it is repeated regularly, it’s part of their life’s rhythm. Almost all are touched by what is called the Camino spirit. This is the combination of kindness, curiosity, and openness without judgement shared among the pilgrims and the people they encounter. Walking the Camino can be quite inexpensive. If you are prepared to sleep in a bunk bed inside a large dorm space and keep food expenses down, the total cost (other than transportation to get to/from the trail) can be as low as €35/day, €1200 to complete the full Frances route in a bit more than a month. Jackie and I stayed in places that provided a private bedroom (often private bath), and ate typical pilgrim meals with a few Michelin star meals mixed in. The cost for the two of us was $3300 for 32 days. Tour companies are happy to take care of all your arrangements, but this will be significantly more expensive (2-4x). Using a tour company is unnecessary, but for some, the simplicity is worth the expense.

    Jackie and I had hoped to walk in 2020 but COVID happened. Shortly after my retirement in 2022 Jackie and I simultaneously realized we could walk the Camino. We completed the 500 miles / 800km from SJPP to Santiago de Compostela along the Frances Camino on June 7, 2023. I posted a follow-up Lessons Learned on the Camino and our polarsteps photo journal.

    History

    The Camino de Santiago started out as a Christian pilgrimage, but as interest has exploded, devout Christians are small portion of the >400,000 people who travel along “The Way” each year. In May 2023 an average of 500 people were leaving SJPP each day, and even more people were doing the last section starting in Sarria. For people used to the “typical” wilderness thru hikes like Appalachian or Pacific Crest Trail it would be useful to read Ten Reasons not to Hike The Camino de Santiago and a counterpoint What you can expect from the Camino de Santiago. The Camino is much more social and a lot less wilderness.

    For some background / history check out 2000 Years of the Pilgrimage which starts with the life of James and ends in the 21st century.  In the 9th century pilgrims couldn’t hop on a plane to return home once they reached the “destination”, that was just the half way point for their journey. The goal of the pilgrimage was to visit Santiago de Compostela Cathedral which is reported to hold the remains of the Apostle James. We don’t know for certain it’s James, but it was someone very important in the Christian community from the 1st century. The space was treated as special (no other burials) through the 8th century when it was publicized as the burial spot of James. Over time several common routes to this spot developed and then were forgotten.  In the 1950s there was a renewed interest in the pilgrim routes and a program to welcome pilgrims was developed. Through the 1980s there were very few pilgrims. In the early 1990s the president of Galicia started to promote the pilgrimage and arrange for the municipal alberques to be built. Next, numerous associations sprung up such as the American Pilgrims which has local chapters such as Northern California.

    Physical Preparation

    Walking ~15 miles / day for 30+ days is challenging for most people, even those who are young and fit. On our walk we encounter many people who were struggling with the constant walking. The majority of people didn’t have trouble with the aerobic demands of say going up the steeper hills, but rather the accumulated wear and tear on their lower bodies due to walking miles day after day. Nearly everyone had sore feet and muscles. The most common issue was blisters which will be addressed later. Some developed more serious conditions such as achilles tendonitis, plantar fasciitis, or shin splints. All of these come from people placing a significantly higher load on their feet and legs than normal.

    The best way to prepare for the Camino is to slowly increase the amount of walking you do each week. Doing a long walk each weekend is not going to be sufficient. In the running community there is a rule of thumb: your weekly mileage should be 3 times the race distance you are training for. Long distance walking isn’t running a race, but I think it’s a good starting point. In the case of the Camino this would suggest that if you are planning to do 15 mile days, that you should walk >=45 miles in a week, with at least one day that is close to the average day you plan to walk on the Camino. I would recommend work up to doing 3 miles each morning and evening (listen to a podcast or audio book if you need to make the most of your time) 5 days, and a 15 mile walk once a week. You could also look for ways to turn your daily activities into walks. For example, I typically walk to get groceries. Since I have to carry the groceries home this means that the trips are more frequent. A nice side effects is our food is fresher.

    When doing your training, it’s important to carry a backpack that has the same weight you would be carrying on the Camino and using the shoes you will wear on the Camino. The slope of the shoe from heel to toe (called the shoe’s drop) changes the demands on your muscles and especially your achilles tendon. Many people wear shoes with moderate to high heels in daily life and use shoes which are near zero drop on the Camino. This can lead to achilles tendinitis.

    The book Fix Your Feet is filled with valuable information for people doing long walks.

    Mental / Spiritual Preparation

    Some people do the Camino as a tourist. That is collecting a set of experiences and crossing the activity off a “bucket list” while staying as comfortable as possible. My perspective is that walking the Camino, especially if you are doing the full Frances Camino, is too much of an investment to approach the journey merely as a tourist. We did the journey as pilgrims. Jackie and I walked with an intention to be open to all we would experience, and to be a blessing to all the people we encountered.

    Pilgrimages provide an environment to step outside everyday life and encounter something greater. Pilgrimages typically involve facing challenges. Pilgrimages aren’t meant to be easy or “relaxing”. It is said the Frances way has three distinct sections. The body: which challenges you physically as you adapt to walking 15 miles a day or so. The mind: between Burgos through Astorga where the landscape can be a bit monotonous. The final section is the Soul where you’re finding your true heart.

    I was considering doing a 30 day variant of Spiritual Exercises of St Ignatius. I started a thread asking if there was any material / recommendations combining the exercises and the Camino. Based on the feedback, I decided that the Camino de Santiago will be too social to be fully immersed in the Ignatian exercises unless I joined a group lead by an experienced director. Doing the spiritual exercises as a walking retreat might be best done on the quieter Camino Ignaciano some other time. Rather, this might be the opportunity to really listen to my fellow pilgrims.

    The best mindset is to lay aside expectations and to embrace the moment by moment experiences. Allow yourself to slow down and notice what you are experiencing on the Camino.

    Some resources that might help you prepare:

    while on the journey

    Social Media

    Nancy Frey has documented how Smart phones and WiFi has altered the Camino experience on her site Walking to Presence. For many people this has resulted in a deeper connections with “home” during the Camino, and less of a connection with people on the Camino. I believe everyone should think carefully about how much they will make use of connectivity. Our experience was less is more. To focus on being present with the people and environment you are experiencing on the Camino, and not worry about “back home”.

    We removed most apps (especially social media, and filtered email). We used a route guide, map, translation app, bible, audio recorder, and a daily devotional app. We also have WhatsApp installed, not to interact with people back home, but to manage reservations and coordinate get togethers with pilgrims we met. The one exception was we installed Polarsteps which we posted to, but never look at feedback. We decided to using polar steps for two reasons. Most important was to honor a request from Jackie’s father who wanted to follow along because he was unable to join us. Secondly, it forced us to daily record a bit about the day.
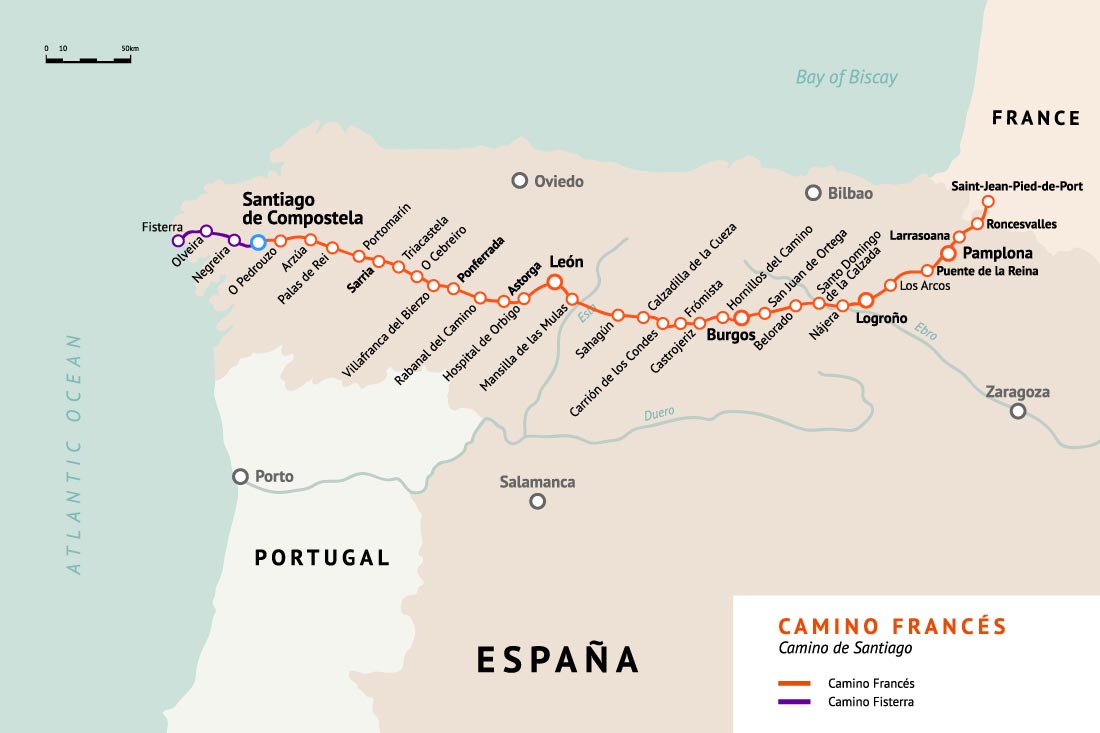
    Timing and Route

    The common view is that the best months are April, May, September, and October. You are missing the worst of the summer heat and the crowds due to school being out. You also miss the harsher weather / closed services during the winter. The temperatures in the fall and spring are cool which is perfect for hiking in, generally (7-18C, 45-65F) though it could be colder or warmer. It is likely there will be several days of rain in the spring. The fall has less risk of rain, but larger crowds. I would note that during holy years there are typically an extra 100k catholics walking the Camino. The next holy year is 2027.

    Any of the guides listed below will provide all the information you will need to plan a journey along the Camino de Santiago. An easy starting point would be the online planning resources from the Village to Village guide.

    All the guides break the journey into daily stages. Most complete the journey in ~33 stages. Many of the stages are identical across the guides with slight divergence and then resynchronizing in a few days. Jackie would like to do the Camino Frances again at a slower pace. The standard 30-33 stages provide enough time for the walking, house keeping, and experiencing community with fellow pilgrims, but not enough time to fully explore the history, culture, and architecture. The traditional first stage from SJPP is one of the longest and toughest. Discussion of how to handle it / where to stay.

    Traditions & Important Sites

    • Remember loved ones lost with wooden cross along the way
    • Drink Rioja wine from fountain of Bodegas Irache, just outside Estella (early in the typical stage 6).
    • Leave a burden behind, symbolized by a rock from home (or maybe the laptop you are carrying) at Cruz de Ferro, the Iron Cross (stage 24)
    • Wash in the stream at Lavacolla, just outside Santiago. In ancient times there weren’t showers each night. The pilgrims would wash and change into their best clothing to enter the city.
    • Pilgrim’s Mass (offers in serveral locations)

    Zero Days

    Some people plan “zero days” to explore a city’s sights and sounds. Other times zero days are to recovery from an injury or illness. The best recommendation is to take a zero day when you body tell you to, and skip zero days you might have planned if your heart wants to continue to walk. Commonly recommended towns for zero days:

    • stage 3 – Pamplona (lively town, food). I think it’s a bit early, but helpful for people who aren’t experienced walkers who might need to swap some of their gear, get a massage, etc.
    • stage 7 – Logrono (good size town known for wine and hundreds of tapas places, especially along Laurel street)
    • stage 13 – Burgos (arch, museum, cathedral)
    • stage 20 – Leon (arch, food, I think the most beautiful cathedral in the world)
    • stage 22 – Astorga (arch)
    • stage 25 – Villafranca

    The follows are some towns which the community has indicated are good places to consider if you want a quiet rest:

    • stage 5 – Estella
    • stage 10 – Santo Domingo or Grañón
    • stage 14 – Castrojeriz
    • stage 17 – Villalcázar de Sirga
    • stage 18 – Sahagun
    • stage 19 – Mansilla de las Mulan
    • stage 26 – O’Cebriero

    Interesting Sites (History, etc)

    The follows sites / towns might be worth exploring as you pass through:

    • stage 6 – blacksmith shop 200m before the fountain.
    • stage 24 – Ponferrada castle
    • stage 26 – O’Cebriero church
    • stage 28 – Arthur Lowe’s art studio on main trail, 1 mile from where the detour to Samos splits off
    • stage 28 – Samos monastery (if you take the detour)

    Festivals Along the Way

    An incomplete list which of seasonable festivals. See moon guide for additional festival. Here is a sampling of festivals

    • Festa do Cocido in Lalin, February
    • Easter, Sunday, April
    • Festa do Maio – celebrations in Villafranca, Pontevedra etc, end of April, beginning of May
    • Ascension, May
    • Fiestas de San Bernabé in Logroño, June
    • Saint John and Midsummer celebrations take place in many other seaside towns  and also in Santiago de Compostela, June

    Sleeping & Housing

    There is a huge range of housing. The cheapest is using a tent or staying in one of the free alberques in the dorm. Most alberques will be between €8-15 for a bed in the dorm. Private rooms run between €30-60. There are some very nice inns, hotels, and AirBnB that are €60-100 / night. Finally there a luxury, 5 star hotels such as the Parador properties which are in restored historical buildings and cost hundreds of € / night.

    Nearly all the land along the routes are privately owned. Historically it’s been harder to find a camping spot than a bed in a alberque (hostel for pilgrims), hostel, or hotel. Most years I would recommend forgoing camping and leave the typical back country backpacking gear behind (tent, stove, sleeping pad, sleeping bag warm enough for outdoors, etc). The 2023 season seemed to be stressing the system due to a backlog of pilgrims whose trip was delayed by COVID, and a number of alberques that haven’t re-opened since the pandemic. I would still recommend using the alberques, just that you should make reservations.

    Alberques (guide to alberques) are the cheapest, most available, and more common option. All alberques have dorm style housing. Many have communal dinners or a common kitchen. Linens and blankets are often not provided in the dorms… so unless you have have made reservations for every night and confirmed they will provide all you need, you should plan to bring a sleeping bag, or a sleep sack + quilt/blanket, a towel and at least a bit of soap. More on this in the gear section. The downside of the dorms is that you don’t have privacy, snoring and others moving around can interrupt sleep. Ear plugs and sleep masks are highly recommended. Many of the alberques have private rooms for extra money which often have ensuite bathrooms and provide linens and towels. Jackie and I think that a private room in an alberque is ideal, allowing a good night of sleep, intimate time as a couple, while experiencing community with other pilgrims.

    There are also hotels, guest homes, pensions, and inns which provide housing. If you are traveling during peak season I would encourage pre-booking accommodations a few months before your trip. If you have a reservation and don’t need it, please cancel it.

    Many people worry about bedbugs, especially in the alberques. We didn’t encounter any bedbugs nor did anyone we traveled with. From reports I have read online and from friends’ experiences in previous years bedbugs will be found occasionally but are uncommon. If you stay in a location that has bedbugs, there is nothing that can guarantee you won’t be infected. There is some evidence that treating your sleeping gear with Permethrin will provide some protection. If you end up picking up bedbugs, washing your body throughly and then washing all your clothing and gear in 140F water will kill them.

    Packing & Gear

    My original packing list had a base weight of 5.5lb and could fit into a 14l bag. At the end of the trip I updated my camino 2023 lighterpack list to include everything I carried on the heaviest day including several items I won’t take in the future. The picture below is nearly everything I carried or wore:

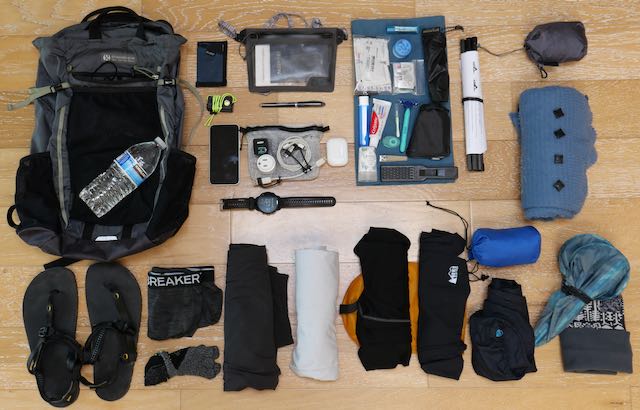
    On the walk I picked up some skin lotion and a 15l folding messenger bag to used after this trip (we don’t have Decathlon in US). There are a few items I added at the last minute (packing for fears) that aren’t in the picture and generally weren’t used. When Jackie’s Achilles tendon started to hurt I carried a few of her items. This raised my “base” pack weight to 7lb. The heaviest total weight was 11 pounds when I was carrying extra water and a fair bit of leftover food / snacks.

    Everyone I have talked with that wasn’t an experienced light-weight onebag traveler or ultralight backpacker said they brought too much stuff. They often either gave away the unnecessary items, shipped them home or to Santiago. Several people who have done multiple Caminos told us that any item not used by the time you got to Burgos isn’t needed, and you should be dropped. I encourage everyone to treat the Camino like a pilgrimage and leave behind excess baggage and live in the moment. I have some general notes about packing light aka onebag travel which might be helpful to someone packing for the Camino. There are people who go even lighter such as such as Tim Evans’s 7L fanny-packing list for Shawn’s 7-10l fannypack packing

    Example Summer Packing List

    It’s pretty warm in the summer and you don’t need to bring a lot.

    • Hiking clothing made from thin nylon, polyester or merino wool which can dry overnight. My recommendation would be:
      • nylon hiking pants that are quick dry like Outdoor Research Ferrosi, prAna Brion or a hiking dress
      • fast dry shirt that is high UPF like ArcTeryx Cormac, OR Astroman, Mountain Hardware Crater Lake, or if UPF 15-20 is enough for you, the very comfortable OR Echo
      • non cotton underwear. Light weight bra or swimsuit top.
      • trail running shoes or hiking sandals that fit you well with a roomy toe box, I like Inov-8 Trailfly G 270 and Luna sandals
      • Non cotton socks, I like Xoskin toe socks (2 pairs)
    • Clothing to wear while your clothing are drying and to sleep in such as a pair of fast drying running shorts and light weight merino wool tee
    • rain gear: light weight poncho
    • insulation: an alpha direct hoody, 100wt fleece, or sweater made of wool, alpaca, or cashmere.
    • sun hat: something with wide brim or veil such as those made by sunday afternoon
    • small first aid kit focused on foot care: compeed bandages are great for protecting skin about to blister
    • toothbrush
    • water bottle such as reusing a smart water bottle
    • a 50F rated sleeping bag or sleep sack + a light blanket/quilt if staying in hostels / albergues
    • Modest size travel towel if staying in hostels, or maybe even if you are staying in full service hotel every night: see towel entry, hitchhiker’s guide to the galaxy.
    • phone, charger, and cable
    • light / comfortable pack to hold the above items

    When needed (which is less frequent than you might expect) you can wash you hiking clothing in a sink, shower, or machine if one is available. That’s all you need.

    Hiking poles are not generally necessary, though if you are used to using them, bring them… just remember they have to be checked baggage when flying. If everything else you are bringing is carry-on, you can use a cardboard “poster tube” to ship your poles.

    In the spring and fall you would want to add insulation, and extra pair of socks in case they don’t fully dry over night, and maybe rain pants or a rain skirt.

    Pro Tip: Don’t bother with “dress up” clothing while walking the Camino. Restaurants are used to pilgrim attire: shorts, tee shirts, slides/sandals. If you need fancy clothing on a trip paired with your “Camino”, ship them to Santiago to be stored until you are done, no reason to carry them while you are walking. There are a number of services such as Casa Ivar which can help. Jackie and my first stop after the Camino was the UK. After after spending a week in Paris, before walking the Camino, we posted our extras including “dress up clothing” to a friend’s home in the UK.

    Footwear

    The single most important item you bring is footwear. I think minimalist shoes are the best way to go IF you have used them for at least six month. Otherwise I would generally recommend wearing trail runners or hiking oriented sandals. Sandals are often seen as people recover from bad blisters which makes me wonder if they won’t be the best “shoes” to start with. I have written up a brief comparison of boots vs trail runners. It’s important that you use whatever footwear you have selected (or identical models) for an extended time before the Camino to give your muscles a chance to adapt. For example, going from traditional shoes with a heel to zero drop trail running shoes is a good way to end up with achilles tendonitis. For people who are prone to getting blisters I would recommend sizing up your shoes by 1 size and wear 2 pairs of socks: a thin liner made of coolmax or nylon closest to your foot, and a thick wool sock worn “inside out” so the fuzzy part is against the shoe, and the smoother side is facing inward toward the liner and your foot. Another good option are Xoskin toe socks. I have zero blisters after walking thousands of miles in Xoskin toe socks. I had pre-blisters from other socks heal while wearing Xoskin socks while doing 15 mile days.

    Backpack

    The second most important item is your backpack. People who complete the Camino generally use outdoor oriented pack which are between 20-40L in volume. For people carrying less than 10 lbs, there are many good options. If you are carrying more than 10 lbs you will want a pack that has a hipbelt which is capable of transferring the majority of the weight to your hips rather than just stabilizing the pack. I have a post about selecting a good trekking pack.

    Sleeping “Gear”

    Most people walking the Camino will spend one or more nights in an albergue dormitories which are often mixed genders in the same room. You should have some clothing to sleep in. Tip: if you are in the bottom bunk near the wall, you can hang your towel to provide a bit more of privacy.

    Albergues typically don’t provide linens. Many pilgrims bring a light weight sleeping bag (rated for 40-50F) which removes the need to worry about sheets and blankets. I prefer to use a silk or nylon sleep sack which is paired with a light weight quilt or blanket. When it’s warm you can use just the sleep sack. A good quality down backpacking quilts can cost $300, but if you only need enough insulation for sleeping inside (say rated for 55F), then there are a number of light weight down or synthetic outdoor blanket / quilts which are less than $100, such as hangtight shop blanket. Costco sometimes has a down throw blanket for around $25. A classic poncho liner, aka woobie is another option. Some folks find that just a sleep sack combined with their outwear can work. Clothing which are warm enough for “light work” in 40F (a typical spring morning) should be warm enough for sleeping indoors when the room is >=60F. I used a sleep sack and a piece of Polartec Alpha Direct 90gsm fabric which was used as a blanket at night, and as a scarf, shawl, vest, or poncho liner during the day. I wrote up a description of this in a post about my poncho system.

    Keep it Light

    For people who are used to luxury & comfort, don’t just prepare yourself to “rough it”, but embrace a simple and more communal experience. It is especially important to minimize what you bring because you will be carrying everything for many miles each day. If your bag feels heavy before you start walking, you are bring too much and it will get worse as the days progress.

    Conventional wisdom is that people should carry a backpack that’s <25% of their body weight. This is reasonable for moderate distances but will be fatiguing on a longer hike. There were several experiments evaluating how pack weight impacted soldiers physical performance. A key finding was that on all day exercises, fit/trained soldiers had a measurable increase of fatigue and a drop in agility when they carries more than 10-12% of their lean body weight. This matches my personal experience: I feel no more tired at the end of a 20 miles carrying 17lb as compared to carrying no pack. My one caveat that when over 8 lbs I need to shift some weight to my hips or shoulder pain will be fatiguing through the day. My wife found her sweet spot is <7lb.

    Some people ship their bag(s) town to town via a transfer service and carry a small daypack which holds only what they need for the day. This costs 4-6Eu for one time, and around 150Eu for an entire journey. I would recommend not planning to do this as a regular practice, though it can be useful if you are trying to recover from an injury or fatigue. If you going to use a transfer service I would recommend using a duffel which does not need to be expense. We saw a number of people using $4 Ikea frakta duffels. Realize that mistakes can be made, and you might find your transfer bag misplaced for a day or two. For people who are finding lodging as they go, using a transfer service can add stress and complications since you don’t know where to ship your bag on days you don’t have a reservation. Warning: Several traditional alberques have banned “suitcases” or transfer services from delivering because the alberques exist “to serve pilgrims, not tourists.”

    It’s better to bring twice the money you think you need, and half the stuff. It fairly easy to pick up items that you forgot, lost, or are damaged along the way. Worse case is a 20 minute taxi ride to a larger town. Several of the town along the Camino have a Decathlon store, which is the Ikea of outdoor equipment and clothing. There are also a number of stores which cater to nearly all the needs of pilgrims (shoes, clothing, backpacks, toiletries, etc) such as Boutique du Pelerin in St Jean Pied de Port, Caminoteca in Pamplona, Pilgrim Oasis in Carrión de los Condes, etc. Most of the towns have a small store near or on the Camino route which sell comfortable shoes (almost all sell Hoka) and some other items that pilgrims might need.

    Food and Water

    Unlike backcountry backpacking, you rarely need to carry much food or water because you will be in the next town before you need more. Generally .5-1L of water will be enough if you periodically stop at a cafe / food trunk for a drink and make use of the fountains. You will want more water on the hottest days. Before walking, you might figure out how much water you need. I discuss this in my post about water treatment and containers. You might want to carry some food with you when entering a less populated area on Sunday because the groceries / cafes / restaurants might be closed or have hours which are incompatible with your schedule. I liked granola bars and Laughing Cow cheese which doesn’t have to be refrigerated. Of course, if all the food options are closed you can treat it as a day of fasting.
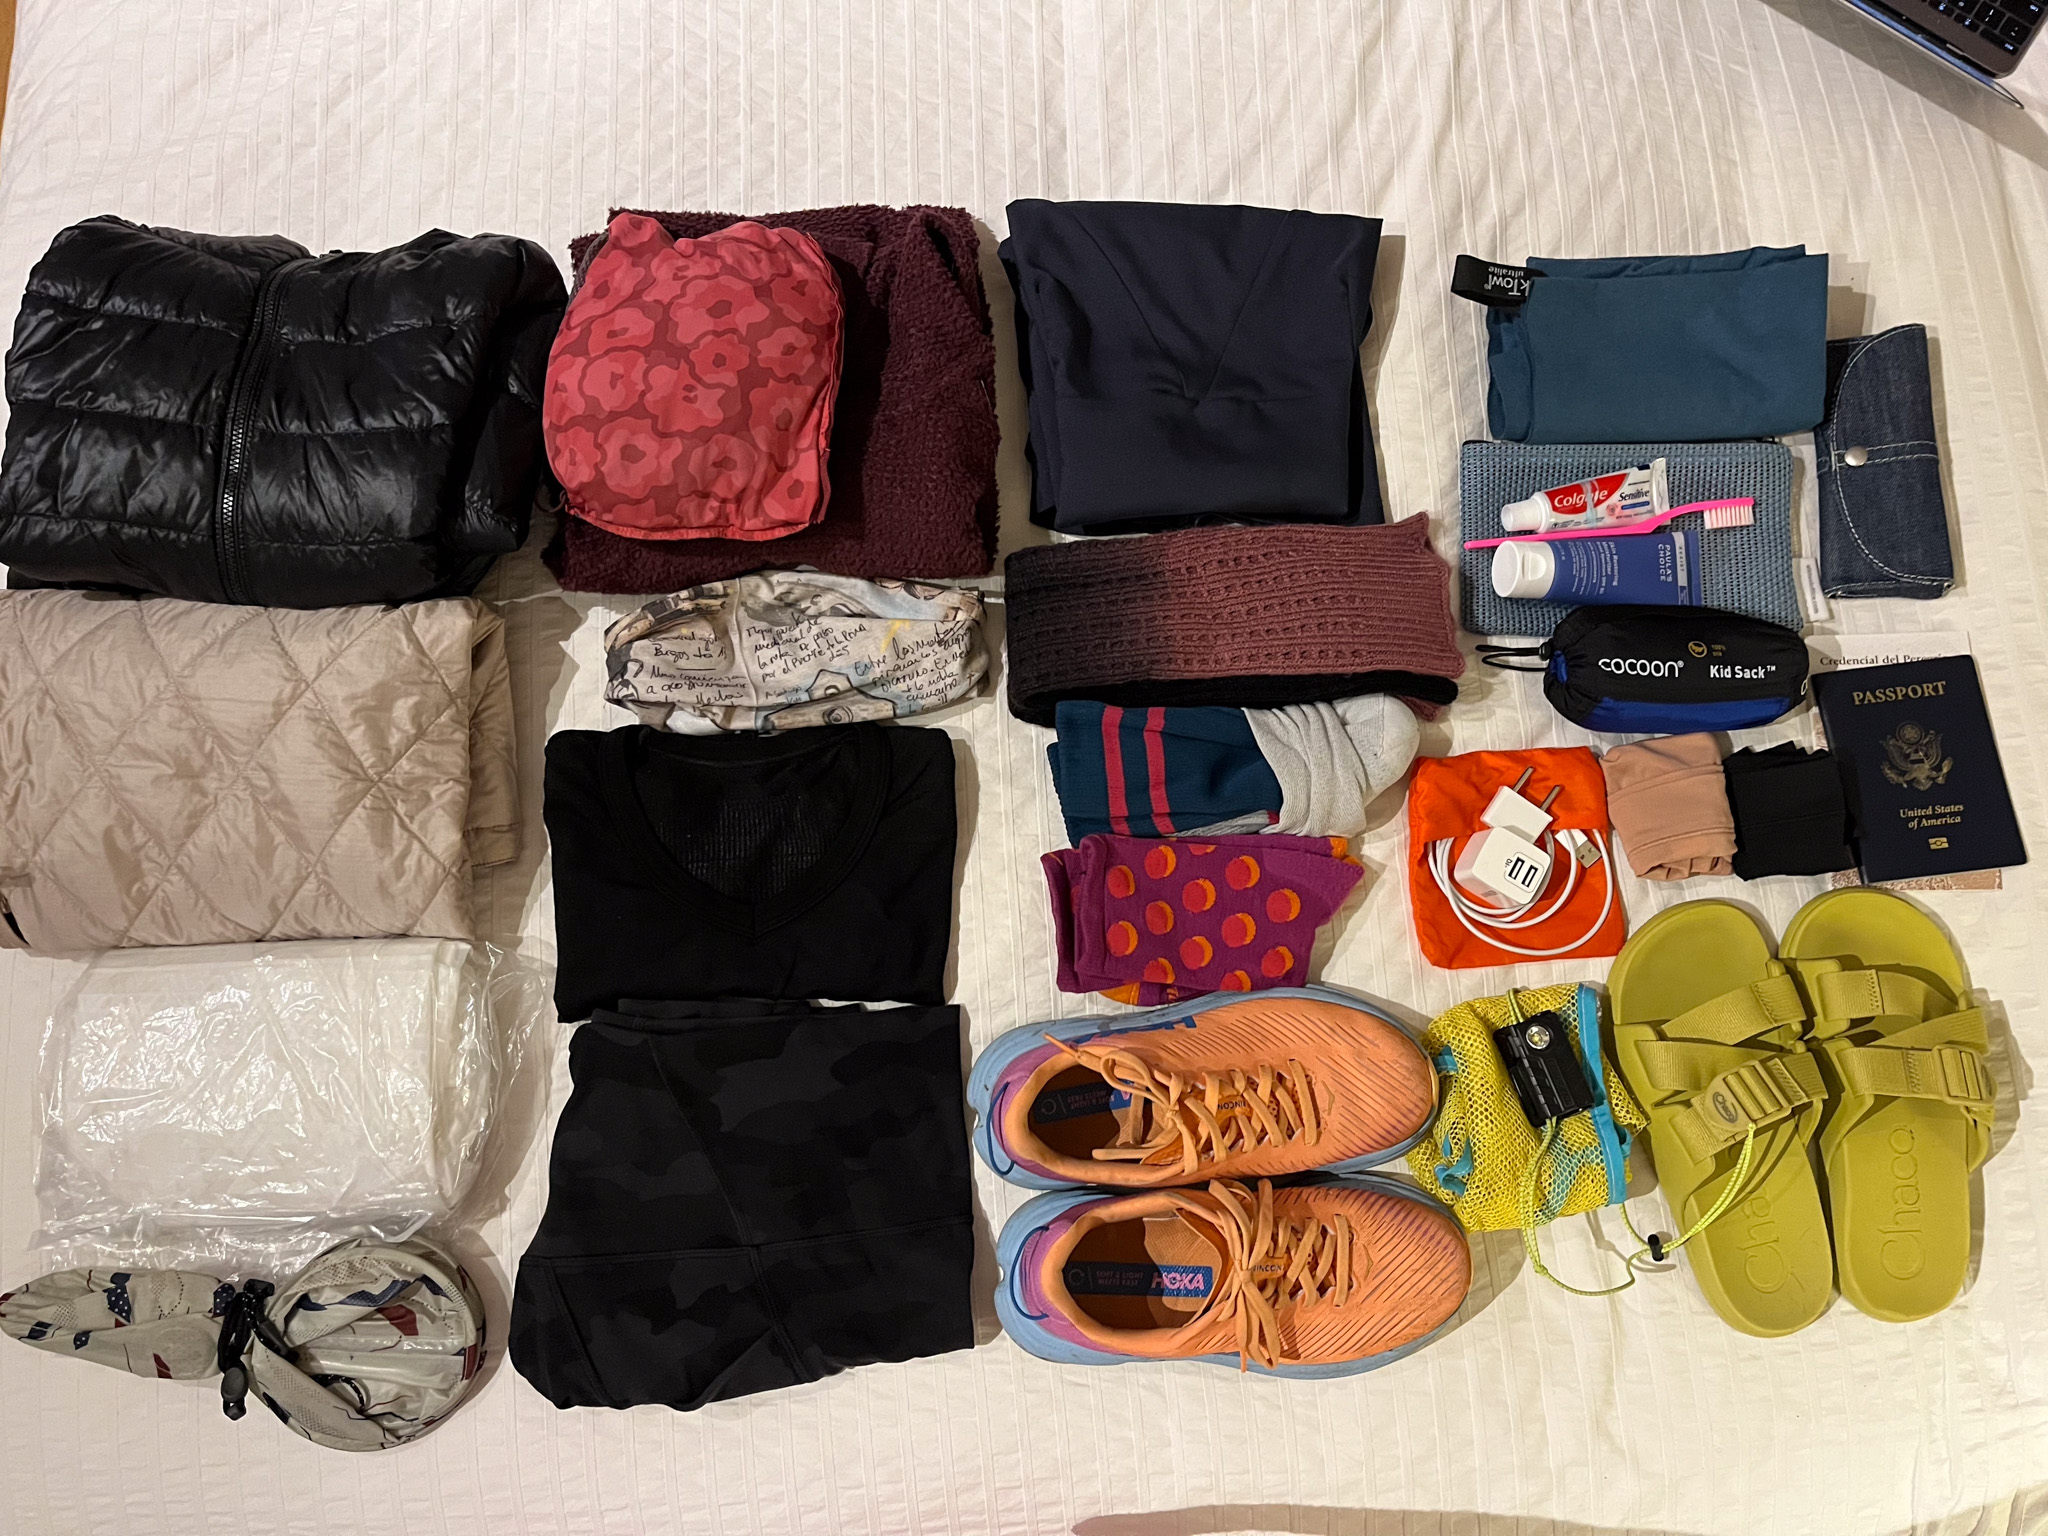
    Jackie’s Pack

    The following is a picture of the contents of Jackie’s backpack for the Camino. She used a 15 year old Camelbak hydration pack which was retired at the end of the Camino. Jackie runs colder than me so she brought more insulation that I did. While my strategy was to use my blanket for warmth during the day, hers was to use insulating clothing + a silk sack for sleep. This works well because night time temperatures inside the albergues required about the same amount of insulation as walking in the coldest mornings.

    OuterwearClothingMisc Other
    Uniqlo Down Jacket
    Montbell Insulation Skirt
    Ikea Rain Poncho
    Montbell Umbrero Hat
    Macpac Nitro Alpha Direct Hoody
    Montbell Windbreaker
    Buff
    2 Yoga Pants
    Decathon Dress (Navy)
    +2nd Decathon Dress (Colorful)
    Underwear (not shown)
    Leg Warmers
    Waterproof Socks
    Wool Socks
    +Compression Socks
    Trail Runners
    Slides

    +Merrill Sandals
    Towel
    Toothbrush / Paste
    Moisturizing Sunscreen
    Glasses
    Sleep Sack
    Cell Phone, Charger , Cable
    Passport
    small fabric shopping bag
    Notebook, Pen
    Headlamp
    +Ankle Brace
    +Knee Brace
    +Tiger Balm & CBD Lotion
    Initial Items, Items Offloaded, “+” indicates items added. Buff wasn’t used. Waterproof socks used only a few times. Leg warmer not used after compression socks was purchased. Jackie didn’t bring first aid… she made use of the kit I brought.

    Blisters

    Jackie and I have been blister free, even for extended journeys like 500 miles of the Camino from SJPP… but we seemed to be exception. Many (most?) people get blisters on extended trips, especially people wearing hiking boats. Most people were able to manage their blisters and continue to walk. A significant number of people we met on journeys like the Camino needed to add a zero day and/or take a taxi or bus to shorten their daily walking to give their feet time to recover.

    The first step is to try to prevent blisters. Blisters develop when your skin is exposed to friction, especially when wet or hot. Most important is to remove friction, specially lateral shear forces (good short video). This means that you shoes need to be roomy enough for your toes to splay without being so large that your feet slide around. If you shoes / boots are stiff, you will need something that provides a cushioning. Wearing two socks, a thick wool sock turned inside out, and a thin synthetic liner sock is one of the most effective solutions. More information about this on my recommended socks page. You also want to keep your feet dry when possible. This is typically best achieved by wearing fast drying, well ventilated shoes or sandals. Avoid waterproof shoes and boots. In rain they don’t really keep your feet dry due to feet sweating, and they hold moisture when it’s dry.

    Second, as soon as something doesn’t feel right apply treatment, don’t wait for a blister to appear. Sometimes changing your laces or adjusting your socks is all that is needed. Most of the time adding something to protect you skin. My experience is that KT-tape and Compeed blister bandages are the most effective treatments. Duct tape works pretty well. Some people swear by “hiker’s wool” but I have no experience with it. I don’t find Moleskin very effective.

    Third, if you develop blisters treat them. Start by draining them and then clean gently. Next you need to make sure they don’t get worse. One option is to leave a small thread in the blister to allow it to drain and then put a breathable protective bandage over them. The method I use is to squirt a bit of superglue (I bring some single use tubes) into the blister. This keeps the loose skin from tearing and makes a durable barrier which protects the tissue under the blister.

    For more information about caring for your feet, read the book Fix Your Feet.

    Guide Books and Apps

    There are a variety of guidebooks and applications designed to help people successfully navigate the Camino de Santiago. All the guidebooks provide information about the route itself and places to stay. Some provide a day by day schedule. Others provide information which allows the pilgrim to decide were they want to stop.

    • A Pilgrim’s Guide to the Camino de Santiago by John Brierley is the classic english language guidebook (don’t buy it in kindle form, terrible formatting, no hotlinks!). It breaks the route into discrete stages. Many people follow his stages woodenly which typically means that the villages listed at the end of each stage will be more crowded. Brierley includes selection about ‘the mystic path” and “personal reflections” which can be enriching, but annoy speople wanting a purely practical guidebook for a long hike.
    • Moons Guide is the only guide which highlights food, and focused more on local culture, detailing local festivals and annual events but is somewhat dated. Several of the restaurants mentioned are now closed.
    • Wise Pilgrim is a very practical guide which is reported to be the best  iOS/Android App. The app supports offline maps. The full content is available as a Kindle and Paperback book.  Much of the content is also freely available of their website. Has booking.com links for any of the lodging that supports online reservations, and WhatsApp links for any lodging that can contacted that way which is great for non Spanish speakers. The paid version has the best offline map (which includes several of the alternative routes). Downside is that it sometimes crashes but always restarted.
    • TrekRight Camino Guide is a iOS Guidebook application. UI needs work but is one of the most complete online guides. Trail notes, offline maps, indications of service in town include grocery stores, some good details sbout each of the lodging locations. Missing booking links and WhatsApp contacts found in Wise Pilgram. Has a notes, flags, highlights flags.
    • Buen Camino De Santiago by Carlos Mencos is available for IOS, Android. What a bit awkward to set up, provides a nice view of your daily stages. Has incorporated a bunch of content from wikipedia and some video clips to provide background to the version towns along the Camino.
    • Camino Guides by Gerald Kelly  is available as an iOS/Android app, Kindle, paperback, and a downloadable PDF. Gerald also makes a free version of the PDF available (which is missing maps and historical background). 
    • Village to Village Guides by Anna Dintaman & David Landis is a practical guide, and has a good online supplement
    • FarOut (aka GutHook) is a hiking oriented mapping guide which focuses on the trail, water sources, etc rather than the towns. I don’t see the point with how well the trail is marked.
    • Camino Ninja is a free app that is well regarded. The author died in 2022… but the people doing Camino Love are keeping it alive and are working to pull the data into their app.

    Particularly Helpful Apps:

    • WhatsApp is used by many businesses along the Camino including a number of the taxi companies and alberquea.
    • Google Translate lets you communication with people you don’t share a common language with. Our experience was English and Spanish were the most useful / common languages used. We heard a significant amount of Portuguese, Korean, French and German. You can download language modules so the app can work offline.
    • The camera to help you remember people and places.

    Resources

    • caminodesantiago.me is a very active online community run by Ivar Rekve, a resident of Santiago de Compostela.
    • santiago.forwalk.org is a very well done website. They have a number of “pre selected” routes / stages with information about what services are available with pictures and links to make reservations.
    • Route Planner which lets you choice start/end locations, and then select the villages you want to stop in  (lists type of accommodations but no description of them). For these selections the website can generate a number of files including a path to be viewed through google earth, gps waypoints,  and a schedule in a nice, spreadsheet readable table
    • American Pilgrims; Online Resources is a list of other resources that are freely available on the Internet.
    • then we walked camino guide: web pages for people who have done the camino 9 times in the last 11 years.
    • Stingy Nomads Camino de Santiago Guide seems filled with useful information from a couple that has recently walked many of the routes.
    • camino adventures: information about some of the other Caminos
    • onestepthenanother: Recommendations for pilgrims on several trails
    • /r/CaminoDeSantiago/
    • backpackinglight camino thread
    • gronze.com: in spanish, but google translate can make it quite useful
    • Metroblue: Best weather app I have found. The weather maps are really useful. iOS

    Stories

    History, Culture, Architecture

    The Camino is steeped in history. Having a sense of the history and culture and enrich the journey. While walking the Camino you will pass some classic architecture. Some resources to appreciate this background:

    • The Pilgrimage Road to Santiago: The Complete Cultural Handbook by David M. Gitlitz won’t tell you anything about the modern cities, hostels, or amenities but will give you an in-depth look into the history of the path you are walking.
    • Iberia by James Michener isn’t about the Way, but provides a good amount of background about this region of Spain.
    • History of Spain: Readable and engaging history book
    • Beginners Guides to Architecture on the Camino: Some good threads on caminodesantiago.me

    Random Hints / Practices

    • Be curious and ask questions of the people you meet. There are many amazing stories you will hear, and many reasons people are walking the Camino. Good questions: “Why are you walking the Camino?” “What have you learned during your walk?” “How has the Camino changed you?” “What are some of the hightlights of your walk so far?”
    • Make a list of people you meet and take pictures of help your memory. Maybe consider asking how you could pray for them and make prayer cards.
    • Get used to Spanish schedule. Breakfast is a slightly sweet pastry and a coffee, maybe a spanish tortilla. Lunch is generally 1:30-3:30. Dinner starts at 8 PM. Many stores are closed in the mid afternoon and on Sundays.
    • As you enter new cities look for a poster with a list of local taxi phone numbers and take a picture in case you are injured and need transportation. Often in the entry of hostels, sometimes there is a poster near the entry / exit to the town. When you take a new picture delete your old picture. For non Spanish speakers, try putting the number in to WhatsApp or iMessage and see if they are on one of those platforms. If so, you can send them messages which includes your location and your request that you translate into Spanish using a translation program.
    • If you are having trouble finding a place to stay on the Camino look a few km on either side, There are often hotels and guest homes that are pretty close, several will offer free pickup and return to the Camino so you don’t have extra walking.
    • Walking takes hours to go between towns, but a taxi and bus takes tens of minutes. It’s pretty quick and not that expensive to return to a town to retrieve something you left behind. Realize just because a town has buses doesn’t mean they have buses that go to where you want to go.
    • Once a week stay someplace with a washing machine. They are way more effective at cleaning clothing than hand washing.
    • If you are bring a cell phone, have WhatsApp loaded. It seemed to be the universally used communication tool along the Camino for many businesses and most of the pilgrims. Take a screen shot of your QR code (settings, click on the QR code icon next to your name). If you don’t have connectivity and want to exchange contact information with someone just have the scan or take a picture of your QR code which will save the hassle (and eliminate errors) of them getting your contact info.
    • Each morning I would stop at first church I came to that was open. I would go inside, if there was a nun present thank her and then sit down to reflect of what I had to be grateful for and then to pray for the coming day and the people I had met along the way. Doing the make the rest of the day better.
    • If you walk from SJPP, prepare for things to change in Sarria. There are many more people and many are more tourist than pilgrim. First, don’t judge them, everyone is walking a different road. It will be much harder for them to experience the Camino spirit, but try to share it with them. To avoid the massive crowds try leaving before 7am or after 9:30. Most of the tours / packaged trips have a breakfast which is between 7-9am.
    • If you want to get a Compostela, use the pre-register website a couple of days before you finish and get a barcode. You will likely be in and out in 5 minutes rather than waiting in line for hours.
    • For people biking the Camino… have a bike bell. Its sound is pleasant and universally understood. Saying “coming through” only works if people understand you language and is more jarring that a bell.

    Re-Entry from a Pilgrimage

    Many people talk about how jarring it is to return to “real life” after a pilgrimage like the Camino. After a month of a slow paced life characterized by simplicity, quiet, and community they found themselves facing a hustle / hurry culture that is filled with noise and often more oriented toward competition than community. It is easy to get overwhelmed and to return to old patterns and habits, leaving the Camino experience something remembered fondly, longed for, but divorced from daily life. As I have talked with people about their post Camino experiences there are several things which seem to have kept the Camino spirit alive for many. The following is a summary of the advice I have heard about how to live into the Camino experience once the walk is complete.

    • Set aside some quiet time (ideally a week or more) between the end of your Camino and starting back to “normal” life to have time to think, pray, journal, and reflect on your experiences. Identify what you learned, how your perspective has changed, how your values have shifted or strengthened. Ask yourself what is important in light of your Camino experience?
    • Consider your life before the Camino and ask the question “How did my pre-Camino life align with my post-Camino understanding?”. It is likely that you will find places the two don’t align. Realize that if you don’t make explicit changes, your post-Camino life will likely look exactly like your pre-Camino life.
    • Identify changes you would like to make as your return to “regular life”. Many try to change everything, fail, and quickly give up. Rather make a list of things you would like to change and then decide on one item you will start with. Break it up into manageable steps and find ways to turn it into a habit and then a lifestyle. The book Atomic Habits is a great resource for this sort of planning. Once something has gotten established, look at your list and make the next change.
    • The most common change I heard from people was making sure they left slack in their schedule so they weren’t constantly forced to react to life. There were moments to reflect and choose a response. Many found that adding a time each day to just be was key. For some this was time to sit, reflect, and maybe write a few sentences in a journal. For others it was a quiet walk in their neighborhood or a nearby park.
    • The second most common change I heard was people striving to build a genuine community. Often, they had been part of some sort of a community before the Camino, but the experience fell far short of their Camino experience. In some cases people have found that by intentionally investing and initiating in their community they were able form a genuine community. In other cases people realized that where they were putting their time wasn’t working and that they should try something different.
    • Set a date for your next Camino 🙂

    All of these items suggest that what’s key is to identify what you loved about the Camino and then to identify little things which will remind you and keep your grounded, anchored to those things.

    I am not in control. I am not in a hurry. I walk in faith and hope. I greet everyone with peace. I bring back only what God gives me.

    Murray Bodo, The Pilgrim’s Credo
  • Bugforce Scale

    Bugforce Scale as proposed by Paul Wagner is an attempt to describe how annoying mosquitoes are from a qualitative perspective. An example of one of my level 9 experiences was descending into the basin around Dick’s Lake is Desolation Wilderness. While walking down the trail I briefly stopped to get something out of my pack. In less than one minute I counting more than 100 mosquitos land on the parts of my body I could see. DEET didn’t prevent them from landing on me, but thankfully they couldn’t penetrate the Supplex clothing I was wearing or get my face because I was wearing a head net.

    0 is Zero. Really. No mosquitoes or other biting bugs

    1. I think I may have seen one. But maybe it was a gnat.
    2. OK, I saw one, and heard one, but didn’t actually get bitten,
    3. Yeah, there were some in a few spots. Only the timid put on organic bug juice.
    4. Got a few bites, but I got more of them than they got of me.
    5. Time for DEET at dawn and dusk. Hiking, we just slapped and sped up.
    6. DEET while hiking. Headnets at dawn and dusk
    7. Pick your camp spots carefully, up on the ridge in the wind. Bites between hat and sunglasses–how do they get in there?
    8. Long sleeves and long pants, I don’t care how hot it is. Pray for wind.
    9. Headnets while hiking, or you’ll breathe in at least one bug per mile. DEET dissolves sunglasses
    10. Clouds of mosquitoes waiting on the trail and on the screen of the tent. Open warfare. DEET dissolves watchband, and it’s stainless steel.
    11. We made it out alive.
    12. They got Larry. RIP, Larry.

    High Sierra Topix board uses a simpler mosquito rating system

    1. No mosquitoes or if there are some, but not biting yet
    2. Very light during the day, moderate at dawn and dusk
    3. Moderate during the day, heavy at dawn and dusk
    4. Heavy during the day, heavy at dawn and dusk
    5. Unbearable all day, no breaks, cannot eat outside of tent. If you stop, hundreds will descend on you; when looking thru a camera viewfinder, you see more skeeters than lake. If you slapped your arm, you’d smear blood from all the dead gorged bodies

    My Approach

    I typically wear long pants and long sleeve shirts which are hard for bugs to bite through with Permethrin treatment to add to the effectiveness. I will use a head net when bug pressure is high. I use Picardin on exposed skin.

    Chemical Protection

    DEET based repellent is proven to be the most effective chemical treatment. The best option is  time released 33% DEET such as Ultrathon. See Mosquitoes and Mosquito Repellents and DEET-based insect repellents: safety implications, and EPA’s list of active ingredients for more information.

    Picaridin finally entered the US market. Picaridin has a number of advantages over DEET: it doesn’t destroy plastics, it doesn’t smell bad, and doesn’t leave that icky feeling. From the studies I have read Picaridin is slightly less effective than similar concentrations of DEET. I have found that 8% Picaridin is effective against modest mosquito pressure for a few hours but not effective in heavy mosquito areas, and >20% worked well for medium to high mosquito pressure.

    I have tried a number of the natural insect repellents. Lemon Eucalyptus seems to have been the most effective. In locations which have only minor mosquito problems they can be effective, but if you are somewhere with lots of mosquitoes (say in the Sierras when the snow is melting, Canada during the summer, etc), you will get eaten alive if you use “natural” repellents.

    Permethrin infused clothing can provide reasonable protection when the bug pressure is moderate, but I found it to be inadequate when the mosquitoes are out in force. Several companies sell clothing with permethrin pre-applied. You can self-apply Permethrin (it’s sold many places including at REI) or ship clothing to Insect Shield for professional application.

    Ticks

    Start with prevention.  Spray your cloths with Permethrin and use DEET based repellent if you are in a location which has a lot of ticks. You should remove ticks by gently pulling them off with a pair of tweezers or using one of the special tick removing devices which are designed to lift ticks off your skin (such as the Pro Tick Remedy).  Using  hot match, Vaseline, nail polish is extremely counter production.  Not only do these techniques risk killing the tick and leaving part of the tick in the victim, but ticks will often expel their stomach contents when distressed, the very thing you want to avoid.  There is a belief that Lyme disease isn’t transmitted for 24 hours, so make sure you do a tick check each night.  If you have been bit by a deer tick, check with a doctor.  There is now an anti-biotic treatment which is more than 80% effective. I collected some info about tick removal tools from backpacker.com forum. Of course, treating clothing with Permethrin helps keep ticks away.

  • Hiking Destinations

    The following is a reference I use when selecting the next hiking or backpacking destination with a bias toward Northern California. I make it in 2002 and just now moving it from my old site so it is easier to fix broken links and add new places to try.

    Each year I say “This year I will do trip reports with the pictures I took.” At the end of the year I look back an realized I didn’t write up even one trip. I have said I would start writing up trips once I retire. Sigh… I didn’t succeed with my first post retirement trip… or second, or any except walking The Frances Camino because we promised family members. Maybe I will never get around to it.

    Years ago I would plan trips using National Geographic’s Topo! and then Caltopo. Decent for desktop use but the UI isn’t great. I have been using Gaia, but it seems like now that they have been purchased and charging model was changed many are trying to figure out what mapping software to use. I have hopes that Organic Maps or mapy.cz might be good enough for back country use.

    Around the World: includes hut2hut

    Sierras

    I will never tire of going to the Sierras. This is my favorite destination and the place I will most likely take my next hike. Yosemite and Kings seem to be my most common destinations. I have spent more time on the west side due to driving times. Now that I have more time I hope to spend more time on the east side.

    SF/Bay Area

    There are a number of websites which document hikes in the SF/bay area. The best online journals I have found are Bay Area Hiker and Kevin’s Hiking PageBay Area BackcountryRidgetrail, and Midpeninsula Open Space provide valuable references to a number of destinations in the area. The book  One Night in the Wilderness: SF Bay Area by Matt Heid provides good coverage of destinations within 2 hours. There was a reddit thread about accessing trails near SF using public transit. Views from various peaks at heywhatsthat. If you want a longer trek do the Bay Area Ridge Trail (trip report report by Manfred).

    Trails Accessible With Mass Transit

    US National Parks

    Parks left to visit:

    • Gates of the Arctic National Park, Alaska
    • Kobuk Valley National Park, Alaska
    • Hot Springs National Park, Arkansas
    • Big Bend National Park, TX
    • Guadalupe Mountains National Park, TX

    Good Destinations for Kid’s First Trip

    • Coastal Camp, Pt Reyes… not to far a drive, less than 3 miles each way, beach, rope swing, horses.  If you want a longer hike going to Wildcat is also very nice which just a bit of elevation change. You are much less likely to see horses and no rope swing, but there is still a beach which has some whale bones and a waterfall pretty close by.
    • Twenty Lakes Basin via Saddlebag Lake, Just East of Yosemite…  further drive but worth it.  Loop is 11 miles, thou you can shorten that by 2 miles if you take the water taxi. Modest elevation changes.  Lakes, fishing, rocks to climb, good place to learn about going cross country because the basin constrains how far you can go wrong.
    • Lake Margaret, Near Tahoe… 3 miles each way, modest elevation changes, nice lake with fishing, common day hiking, but evenings can feel like you have the place to yourself. Rocks to climb on
    • Rancheria Falls in Hetch Hetchy, Yosemite… 6.5 miles each way, modest elevation changes, nice campsite, pretty falls.  Good for early spring when snow isn’t cleared at higher elevations

    Recommended Trips (Close-ish to Bay Area) 

    Sykes CampVentana Wilderness. A nice walk (10 miles in, 3000 ft climb along with a 2000 ft descent), beautiful and rugged country, mild weather, and a hot springs at the end. No quotas. What more could you ask for? How’s about a stream filled with young trout? Downside? Too many people during summer weekends, poison oak. I have passed through Sykes more than 50 times on solo trips, and likely brought more than 10 groups in. Everyone has enjoyed it. Fire->landslides closed it ~2018-2022 but open again. While the trail was repaired the “non-natural” sandbags which made the hot springs pools luxurious were removed making them smaller and less deep.

    Emigrant Wilderness just off rt 108, one of the closest destinations from bay area with on-demand wilderness permits / no quotas. Crabbtree trailhead has heavy traffic first few miles but drops off significantly after Gem lake. My no think weekend trip is a 37 miles loop out of crabtree going past jewelry, emigrant, huckleberry, wood lakes. Gianelli Trailhead – to chewing gum lake, then cross-country to  Granite Lake, then to Leopold Lake or connect to Crabtree Trail by traveling south from Granite, then to Long Lake or Buck Lake via Crabtree, then Relief Valley Trail back towards Gianelli. Lots of options out of Gianelli.

    Lost Coast, King’s Range. One way it’s 23 miles, or you can make it in a loose loop by taking the crest trail. Known for rain, wind, and fog, this area can also have wonderful weather. Very pretty with nice views. When it’s not cloudily, great night time sky. Did this more than a dozen times. Used to be easy to get a permit, uncrowded (numerous trips I saw some surfers and maybe a few backpackers), and the weather almost always gave me at least one storm day – great for testing limits. Now is challenging to get a wilderness permit. All permits are released Oct 1 for the following year. It seems that most weeks someone cancels, so if you are OK heading out on a Wednesday, you can often snag a 1-3 person permit with a week or two warning.

    John Muir Trail. 222 miles of the prettiest country known to man which also happens to be graced by some of the mildest weather of any mountain range.  Used to be easy to do, now it’s become so popular that wilderness passes are issued by lottery. Doing South Lake to North Lake is a short trip which will let you see of the best parts and is easy to get wilderness permits.

    Yosemite National Park: The valley is over-crowded with people and traffic, but you can hardly blame people. The valley is one of the most beautiful places I have ever visited. If you want to get away from people I would recommend backpacking from any of the trailheads which are not connected to the valley floor, or Tuolumne Meadows to a lesser extent. Jeffrey Schaffer’s 100 Yosemite Hikes is the best guide I have found. There is a Yosemite NPS web site. Hikes out of Tuolumne Meadows can be very peaceful after Memorial Day because the crowds are gone. Nice images at extreme resolution: yosemite.

    Redwood National Park & Associated State Parks. Simply beautiful. The ocean side of the hills are cool, windy, and mostly fogged in during the summer. Inland just a bit over the hills and you can actually see the sun. 

    Lillian Lake Loop, Sierra National Forest. 13 mile loop through pretty country. A great way to introduce people to the Sierras. Not nearly as crowded as Yosemite. Good fishing. In the summer some of the lakes are quite warm because they are pretty shallow, perfect for swimming. 

    Pt. Reyes: Close in to the bay area. Great place to introduce people to backpacking, with it’s short to moderate length hikes. This place is especially great for introductory trips for kids because there are good beaches to play on, tide-pools to explore, and sea mammals to see. Booked during the summer: make reservations three months in advance.

    Skyline to the Sea: Maybe the best known trail in the bay area. If you are looking for solitude, this isn’t the trail to take. The top section is close to roads and you go right through Big Basin, one of the most used state parks in the area. On the other hand there are some good views and it can be a fun trail to hike. After the fire of 2020 likely closed.

    Henry Coe State Park: Just 1 hour from the mid peninsula… a surprising large park. The 2.4 mile “forest trail” has 28 markers highlighting interesting features of the trail which is perfect for small children. For more serious backpacker there are a number of trails with a lot of elevation change which will give you a good work out. Great in early to mid – spring. Very hot and dusty during the summer which so/so water supplies.

    Car Camping

    Samuel P. Taylor SP. Nice redwoods reasonably close to the bay area.

    Pinnacles National Monument: Very pretty in the early spring. Very hot and dry in mid summer. 

    Big Basin State Park: Unofficial Big Basin State Park. Seriously damaged in the fire of 2020 🙁

    Henry Cowell State Park, Santa Cruz Mountains: A great place for low-key car camping trip with friends and family. You can walk down to the San Lorenzo River via the pretty Eagle Creek Trail and wading in the water.

    Day Hikes 

    Black Mountain, in Santa Cruz Mountains: 4.5 miles up with approx 2500ft gain. The first mile is somewhat steep. A good place to train for climbing hills in the sun. If you continue on just a bit you come to the backpacker camp which is a nice little space. I saw a pair of foxes playing in the grass. I have only once seen the campsites in use.

    I did a lot of climbing and backpacking in the 70’s through the mid 80’s. My favorite destinations were the Bighorn National Forest, Glacier National Park, Grand Teton National Park (especially Teton Crest Trail) , Rocky Mountain National Park, Pacific Crest Trail (especially from Kennedy through Tahoe), Red River Gorge in Kentucky, Bartram Trail in North Carolina, and sections of the Appalachian trail (though I would have liked less rain in the Blue Ridge Mountains).

    Good Trip Reports (by Others)

  • Get Outdoors

    Every Saturday Jackie and I take at least a couple hours to walk in one of the parks in our area or we might be further afield at some state or national park. Within a few minutes of beginning our walk I can feel myself relaxing. I periodically go on solo backpacking trips, my version of a personal retreat. Not only do I come home refreshed, but often I will have insight into how to resolve what had been an intractable problem.

    One of the best things you can do for your health and wellness is spend some time outdoors among trees and other sources of natural beauty. This is sometimes called Forest Bathing. USDA&USFS jointly published Health and Wellness Benefits of Spending Time in Nature cites a number of studies which have shown time spent in nature, especially when combined with walking has a significant, positive impact to people’s physical and mental health. The APA published a list of research papers about how nature contributed to our mental health. The podcast Hidden Brain episode Our Better Nature: How The Great Outdoors Can Improve Your Life covers similar material in greater depth. They found that a three day retreat in a forest made significant improves in a number of bio-markers, and that these improves persistent for several weeks. People who got a three day vacation in a city saw no improvements in their bio-markers. The WSJ journal had an article about the benefits of spending time outdoors. A study in Scientific Reports found the minimum effective dose of nature was around 120-190 minutes in a week, with not additional benefit over 300 minutes. Other studies found the practice of forest bathing helped general health and lowered hypertension; time in forests saw increases in anti-cancer proteins, lowered parents stress, and increase resilience in children.

    My first choice for a vacation is to spend time in the outdoors which has included around 90% of US national parks. My outdoor activities are primarily:

    • running: 9-45 miles/week depending on season and training program
    • walking, hiking, backpacking: 12-17k steps daily walking, at least one >6 miles walk with Jackie, large range on special activities
    • bicycling: 0-150 miles/week depending on how much running and hiking I am doing

    When I was younger, I spent quite a bit of time canoeing, climbing, fly fishing, kayaking, sailing, and a variety of winter activities such as skiing. I have dabbled with geocaching. I am no longer regularly engaging in these activities.

    I am so grateful to my dad, and the boy scouts who introduced me to many of these activities. There are several organizations in my area that help people discover the outdoors such as Bay Area Wilderness Training (BAWT) and the Loma Prieta Chapter, Sierra Club.

    I encourage people to support organizations that work for a sustainable future which insures natural environments such as Nature Conservatory, NRDC, Environmental Defence Fund and Sierra Club.

    Related:

    Keep close to Nature’s heart, yourself; and break clear away, once in a while, and climb a mountain or spend a week in the woods. Wash your spirit clean from the earth-stains of this sordid, gold-seeking crowd in God’s pure air. It will help you in your efforts to bring to these people something better than gold.

    Alaska Days With John Muir, Gibbs Smith Publisher
  • Flashlights & Headlamp

    Updated November 2024

    Flashlights and headlamps let you continue your activities once it is too dark to see. The ability to expend the hours that we can do things is invaluable. Today, virtually all flashlights and headlamps use LEDs to produce light. I strongly encourage people to retired any lights which aren’t using LEDs. LEDs are more durable, have a longer lifetime, and are more energy efficient than other options.

    [toc]

    My Choice

    I use the Nitecore NU20 classic for most of my lighting needs. Until recently I used the original NU20 which weighted 1oz with the headband replaced by shock cords. Light output 1lumens/100hours, 40/7h, 220/60min which falls off, turbo boost 360/few minutes. It can charge and run at the same time so you can use it as a remote battery headlamp with a USB power pack when you want longer runtimes or in extreme cold. Holding the button will indicate >50%, between 10-50%, or less than 10% battery level. Output is well for regulated for low and medium output levels, the high not so much. The downsides are that the throw isn’t really up to challenging cross country way finding and you can’t quick change the battery. If I am going to do a lot of way finding while backpacking, I sometimes switch back to my ZebraLight H51 that has a better beam. When I need a lot of light or all night runtimes I use a ZebraLight H600 headlamp (notes on ultralight headband). My family regularly uses a Black Diamond Apollo lantern both around the house and when camping.

    Issues to Consider

    There are a wide variety of headlamp and flashlights. They come at all sorts of different price points, features, and characteristics. Below are some of the issues I consider when selecting a light.

    Brightness/Throw

    The need for light varies based on how light sensitive a person’s eyes are (often older folk need more light) and the task at hand.  Given time, many people’s eyes can adjust to available light. If you are patient, you might find that the moon and stars provide enough light for a number of activity.

    Petzl has been developing lights which adapt their intensity based on the conditions. While I think this is an interesting idea, everyone I know with one of these headlamps has told me that it’s still a work and progress and more gimmick than function.

    I look for lights which have multiple output levels. My experience is that:

    • 1 lumen is enough light for simple tasks
    • 10 lumens close proximity tasks that require seeing details or color.
    • 30 lumens following established trails
    • 100 lumens with focused beam for easy cross country travel
    • 200 lumens for moderate speed urban cycling, technical navigation requiring short distance visualization of terrain
    • 500 lumens for cycling at speed, cross country navigation requiring long range visualization

    For up close activities, an even floody light is desirable. When moving fast (running, biking, skiing), or trying to see things in the distance, a narrower, focused beam is helpful. The distance that a light is effective is called the “throw”. Often lights will provide a compromise by having a focused center (call the hotspot), with a broader area of light at a lower intensity called the spill. When needing to see far distances (like wayfinding) you want the beam to be focused with little spill due to inverse intensity law: I = 1 / d^2. The spill from nearby features will drown out the the distance.

    Regulation

    I strongly recommend using flashlights and headlamps which have full regulation, sometimes called boast regulation. Full regulation uses circutry to keep a steady amount of power flowing through the LED. As a result, the brightness of the light stays nearly flat until the battery is nearly out of power. An unregulated light just lets the current flow which means the light is quite bright with fresh batteries, but falls off quickly.

    The best way to understand the performance of a light is through a runtime graph.  In the graph below you can see the performance of four different flashlights.  the Fenix has full regulation and keeps nearly 100% of it’s initial output for most of the flashlight’s runtime.  The Sapphire light has no regulation. It’s very bright for the first few minutes and then it’s brightness falls off fairly quickly. The EOS flashlight uses simple resistance regulation which limit the amount of current that is permitted to flow. This prolonging the “high” runtime by limiting the maximum brightness with new batteries.

    candlepower forums,com

    You should know that unregulated lights tend to report how long light is generated rather than light which is at a particular intensity. So in the case of a flashlight like the Sapphire, the runtime might be reported as 9 hours, even though it’s at 50% after just 30 minutes, and a quarter after 2 hours. This issue is explore more in the article why headlamp claims are deceptive. You can use ceilingbounce to do your own tests. BackpackingLight is working on LightBench which is a quantitative method for rating flashlights which uses the area under the curve to characterize the light produced.

    Battery Type & Sizes

    Historically I have selected lights it to use AA because this is what most of my other devices use, they are easy to find in stores, and have a reasonable size/power density trade-off. When I have need a light which is exceptionally bright or has a long run time I will consider 18650, 22700, or internal rechargeable batteries because USB is becoming a ubiquitous power source.

    During summer months I recommend using eneloop (or other low discharge NiMH formulation) batteries which outperform classic alkaline batteries and are more eco-friendly. I recommend avoiding the “Pro” version of the envelop, they tend to die much more quickly than the “normal” version.

    In cold conditions NiHM batteries function better than alkaline, but I would recommend using Lithium batteries because they even less affected by cold, hold more power, and, are 30-40% lighter. You should be aware that lithium batteries can burn out un-regulated LEDs. Verify that your light is rated to be used with lithium batteries.

    I would recommend getting a conditioning charger because you can reduce a battery’s capacity and lifecycle using a poor charger. I would recommend the Xtar VC4SL, Nitecore I4, Vapcell S4, or the pricy Epoch X4. The cheapest, more versatile, and compact options is a “universal magnetic” charger. These chargers plug into a USB outlet with two leads that terminate in magnetic heads. Most support multiple battery chemistries, automatically detect polarity. Only downside is that they are fairly slow charging. The first was made by oLight, which not longer makes them, but there are several clones still in the market. These chargers typically cost less than $15. There are a number of batteries that have integrated charging circuits powered by a built-in USB ports such as the Fenix ARB-L14-1600U. Alas, even though this AA Li-Ion battery limits output to 1.5V, it doesn’t work in most Zebralight brand lights. 

    Other Issues to Consider

    Beside what’s listed above things I look for:

    • reasonable user interface (can be used with gloves and doesn’t have many blinking modes you have to cycle through)
    • weight (lighter generally better)
    • waterproof
    • battery life indicator
    • good price / value
    • for headlamps comfort to wear and stay on the head when active
    • additional features such as being an USB power bank.

    I don’t have a recent of experience with headlamps which are extremely bright (>600 lumens) or are dependent on remote battery packs. Remote battery pack are very important when in extremely cold environments because the battery pack can stay under your coat to keep the batteries warm so their performance doesn’t fall due to the cold environment.

    Headlamps

    I recommend getting a headlamp because the hands free operation is extremely useful and you can always use it like a hand light.  Why would you use a headlamp in your hand?  Having a light source coming from the same location as your eyes creates hard shadows which can make it harder to see things. When night hiking having the light coming from down around your waist makes it much easier to see the terrain. Secondly, when in groups, there is a tendency to turn toward people who are talking which minimally exposes them to the spill of the headlamp if the headlamp is properly adjusted down, or worst case, you hit your friend with full force light. When in a group, a useful trick is to wear the headlamp loosely around your neck with the beam angled down toward your hands.

    Headlamps with swappable batteries I would recommend:

    • Zebralight make numerous excellent headlamps. These are my top recommendation if their price isn’t too high. I suggest the standard (non floody) reflectors for all-around use, powered by whatever batteries has the size / runtime profile you desire. Zebralight maintains a google sheet with the specs of all their lights. I have used a ZebraLight H51 from 2010-2019 for most of my portable lighting needs. The current version of this light is the H53. The H51, an AA eneloop battery, and original headband weight 3.5oz. It has 6 regulation output levels which include lumens/runtime : 0.2/19 days, 8/39h, 30/10h, 200/55min. I have the standard (non floody) reflector: the beam has a hot spot with enough throw for wayfinding and enough spill to be useful for close up tasks. The headband is comfortable, removable, with a glow in the dark holder which makes it easy to find at night. The only thing this light is missing is a battery life indicator which exists in the later version. When stored, I unscrew the tail-cap 1/3 a twist to prevent accidentally it turning on. The Hx2 models had one advantage over the newer ones, they can use 14500 batteries.
    • Thrunite TH20, $30 is one of the best values. Durable case, good quality regulation, nice user interface which ramps up intensity rather than going in 2 or 3 big steps. Can use any formulation of AA battery including Lithiums. Beam patterns is fairly floody.
    • Mankerlight E03H, $35 can be thought of as a budget version of the Zebralight H53.
    • Fenix HM50R. $60 which have a good beam, regulation, swappable battery and weights 2.8oz. Downside is lowest setting is 30 lumens which is overkill for simple tasks.

    If none of the above headlamps appeals to you, I would recommend looking at headlamps made by Fenix and Nitecore since they have good regulatory circuity and durable cases at reasonable prices.

    Many of the better known manufacturers include Petzl, Black Diamond, and Princeton Tec tend to lag when it comes to embracing the more efficient LEDs, regulation and durability. I know people who really like the Petzl e-lite but I don’t recommend it. More details below in the section “Button Lights”

    While I generally prefer replaceable batteries when away from civilization, I have come to appreciate several lights which integrate rechargeable batteries into their headlamps.

    • NU20 classic is an upgrade of the original NU20/NU25, and I think better for many people than the current version of the NU25. NU20 classic model is USB-C, has a red and CRI lamp, with a more efficient and better thrown main LED, and improved battery life indicator. A useful review.
    • Petzl Bindi: is the mainstream version of the NU20. I think the NU20 is superior and cheaper, but you can likely buy a Bindi in a local store.
    • BD LT 1100 no personal experience, but is reported to be good for off trail navigation with a super bright burst model which is helpful when trying to see distant indicators.
    • The Nitecore CU10 was an interesting design which clips to a backpack strap and is powered by an external USB power source. It was discontinued shortly after release 🙁

    Traditional (Hand-held) Flashlights

    There are numerous good options today. I would suggest you start by decided what battery size you want to use. Three factors typically effect battery selection: what batteries are being used by other devices, size/weight, and run time. I generally think flashlights which are powered by AA batteries are in the “sweet spot”, through I will consider 18650 when I want longer runtime / brightness, or AAA when small size matters.

    There are a number of companies which make excellent flashlights. Generally I tend toward the flashlights made by Fenix because I have found them to be well made at a competitive price. There are a number of other companies that make excellent flashlights including NitecoreolightStreamlight, SureFire,  Thrunite, and Zebralight. My short list recommended flashlights based on value and performance:

    • Thrunite Ti3, $16, uses a single AAA battery.  Good regulation with three lighting levels 0.04 lm(115h), 12 lm(6.3h), 120lm(0.5h). I think this is the best flashlight you can stash in your pocket, purse, backpack for emergency lighting. The olight i3s eos is very similar, with the maximum output being 80 lm(50 minutes).
    • Fenix E12, $30, uses a single AA battery. Good regulation with three light levels: 5 lm, 30 lm, 200lm. I think this is good all around flashlights in a compact form.
    • Zebralight SC600w, $100, using a single 18650 battery. Has 12 light levels which include 0.1 Lm (4 months), 150 Lm (12 hours), 1700 Lm (20m). Great if you need a very bright light in a modest size package.
    • Wurkkos HD15, $35 is a decent 18650 powered flashlight which can double as a USB power bank. Note: many devices work with the power bank feature, but iPhones didn’t.

    Button Lights

    Small lights that are powered by coin/watch batteries and typically have a single LED. These lights are very small and light. People often attach them to keychains, zipper pulls, or drop them in their pockets or purses for when there might be an unexpected need for lighting.

    Button lights typically have only a few hours of useful light for close proximity tasks or maybe a hour illuminating an easy to follow path. Most button flashlight permit momentary on/off operation by squeezing the case, and most provide a way to “lock” the light on. Many of the locking mechanisms can accidentally get locked on when carried in a pocket using up the batteries. I think the  Doug Ritter Photon made by Photonlight is the best button light made. It’s user interface is very good (easy to vary intensity and to select push-to-light mode, and the various strobes stay out of the way unless you need them). The primary down side is that the light falls off pretty quickly as indicated by the Photon Freedom’s runtime graph.

    Some ultralight backpackers seem to like the Petzl e-Lite, which is a headlamp powered by two coin batteries. Like the Photon Freedom, the light intensity falls off very quickly. I think a AAA powered flashlight with good regulation or the modern keychain lights are nearly as small, significantly more useful.

    Keychain Lights

    I don’t have a lot of experience with the modern keychain lights. These are high performance replacements of the button lights. Rather than running on a coin battery the have internal batteries which are recharged via a USB port. The typically offer a range of intensities, often including super bright (>400 lumens) for brief periods of time. In the ultralight backpacking community the RovyVon Aurora A8 is popular. Moon and low well regulated. A somewhat narrow beam which is useful for navigation, though medium and high fall off pretty quickly. Useful for around camp, easy trail hiking and very brief wayfinding. The Nitecore Tiki and Tip keychain flashlights seem to be popular in the flashlight geek community.

    Bicycle Lights

    Bicycle headlights are sometime mounted on the handlebars and sometimes mounted on the helmet. I prefer the handlebars because I see shadows being cast by obstacles that I might otherwise miss if the light was coming from the same angle as my eyes. The one advantage of a helmet-lamp is that it can shine in any direction you turn your head, not just in the direction your bicycle is going.

    I believe that headlights under 200 lumens primary use is for other people to see you. I can get by on suburban streets with a 300 lumens light, but I often experienced near misses. At the speeds I ride (>15mph), I want a light with an output of least 500 lumens, with 800-1000 being a sweet spot. I certainly appreciate brighter lights, but it’s not worth the reduction in runtime or increase in size/weight. There are a number of companies that make excellent bicycles lights. I have been very happy with the lights made by Cygolite and Light and Motion. There are a number of other good manufacturers. The website bikelightdatabase.com has pretty good coverage of all the options.

    Two Fish makes several different size LockBlocks which make it easy to attach a flashlight to the handlebars of a bicycle. I have had good luck using a Zebralight SC600 and my daughter used a LockBlock with AA powered Fenix flashlight.

    The Cygolite Expilion 850 is the bike headlight I used for several years. It’s bright enough that I have time to maneuver around obstacles in my path, it’s reasonably compact and the batteries are swappable for longer rides, though you have to buy them from Cygolite due to a special case. This light was recently stolen which is why I replaced it

    Fenix BC21R has a good range of intensities with reasonable run times, powered by a removable 18500 battery so it’s easy to carry extra power when you need longer runtime than a single battery can provide and you can charge the battery outside the light enclosure. The enclosure will also charge the battery when powered via a micro-USB port inconveniently located on the underside of the light. You likely will need unclip the light from your bike when charging unlike some lights which place the charging port on the rear of the light which is easily accessed while sitting on the mounting. I found the “dual lens” a great theory, but found the more even light distribution from other lights such as the Cygolite 850 to be more useful.

    I think it’s very important to use tail lights during the day and at night time. They make bicycles significantly more visible. There are a lot of good tail lights. I don’t have a strong preference between them. I purchased the original Cygolite HotShot several years ago, and have been very pleased with it. Recently my Hotshot was stolen. I ordered a replacement from Amazon which was defective. The forth HotSpot I received finally worked… the rest were returned because they were DOA.

    Lanterns

    I don’t have recommendations  if you want a lot of light (>800 lumens). It used to be that the best option for this sort of light was fuel powered lanterns which ran on iso butane canisters on propane. These days I am sure there are good alternatives which use LED that are significantly more durable, and likely have a better light produced / weight ratio.

    If you want less than 700 lumens, there are a number of excellent LED lanterns. These lanterns are not just more durable with a better amount of light / weight compared to their fossil fuel siblings, but if you have a solar panel, you can “fuel up” during the day. My favorite options are the tiny Nitecore LA10 and the fairly compact Black Diamond Apollo which can put our 230 lumens and is powered by an internal rechargeable battery and can switch to three AA batteries if you need additional power. If you need more light, the UST 30 day lantern puts out 700 lumens, and is powered by three D batteries.

    In the old days, candle lanterns, or small oil lamps were the lightest way to provide long lasting light. There were not bright, but you could get something like 12 hours out of a 2oz candle. The candle holder would be another 4-6oz. The old candle lantern has the one advantage of providing a bit of warmth which is nice on a cold night.

    Other Information

    BPL did a State of the Market Backcountry Lighting (2025) which includes a description of their LightBench testing.

    Candle Power Forums (CPF), is one of oldest online communities devoted to flashlights and Budgetlight Forum is quite active. They have great reviews which typically include runtime graphs and beam shots. FlashlightWiki has links and information for people who are obsessed by all things flashlight like. A nice review of some ultralight lights.

    There used to be a large number of websites which specialize in high quality flashlights, headlights, and batteries. These days it seems like there are only two that are left: brightguy and battery junction.

    An interest podcast about how the cost of lighting dropped through history. Until 300 years ago, a day of labor would pay for around 10 minutes of artificial light. The development of kerosene in the 1800s raised this to 5 hours. Today, a day of labor pays for more than 20,000 hours of artificial light!!

    Low Cost

    For basic task lighting, the photon II knock-offs can be found for between $1-$3 many places.

  • Knives and Other Sharps

    Many activities benefits from having some sort of sharp object to cut things. Examples of this include food preparation, opening packaging, trimming material to cover a blister,  preparing kindling, or hacking branches to build an emergency shelter.

    My Choice

    My every day carry (EDC) knife is a Victorinox Rambler Pocket Knife which is the smallest tool I have found which has all the features I desire: a phillips head & flat screwdriver, scissors, and a sharp blade. I also get a bottle opener and nail file which are periodically useful. When flying I switch to a Swiss+Tech Utili-Key which is not as usable as the Rambler, but for years has made it through TSA checkpoints without being confiscated. When backpacking with others I bring a Benchmade Mini Bugout folding lock blade for food prep. I am no longer fishing or hunting so I don’t need to worry about prepping game/fish. When I expect to do wood craft, building fires for larger groups, or in remote back country when a knife might be required for survival I bring a Fallkniven F1. Our family go/car camping bag has a little Vicky for food prep and an original Leatherman because it has a wide array of tools which are sometimes useful: most often the pliers. In the kitchen we most often use an inexpensive Victorinox paring knife and a New West Knifeworks Santoku.

    Pocket Knife

    A “pocket” knife is one of the most used tools while camping and backpacking, but there are many different styles selected by people. Ultra-light backpackers often make do with a tiny Swiss pocket knife like the Victorinox Classic which have a small blade, scissors, a nail file, tweezers, and a toothpick. These tiny knives are more than adequate for basic “housekeeping” tasks.

    I think the best balance of features and size is the classic Camillus boy scout pocket knife and it’s cousin, the medium size Swiss knife from Victorinox which contain a can opener, bottle opener/screw driver, 1-2 blades, and maybe a few other options such as: an awe, corkscrew, and/or phillips head screwdriver.

    Alas, the tendency of bloated “more is better” led to the creation of large Swiss “pocket” knives with their 10s of tools in a package that really doesn’t fit comfortably in a pocket anymore. In general I don’t like these knives since they are expensive, bulky, and I expect I will use less than 50% of the tools. There are also the super light (and not that durable) derma safe utility razor and backknife.

    Folding Lock Blades

    Folding lock blades are often a good compromise. By locking the blade they are safer to use than typical pocket knives and are more compact than fixed blade knives. The most common locking mechanism is a liner lock. It’s cheap, but not super reliable. In recent years there are a number of locking mechanisms which are significantly stronger and easier to use such as my favorite, the the AXIS lock originally developed by Benchmade and now being used by others since the patent expired in 2016.

    I think that Benchmade is one of the best manufacturers of folding knives. If I had to purchase a general use lock blade now, my first choice would be the Benchmade Bugout. It’s not cheap, but it very well designed, made from excellent materials, with great attention to detail, and substantial enough to depend on in emergency situations. The Asher Nomad3 is reported to be a good quality copy for less money. The first lockblade I owned was an Buck 110 Hunter and later used a Ritter RSK Mk1 Knife for many years. The Chris Reeve Sebenza might be the ultimate folder, but I could never bring myself to pay so much for a pocket knife. My knife loving friends also recommend Spyderco and the higher end knives from Kershaw, SOG and Boker. Decent lock blades at a more reasonable price point are made by Buck, CRKT, Gerber, Kizer, and Kabar / Dozier. Ganzo sells a number of Benchmade clones which are 5-10x cheaper (average price $20) but but are lower quality. I have also heard the KingMax folder is an ok knife and only $12. Opinel makes a number of folding knives which have good quality carbon steel blades, adequate wooden handles, and cost around $10 making them a great value. Just be careful to dry them well or the blade will rust and the handle will swell. I generally prefer the simplicity of a single blade locking knife, but there are some multi-blade pocket knives that lock such as the Victorinox Hunter.

    For people doing a lot of cooking on the go might want to check out A.G. Russell Folding Cook Knife, the pricy Spyderco SpydieChef, or one of the ncampgear folding food prep knives. MagnaCut and LC200N are ideal for food prep because I hold a good edge and resist corrosion, but are more expensive than most other options.

    Fixed Blade

    Finally there are some people who really like fixed blade knives because of their ability to stand up to serious abuse (chopping, digging, etc). You should stick with knives with a full tang for maximum durability. Keep in mind that you don’t need a huge / heavy blade, 3-4″ is actually plenty for tasks as described in the book Bushcraft, and a short article in field&stream about The Wilderness Blade. My favorite fixed blade knife for the back country is the Fallkniven F1. This is a high quality knife that is durable and functional.

    There are a number of other high quality, reasonably light weight fix blades which are up to taking serious abuse. I don’t use them, but I have friends who like fix blades from ESEE, SOG, Survive Knives GSO 4.5, and the Benchmade 162. The classic Kabar and USAF Survival Knife are also popular, but heavier than I would want to carry.  Others have noted the the quality of the Kabar and the USAF Survival knife is much lower than the beloved knives from 1970s and before. The Chris Reeve One Piece knives like the Aviator have been very well regarded, but are now discontinued so will likely be even more expensive as they become collectors items. These knives are very well crafted, but I found that I didn’t like the round textured  metal handles. I much prefer the feel of the Fallkniven knives.  If you are around salt water a lot you might look at the Gerber Silver Trident or the titanium knives made by Mission.

    The most affordable, but decent quality fixed blades I have seen are from the Swedish maker Mora though they typically don’t have a full tang such as the Mora Companion or Bahco 2444.

    There are also a number of minimalist fixed blades which aren’t up to heavy abuse, but are reasonably priced and provide a better blade than they typical pocket knife such as the Ka-Bar BK14 Eskabar,  Ka-Bar Becker Remora, the Buck Hartsook, AG Russell Hunter Scalpel, or even an inexpensive kitchen paring knife such as the Little Vicky.

    Most sheaths provided with knives are pretty heavy. Ultimate Edge Bladesaver can be the basis of an effective and light weight sheath or you can get a nicer but more expensive custom sheath from Cleveland Kydex.

    At the minimalist extreme is the CardShark and the pricy Lynx cardblade. These knives are so light that they are easy to be damaged. While I might uses these around town, I would want something more substantial in the back country where a knife might make be critical to surviving something unexpected.

    Multi-Tools

    Growing in popularity are the multi-tools first introduced by Leatherman. These are typically fold-able piers or scissors with a number of blades hidden away in the two handles. If you expect to be repairing machinery, these are a great option since it is like having a small toolbox in small package. Of course having a single package can be an issue since you can’t hold a bolt with the pliers and use a screw driver at the same time. The Leatherman Squirt seems to be one of the more popular multi-tools among backpackers.

    Scissors

    Some people have found that all their cutting jobs are easily handled with just a small pair of scissors. Super ultralight folks tear apart the Victorinox Classic, use the scissors from the Victorinox Swiss Army Swiss Card, or use the small blunt-end kid scissors.

    Additional Information

    There are a large variety of knives in the marketplace today. Options includes basic type (pocket, fixed blade, etc), type of ground used on the blade, blade material, blade shape and craftsmanship. Doug Ritter’s Sharp Stuff page has a good discussion of knife choices with an eye on survival. You can checkout Knife ForumsBlade Forums and EDC Forum’s knives topic  to see what knife enthusiasts have to say.

    Musing about Knives

    There was a discussion on BPL about “Why bring a knife?” A couple of things I thought were noteworthy. First, that a “serious knife” was rarely needed when people are backpacking, but people typically found uses for their knives… e.g. having a knife produced reasons to use it. The second was whether high end knives where “worth it”. For some people high end knives are worth the money. Others will see them as a wasteful extravagance in the same way that some people love their Toyota Corolla while others love their Porsche. Reasons for high end knives:

    1. ease of use single handed. Knives like the Benchmade Bugout can easily opened using one hand and safely closed (love the AXIS lock).
    2. durability in the face of mistreatment / neglect. Counter-point: you could replace cheaper knives multiple times before a high end knife makes financial sense
    3. performance / characteristics such as it’s ability to hold a good edge in the face of challenging situations
    4. enjoyment of good craftsmanship. several people noted the simple act of opening and closing the knife could be joyful.

    Low Cost

    The very cheapest option is the $2.50 derma safe utility razor. You can get a YAODHAOD Ceramic Pocket knives for $8. They are sharp but ceramic blades are much easier to destroy than steel. The small Victorinox Classic can often be found for $10 and are often given away with someone’s logo on the side. If you want a larger pocket knife, it is possible to find the classic Victorinox Recruit for around $15. If you want a locking blade folder, then you should be able to pick up a Opinel folding knife for less than $15.

  • Water Treatment & Containers

    Next to staying warm, the most important survival and comfort factor is drinking an adequate amount of safe water. This often means you need to carry water and be prepared to treat water. Not all locations have a continuous supply of safe water. Failure to treat the water can result in severe illnesses which would minimally make your trip less enjoyable, and in the worse case be life threatening. Death is likely after three days without water.

    My Choice

    Every water treatment option has compromises in terms of speed, simplicity, reliability, and ease of you. Periodically I change my system because my weighting of the tradeoff changes. In the back country I typically carry a SmartWater bottle for drinking, and use a Platypus to hold dirty water which I filter through a HydraPak 28mm Filter Kit. I have a few doses of Aqua Mira or Micropur tablets as a back-up and to purify my collection water container. On group trips I use the HydraPak in-line filter between a 3L Big Zipper SL and a Platypus Water Tank as a gravity filter.

    Pro tip: many of the modern filters need the fibers to be wet to function. A day before your trip make sure they flow. If not, they will typically be good after soaking in water for an hour.

    In urban areas I tend to carry a Zojirushi Double Walled Mug because it can easily be used one handed, locks so it doesn’t open accidentally, pours at the perfect speed, the mouth is wide enough for ice cubes, and liquids stay fairly warm or cold for 24 hours.

    How Much Water?

    Knowing how much water you need is important so you have enough but don’t carry several extra pounds of unneeded water. There has been a lot of mis-information about how much water people need. Overhydration in endurance sports can result in hyponatremia. The best rules of thumb are to drink when you feel thirsty and to pay attention to when you pee. If you are peeing every hour you are drinking too much. If you can’t remember the last time you had peed, or when color of your pee is dark, you aren’t drinking enough. Also keep in mind that if you are sweating a lot you will be losing electrolytes. If you loose too many electrolytes will you start to cramp. If you are expecting high heat / activity levels bring an electrolyte supplement. I like lemon flavored powders that I can add to my water that have little or no sugar.

    I developed a sense of my water needs by repeatedly running an experiment. I would weighing myself naked, get dressed. engaged in activities at different MET intensities and temperatures (no peeing during the experiment and any consumption was measured, and accounted) for 1-4 hours, removing clothing, drying with a towel, and then weighing myself measure weight loss due to sweating / perspiration / breathing. I lost 1L every three hours when it’s 30-60F and I am moderately active (MET 3-6), around 1L for every 1.5-2 hours 60-80F, and 1L every hour when it’s more than 80F.  When >9 METs water lost was 3x my normal rate. When I gave chat-gpt the prompt “what’s the rate of water loss in humans at different MET and temperatures? How does variance of humidity effect this?” I got results compatible with my self experimentation and some added nuance.

    Water Treatment

    Water can be contaminated by biological, chemical, and radioactive components. Some would add micro plastics to this list. In most of the US and the EU the municipal water is “safe” from all contaminates, e.g. you can drink from the “tap”. There is a risk of chemical (lead) contamination in older buildings if their plumbing used lead. The only treatments which effectively remove lead are charcoal filters or reverse osmosis. The safety of water varies in other countries, often better in cities than rural locations. Chemical contamination is more likely downstream from large scale agriculture and mining which is beyond the scope of this post. In these locations it’s best to use water which is bottled / “imported” from outside the area. The rest of this post focuses on biological contaminates because that is what is the most common issue in the back country.

    In the back country of the US (streams, lakes, rivers) the the most common issues are typically larger organisms: bacteria, cysts, etc. If the water is particularly cloudy, chemical and UV treatments are are less effective with these, especially cysts and bio-films. Outside the US, you might also need to deal with even smaller organisms like viruses. A basic filter is not effective, you need a “purifier” filter. The good news is that chemical and UV are highly effective against these smaller organisms, so often people will filter and then use chemical or UV to be completely sure the water is safe. The best place to take water is from the top 1/2 inch of a lake. Constant exposure to UV light from the sun tends to purify the top layer of a fixed body of water.

    Chemical Treatments

    Chemical treatments are small, light weight, and don’t clog. First, let me suggest that you should skip to common chemical treatments of iodine and bleach. Both chemical are more effective than nothing… but both chemicals are less effective than Chlorine Dioxide water purification. I like Chlorine Dioxide because it is effective and has less of a “taste” than most other chemical water treatment. Just after treatment, the water can taste a bit like pool water just after treatment and becomes less pronounced if given a bit of time to “breath”. In clear water it’s fully effective in 30 minutes, in cloudy water everything but cysts are killed in 15 minutes, with the cysts taking up to 4 hours to neutralize. I often used Kaytadyn Micropur tablets because they are so simple. I have also used  Aqua Mira treatment drops. There are a few other chlorine dioxide based treatments tablets made by Aqua Mira, and the MSR MIOX system. The tablets from Aqua Mira and Kaytadyn have three times the chemical load of the suggested dose using Aqua Mira drops making them more effective but also having a stronger taste.

    Squeeze / “In Line” filters

    Squeeze filters have become quite popular since they filter as fast and pumps with less work. The downside is that you need a large contain to hold “dirty” water. Many companies set filters which attach to soft bladders that you squeeze to push the water through the filter.  HydraPak, Katadyn  BeFree, and Sawyers Squeeze are what I have had some experience with, but there are a number of other options these days. I have also heard some gook things about the Platypus Quick Filter. There was a post on reddit of someone who has been testing 5 different filters. Water can be moved through these filters in a variety of other ways beyond squeezing:

    • Gravity filters: originally either DIY used by backpackers or very heavy systems designed for base camps.  A number of companies now sell purpose designed gravity filters that are appropriate for backpacking including the Platypus Gravity Works,  MSR Autoflow and Katadyn Basecamp.  I like the feeder for the Platypus, but I think the clean reserve is less than ideal. The Platypus Water Tank is much better because it can sit on the ground with the opening toward the top.
    • In-line hydration: You typically had to create suction with your mouth to pull the water through. This is fine around town at lower elevations. If you are slightly out of breath after a long climb, and you are at 14k ft, having to apply sufficient suction can be very difficult. The exception to this was the The Geigerrig hydration system let you use a small hand pump to pressurize watch so it would flow through am filter and literally squirt when the activating a “bite value” allowing the filter to be “in-line” of a hydration system.
    • Straws: Sometimes built into hardside water bottles or look like large straws you stick into a water source such as those made by LifeStraw.

    Pump Filters

    Pump based water filters used to be the go-to water filter system used by backpackers. They are very well suited to situations when water hard to access, like in very shallow pools. They are effective, long lasting, and some have charcoal elements which will remove some chemicals and improve water taste. Filters tend not to catastrophically fail, but as the age they can filter 4x slower than a new filter. If you use a filter when the nights get below freezing, make sure to either fully drain your water filter, or keep it warm so it doesn’t freeze. Filters are particularly useful if you are in locations which are hot and have few sources of water. You can “camel up”, drink as much water as you can at the source so you don’t have to carry it.

    UV / Solar

    Recently, a number of products have come to market that use UV light to purify water. The most popular is the SteriPEN which is now owned by Katadyn.  The nice thing about the using UV light is it will purify reasonable clear water in something like 60 seconds. Just scoop up the water and turn on the UV source. When the water is cool and good tasting, this can be quite the treat. The downside of the UV systems are that they don’t work well with cloudy water, and the systems is prone to fail, particularly in colder conditions. It you decide to use a UV system, bring a a backup system. Most UV systems needs a wide mouth container so the typical Playtpus bladders don’t work with it.

    Solar water disinfection (SoDis) is a highly effective way to treat water in sunny locations if you aren’t on the go. Simply fill up a plastic 2 litter or smaller bottle with water, and put it in the sun. In full sunlight it will be safe to drink in 6 hours.

    Boiling Water

    Three minutes of boiling water is also highly effective went dealing with biological containments. The downside is that you might need to carry extra fuel, and in hot weather, you don’t get safe, cold water to drink.

    No Treatment?

    There is significant evidence that poor personal hygiene (e.g. not washing hands during food prep) is the most significant source of contamination in the back country, so some people don’t purify their water sources. I think this is an unnecessary risk and don’t recommend this approach. One of the early scholarly look at this was performed in 1984 about  Giardia Lamblia and Giardiasis in Sierra Nevada and a more recent study from UC Davis from 2003 seems to indicate that the water in most of the high sierras is still pretty clean.  You can read their technical article An Analysis of Wilderness Water in Kings Canyon, Sequoia, and Yosemite National Parks for Coliform and Pathologic Bacteria. Related articles include Cyst acquisition rate for Giardia lamblia in backcountry travelers to Desolation Wildereness and Evidence based Medicine in the Wilderness: The Safety of backcountry Water.

    Water Containers

    When engaged in activities away from home or the office it is good to have water readily available.

    Nalgene & Plastic Water Bottles

    Nalgene water bottles have been one of the most iconic and commonly used water bottles. This is understandable because they are nearly indestructible, don’t give beverages a “taste” like aluminum can,  and have a wide mouth which makes them easy to fill. Boiling water doesn’t melt them which make them particularly useful in the winter as hot water bottles.

    Also popular are sports bottles that are flexible enough to squeeze with sealing squirt tops which was originally popularized by cyclists. There are several companies which make insulated bottles, but I haven’t found any which can keep my drink cold or hot for more than an hour.

    Empty bottled-water containers are a cheap and lighter alternative to the classic Nalgene water bottle and are surprisingly durable. They are also a good size to hang on your shoulder strap (adventurer racer style) which gives easily access and can provide a bit of weight to counter balance your pack

    In recent years people have become concerned about polycarbonate based plastic which might pose a threat to pregnant women and young children. Nalgene now makes a number of bottles which don’t leach chemicals into water.

    Metal Containers

    Metal canteens were a commonly used water container for outdoor pursuits before plastic water bottle became available. In recent years they have been making a come-back as people are concerned about plastic leaching harmful chemicals into their drinks, a desire for containers which are ultra durable, and with the advent of the double walled vacuum container the ability to insulate.

    For modest amounts of water I think metal containers can work well, but when the amount of water exceeds 1L I believe it’s best to use lighter weight water containers.

    Some of the more popular metal water bottles include those made by  Hydro FlaskKlean Kanteen, Yeti. I am very fond of the double walled insulated water bottles made by Zojirushi. Snowpeak makes some beautiful titanium water bottles.  There was a thread on reddit with a discussion about good titanium water bottles.

    Water Bladders

    Platypus was one of the first companies to make flexible bladders designed to carry water and other beverages. The original models could be folded up into a small space when empty and were hand held with a small opening for filling and drinking.  The narrow mouth could be a problem since it was challenging to clean, dry, and in some situations fill. Since those early days a number of other companies now make flexible water containers including Vapur, Hydrapak, and MSR.

    There have been a number of innovations, largely related to the openings. Several companies have paired the soft side bladders with larger opening to make then easier to fill and clean. There is also significant cross over between  water bladders and hydration systems discussed below.

    Hydrations Systems

    Camlbak might have been the first company to make a hydration system. They combined a flexible water bladder which could be kept inside a backpack with a plastic tube and “bite” valve that allows the user to drink without using their hands.

    Several other companies including Platypus now make hydration systems. For several years I used the Platypus 3L Big Zip SL. It is light, durable, and collapsible, and competively priced.  Today, I use a pressurized system made by Geigerrig.

    Other Information

    BPL’s ultralight water treatment options,  and their older Water Quality Technologies and Trends. The most complete review I have seen, but no longer published was the US Army’s Commercially Available Water Treatment (via archive.org)  That site does have a number of resources about safe water.

    Low Cost

    If you aren’t moving much and it’s sunny, you can put the pop bottle filled with water in the sun.  The sun’s UV will kill off biological threats within 6 hours. Otherwise, Aqua Mira or boiling will be the cheapest in the short term.

  • Vapor Barriers

    In extremely cold vapor barriers can be part of an effective clothing or sleep system. According to the book Secrets of Warmth by Hal Wiess, the human body gives off moisture for three reasons: (1) as a fear response, (2) as sweat to cool us down when overheating, (3) to maintain adequate humidity (~79%?) for the skin. There is some debate in the backpacking community as to whether the insensible perspiration (aka transepidermal water loss) is directly related to keeping the skin at a fixed humidity… but there should be no question that the micro climate near the skin effects rate of transepidermal water loss. This is alluded to in numerous scientific articles such as Eero Lehmuskallio’s thesis Cold Protecting Emollients and Frostbite. [I will do a more complete literate search later… most of the article I found were about care for premature babies.].

    The most important reason to use a vapor barrier is to keep moisture out of your insulation. If you are out for more than a couple of days when the conditions are constantly below freezing, moisture from your body will condense and then freeze in your insulation. This will result in your insulating jacket getting heavier, stiffer, and be less insulating. A vapor barrier prevents this from happening.

    A vapor barrier is likely to make you feel warmer, and you will use less energy because the vapor barrier trap some moisture near your skin so you don’t need to perspire as much. BPL has a brief article on vapor barrier liners by Andrew Skurka which has expanded into his Introduction to Vapor Barriers. One of the early modern proponents of vapor barriers was  WarmLite’s Benefits of Vapor Barriers. You can see a rebuttal of some of the warmlite VB claims.

    I found vapor barriers useful on some extremely cold trips in northern Canada. When I was active, I found that vapor barriers didn’t seem to help me until the temperature was below 10F. I found that vapor barrier socks are great, pants and mittens are fair, and that shirts were useful but hard to get right.

    I found when I was inactive or sleeping vapor barriers worked very well when the temperature was 20F or lower and I was using appropriate amounts of insulation (e.g. don’t overheat or you start sweating and it doesn’t have anywhere to go).

    Very few companies make vapor barrier clothing. I would recommend checking out rhdesigns and warmlite. The cheapest way to try out vapor barriers is wear light polypro liners, with bread bags or better “roasting” mylar bags as a vapor barrier followed by wool socks (your insulation),  try some liner gloves, plastic food service worker gloves or industrial dish washing gloves over your hands and insulate your insulated gloves or mittens, and/or a plastic trashbag around your torso. If this works for you, take a look are some of the better quality materials. These days I am not doing extended winter trips and am not using vapor barriers.

  • Recommended Clothing

    I recommend clothing that can be comfortably worn day after day for a wide variety of activities while still looking good. When in the outdoors no one cares how you look, but in urban environments it can make a difference in how people treat you. When in doubt, dress up rather than down. My packing / traveling light page has a section about selecting clothing for the journey. I have a number of posts with a clothing tag that have more detailed recommends including:

    [toc]

    Versatility

    My clothing is typically made from technical fibers or merino wool which provides good mobility, light weight, fast drying, and odor/stain resistant. I use mostly the same clothing for daily urban life, travel, done in a day outdoor activities, and extended time in the backcountry. Given my mixed use, I generally constrain clothing styles and colors to be something that would be considered “business casual”, acceptable in a typical business meeting or at a nice restaurant. For example, no cargo pockets on the thigh. I use some specialized clothing when engaged in vigorous exercise because these activities benefit from more specialized clothing.

    I use my everyday “urban” clothing on trips that mix cities with the backcountry. When my backpacking trips leave and return from home my backpacking clothing tends to be hand-me-downs from daily life. When a clothing item is looking a bit too worn or stained to wear to a nice restaurant, they get relegated to my “backpacking clothing” bag. I can get more use from the old clothing in situations no one cares about apperances, and avoid excessive wear on newer items which is caused by many outdoor activities.

    Layering

    Conventional  wisdom is that you should dress in three layers: a base to manage moisture, a middle to provide insulation, and a shell to protect you from the elements such as wind and rain. In colder conditions it is common to have multiple insulation layers which can be added or removed to maintain comfort over a range of conditions.

    A slight variant of this system is to use a windshirt over the base layer. When people are engaged in high output aerobic activities the combination of high breathable base layer like the Patagonia’s Thermal Weight Capilene Hoody and a light weight unlined windshirt such as the ArcTeryx Squamish or a rain shell that has high MVTR such as those made from Gore’s Shakedry fabric can keep the wearer comfortable for a surprising range of conditions. When activity level drops or if the conditions turn harsh (significantly below freezing), insulation and/or a heavier shell can be placed over the wind shell. Softshells are the cold weather variant of a base + windshirt, providing more insulation while maintaining good breathability. Softshells work well when the wearer is highly active facing variable conditions

    Minimize Moisture Absorption

    Managing moisture is critical to comfort and safety. Heat loss when immerse water is 24 times more effective than if you are standing in still air. While a soaked garment isn’t as effective, it can chill you more than standing naked. Ideally, you want clothing to stay dry. It’s not always possible to keep clothing dry, so the best mitigation is to select clothing which minimizes water retention and dries quickly. Polyester absorbs the least water, followed by nylon (which is a bit more durable) and then wool which has the bonus of resisting odor. There are a variety of wools including sheep (merino particularly nice, icelandic warm), goat (cashmere – luxury but very fragile), alpaca (warmest/weight), and possum (found in AU and NZ). Cotton is an inappropriate material for highly variable conditions.  Cotton can absorb more than four times of its weight in water and can take five times as long to dry as some synthetics! Silk, Rayon, and a host of other fabrics are better than cotton but not great. I have more on the page Water Retention In Clothing.

    A nice side effect of quick drying clothing is that on extended trips in the back country or when you are adventure traveling you can wash your clothing in the sink or river and be able to wear them almost immediately. This reduces the amount of clothing you need to carry without being grubby or smelly. All of my clothing normally dry overnight if spun dry or squeezed with a towel after washing. The exception is when it’s >90% humidity and <65F… some items are slightly damp after 7 hours.

    Select the Right Amount of Insulation

    There are four things which effect how warm you feel: your base metabolism (do you run “hot” or “cold”), the environmental conditions you are experiencing (temperature and wind), the amount of insulation you are wearing, and your activity level! Richard Nisley posted a wonderful graph illustrates how these factors are inter-related as does his revised paradigm for estimating garment comfort limits.  I found Richard’s graph very helpful in selecting the right set of garments for a trip or event. My caveat is that I seem to require around 1/2 the insulation Richard recommends except when I sleep. When your activity varies so does the amount of insulation you need. You want to avoid wearing clothing which is too warm. Most people take 10-20 minutes to “warm up” from their activity. If you are going to be highly active like going for a run or an uphill hike, you want to wear clothing that will be comfortable once you are “warmed up”. Either you need to plan to remove a layer after a short bit, or be prepared to be chilled / cool at the beginning. When engaged in multi-day activities like wilderness backpacking I often bring insulate which is warm enough for “light activities” in the evening, but does not keep me warm enough in the middle of the night. I will often eat “dinner” early and then hike at a moderate (no sweating) pace until dark and then immediately get under my quilt. In the morning I immediately start hiking and eat breakfast once it warms up a bit. This means I need clothing that are much less insulating than something that would keep me comfortable when sitting around at the coldest time in the day. I have also found Richard’s graph is a great reminder that besides adding or removing clothing layers, a highly effective way to maintain a comfortable temperature range during the day is by altering activity level.

    Know How Much Durability is Needed

    People are often concerned about the durability of clothing that will be worn in the back country or for an extended period of time while traveling. Many manufacturers encourage people’s fear and sell seriously overbuilt clothing, often  labeled “Expedition Proven” or some such thing. The truth is, very few people, even those on expeditions, need clothing that is so overbuilt. Unless you are facing continuous hard-wearing conditions, lighter weight clothing will have close to the same lifetime as the over-built clothing. There are many advantages to selecting items which aren’t overbuilt: you save weight, save space, often get better performance and spend less money. It is possible to go so light that durability is effected. Several manufacturers make clothing which is aimed at extreme athletics looking for the lightest weight performance, which comes at the expense of durability.

    How “Dressy”?

    In the outdoors, no one cares about what your clothing looks like. Function, not form or style matters way more. Stains are often a badge of honor indicating you actually got “out there”. When we come back to urban environments you will often be judged by the clothing you wear. Clothing covered in dirt, stains, or holes (that weren’t fashionably applied) often results in the wearer being treated less well than they would if they were “dressed up”. It’s useful to have some clean clothing, or be able to clean your outdoor clothing before engaging with “polite society”. To some extent, people who are considered particularly attractive or powerful/high status can “get away” with more casual clothing. You can almost never be too dressed up, but you can easily be not dressed up enough.

    There are many areas in the US and SEA where clothing can be very casual: sandals, shorts and a tee-shirt are normal and acceptable for both men and women, and won’t get a second look in sophisticated restaurants and important event. On the other hand, there are many places where this sort of attire would be perceived as inappropriate if not disrespectful. It’s important to know what are the expectations of the environments you are in. For example, in some locations, men don’t wear shorts, only boy do this.

    It used to be that in nicer venues men were expected to wear closed toe leather shoes, nice slacks and a blazer, women nice shoes or sandals, a nice skirt / blouse or dress. Venues / events which have higher expectations explicitly state their requirements: semi-formal, formal, black tie, etc. Since COVID I have noted that in most situations men and women can get away with a loose business casual.

    Men can be as informal as clean running shoes, nice jeans or slacks (but not joggers), and a button up shirt. Some places a polo shirt is ok, but personally I won’t “risk it”, and I find button down shirts more versatile. I love these evolving standards because well styled high performance clothing appropriate for outdoor adventures are also acceptable for more urban activities.

    Standards in many place have also loosen for women. Nice sandals or shoes, attractive slacks or skirt, and a nice top. I am not specifying top… women seem better than men at understanding what looks nice. My wife has found a sleeveless hiking dress which can optionally be combined with a blouse works really well. In some countries, especially when a distance from “international class” cities, women are expected to be “modest”. This means wear skirts or dresses which go below the knee and tops that at least cover the shoulders. Women not so clothed are assumed to be prostitutes or “loose” and could find themselves harassed by locals.  In many Muslim countries women are expected to keep their heads covered with a scarf or a hat.

    In cooler weather, a nice sweater is often perceived as being more dressy than wearing a shirt covered by an outdoor jacket / fleece. A blazer is better still. I recommend suits and blazers made from super 140 wool and for people who travel a lot, or the clothing from Bluffworks. Recently the “Chore Jacket” has become fashionable alternative to a blazer, though I don’t really “get it”.

    Price / Performance “Tiers”

    My experience is that clothing (and most other products) comes in a number of “tiers”. Generally they go up in performance and cost. In my experience “value” products are the best products in terms of number of uses / cost. Generally the ratio of performance / cost starts to go exponential as you approach “the best” performance. With expensive products I generally look for the “knee of the curve”, were I am getting the best performance before the prices start to raise exponentially. Often the price difference between cheap and best clothing is small enough for me on an absolute scale, that I am willing to go for “the best”.

    • Fast Fashion: All about the “style” TODAY and quickly becomes dated. Cheap (almost disposable) fabric, poor workmanship. Great if you want something that looks like the cool kids and will be worn out by the time the new style comes out. H&M, Zara, Shein, Boohoo, etc. Bad for the planet and the workers. I never buy these.
    • Value: Typically use classic style, decent material, decent workmanship maximizing performance/price. In the 1980s this was Land’s End and L.L. Bean. These days I think of Muji, Uniqlo, Kirkland brand at Costco, Everlane, maybe Old Navy. This is what I historically purchased and still do if I am going to put excessive wear on the item.
    • Name Brand: Clothing that used to be good quality materials, good workmanship, that are designed for a specific application, performance characteristic, and are stylish. The first company that comes to my mind is Nike but there are many. I rarely see an advantage of name brand these days. It used to be it guaranteed better quality than value priced items, but that is not alway true now. A lot of name brands attach their logo to clothing which doesn’t have the same quality are their core / original productions… especially items sold at “factory outlets”.
    • Top Performance: Clothing that uses top materials, excellent workmanship, and great design. When you put it on it just feels right and the garment feels tailored to move with you. The seams are a thing of beauty. Often uses innovated techniques. Many products from Arcteryx exemplify this level of clothing. I often find there are numerous little details that they pay attention to that other companies don’t. Taken together it elevates a piece of clothing from something that gets the job done to something I love every time I pull it out. I am lucky enough to be able to afford these items when I really care.
    • Luxury: The logo makes the item cost >5x what any normal company would charge for an equivalent product of the same quality. Prada, etc. I never purchase these for myself nor would I normal wear them.

    My Choice

    I go into greater detail in each of the above posts and in my personal gear page, but a quick summary of my clothing:

    • Icebreaker Anatomica Tee-Shirt (Merino Wool). Comfortable wide range of temps. UPF 20-30. Dries overnight. Very odor resistant. Adequately durable.
    • OR Astroman Button Up. UPF50+ shirt that is reasonable comfortable in hot weather, keeps bugs from biting me, and looks like a dress shirt when under a jacket. A jack of all trades, master of none.
    • Outlier AMB Merino Wool Button-up. ~UPF30, resists wrinkles, looks like a traditional dress shirt, very comfortable, dries overnight.
    • Icebreaker Anatomica Briefs. Most comfortable briefs I have found.
    • Outdoor Research Ferrosi Transit Pants: Decent looking pants made from nylon but don’t have that “swish” of some technical fabrics. Durable, reasonable fast drying. Can wear with a sport jacket or on the trail.
    • Xoskin Toes Socks: No blisters!
    • Smartwool Socks: Durable, Comfortable
    • Luna Sandals: Light, comfortable, durable. What I would wear all the time if I could get away with it.
    • Inov-8 Trailfly G 270 Trail runners in all black: when the route is too technical for the Luna or when I have to wear close toed shoes. I get 1500 miles / pair, about triple most trail runners. Has been accepted in 3-star Michelin restaurants and at many dressy events.

    Outerwear

    • Macpac Nitro Hoody (Polartec Alpha Direct) Comfortable in a huge range of conditions depending on how much you block air movement. Dries super quickly. Reasonable warmth/weight ratio. Reasonably compressible. If never going into backcountry would likely replace with a cashmere sweater which is more dressy looking.
    • Gore Shakedry shell. Most breathable waterproof material I have used. Doesn’t wet out in long rains. Can double as a wind shell.
    • Montbell Plasma 1000 Vest (Down) Light and compact insulation for core.
    • Patagonia Micro Puff Hoody Jacket. Keeps me comfortable 25F lower than whatever clothing I am wearing. Typically layered over other clothing when in sub-freezing conditions.

    Exercise

    When engaged in vigorous physical activity (running, bicycling, fastpacking, etc) items are part of my mix

    • De Soto Mobius Tri Shorts or XoSkin Compression Shorts + Sun Protection Leg Sleeves: reasonably comfortable when wet, minimized chafing, pockets on the thighs and hips which keep things from bouncing when running.
    • Xenith Delta Tee + sun protection arm sleeves. Dries perfect speed to help keep me cool. Very good odor control for a synthetic. Doesn’t bind when soaked.
    • Black Diamond Alpine Start Jacket. CPM somewhere between 40-60 making is perfect for high output activities. NanoSphere treatment makes it quite water resistant. One of the highest MVTR measured in a wind shell.

    Additional Thoughts

    Ryan Jordan’s The Dirt Catwalk: Modern Layering, and Andrew Skurka’s Core Backpacking Clothing are proven and field tested examples of clothing systems for a wide range of conditions. Understanding Layering Using Patagonia as A Guide by Nick Gatel is insightful and a bit of a history lesson. Keith Conover is an MD at University of Pittsburgh Department Emergency Medicine who has devoted several decades to search and rescue in the Appalachians. Keith has regularly updated his Clothing Materials page since 2000 and also has usefulcontent in chapter 4 of his Search and Rescue Handbook which covers clothing and other equipment. Richard Nisley’s article A Revised Paradigm For Estimating Garment Comfort Limits provides an in-depth model for evaluating clothing.  I would also recommend checking out the somewhat dated articles Andy Kirkpatrick’s (aka pyschovertical)  The Art of Not Suffering (2008) and BPL Clothing (and Sleep) System for Mountain Hiking (2001). I would also look at the the various BPL forum posts by Richard Nisley and Steven Seeber. There have been some wonderful research done at the institutes housed U.S. Army Natick Soldier Systems Center (NSSC). Alas, finding their publications is harder today than it was in the early 2000s. DeputySean’s Guide to Summer Wear is an opinionated set of recommendations for good sun protection for hiking in summer alpine conditions. Frank Revelo’s clothing theory, clothing rejected, and clothing current is a an interesting take… very appropriate for the treks he takes.

    I wonder if clothing which makes use of graphene such as graphene-x and vollebak could be a game changer… but for now I am highly skeptical. I am unlikely to spend my own money to test it out given I think it’s just hype. The only real user review I found was not exactly positive.

    I am just starting to learn more about sun protection. A good starting paper about properties that impact the protection of fabrics.

    My Stay warm notes might provide some insight into clothing choices.  Finally, I would recommend the tips in winter running for people who engage is very high energy activities in cold weather. See my others posts with clothing tag for specific recommendations.

    There is some very sophisticated science being applied to clothing material. Examples include Schoeller’s nanospheres which virtually clean itself, a treatment from Avelana and Roudiere which is first being applied to wool which has some thermoregulation properties much like Outlast, several Japanese companies are making garments that generate heat when they get wet, materials which are normally soft but stiffed to provide protection during an impact developed by d3o, and clothing as a battery. Some folks are claiming that high concentrations of some metals speeds recovery time which I am somewhat skeptical of. There is also a trend toward mixing different materials using tools like thermal mapping to guide the level of insulation, moisture transfer characteristics, etc to different parts of the body. There was an interesting article comparing Sir Hillary’s Clothing on Everest to what we wear today. While this comparison is interesting, his system wouldn’t fair as well against a more careful selection of modern clothing. There was an interesting thread about Clothing Science and Folklore on backpacking.net. There is a classic article called General Principles Governing vSelection of Clothing for Cold Climates by Paul Siple of the U.S. Army from 1951 which provides useful background information. Many of Richard Nisley’s postings on BPL are filled with useful, science based information.FabricLink has a decent index of high performance materials and Keith Conover wrote up his experiences with different clothing materials. The US military has spent a lot of time and money working on clothing materials. You also might be interested to look at a discussion about the performance characteristics of the new protective combat uniform and a review of the PCU.

    Low Cost

    Performant clothing doesn’t have to be expense. Most of my pages identify reasonably priced options. If I was asked to build a modestly priced wardrobe to handle a wide ranges of conditions I would recommend:

    • Trail running shoes (all black)
    • Costco Merino Wool Socks (6) $22
    • 32 degree mesh boxer briefs (6) $25
    • 32 degree airmesh tees (4) $20
    • Nylon or Polyester Hiking Pants (2) – $25/pair at Costco, Sierra, etc
    • Long Sleeve Nylon Button Up Shirt – $45 from Sierra
    • 100wt Fleece – $25
    • Down Puffy – <$80 Uniqlo, Costco, Decathlon, Sierra
    • Either a light rain shell with pit zips or a wind breaker + poncho – <$100
  • Tarp-tents and Other Ultralight Shelters

    Today  there is a wide range of ultralight shelters including traditionally designed tents using exotic materials to move them into the ultralight weight classification. Many of the ultralight shelter designs came from people’s experiences on long thru hikes combined with a desire to find the lightest possible shelter while still providing adequate protection. I think the sweet-spot value sweet spot are single wall tarptents made from SilPoly. You can save weight by upgrading to a shelter made from DCF. A big advantage of SilPoly and DCF over the classic SilNylon is the lack of stretch so you don’t have to constantly re-tighten the shelter to maintain a taut pitch. These single wall shelters are extremely light weight, and when well designed can handle severe weather, and provides a bug free space which enables me (and I expect others) to have a more restful night. There are a number of other types of shelters, one of which might be better for you. See fitmytent.com to see how interior space of different shelters compare to each other.

    My Choice

    I use a Durston x-mid pro2 which is light enough for solo use and large enough for trips with my wife or a friend. Stable enough for 3+ seasons, can be opened up for decent ventilation in warmer weather, and easy to pitch if you use a few tricks. I now also have a Gossamer Gear Whisper shelter for solo trips when I want to minimize my load.

    Quick Recommendations

    I can’t recommend one shelter as being the “best”. Giving equal weighting to the weight, usable size (See Andrew’s article about calculation usable space and the related space spreadsheet), small footprint, ease / speed of pitch, bug protection, survive high winds, rain protection, and ventilation, there is no clear winner. Add price and the field flattens even more. Depending on how you weight these issues will result in a different shelter being “the best”. Here are my favorite:

    • Durston X-Mid2 Pro 20oz, $639, A two person, hiking pole shelter. Plenty of room for two. Likely can handle light 4-season weather (not extreme snow), easy to pitch.
    • MLD SoloMid (or DuoMid) XL with inner bug-netting which can be thought of as a “some assembly required” tarp-tent. Doesn’t do anything perfectly, but can handle just about any conditions you might encounter.
    • Six Moon Designs Gatewood Cape $135, 10oz, combined with the Serenity NetTent $125, 12oz provides shelter, rain gear and pack cover in a versatile package. There are better shelters and better rain gear but this is a great system for some people. I find it a tad too small for my taste, but it is workable and beloved by many.
    • Tarptent Notch Li solo 20oz, $599 provides a very usable space which is more storm worthy than ZPacks shelters and feel more roomy that the SoloMid.  Inner tent is small but useable and can be set up after the outer tent is up. A good first look review of the Notch Li. Need room for two? Check out the Stratospire Li.
    • HMG Mid-1 solo 16.8oz, $599. One person pyramid with integrated bug netting and floor. A number of extra tie-outs for want facing more severe weather. Sets up with a single pole.

    Limitations of Tarp-tents

    Tarp-tents are ideal when facing moderate weather conditions combined with a desire for a bug free space. There are shelters that provide more protection, or are lighter weight, but few that will match a tarptent’s overall performance. There are a number of situations that I think there are better shelters:

    • Extreme Conditions.  Most of these shelters don’t handle extreme conditions well.  What’s extreme?  For me, winds consistently above 35 mph, standing water, or real snowfall. A little snow isn’t a problem, but when there is enough to pile up and get blown in to the shelter most ultralight designs just aren’t appropriate with a possible exception of pyramid tarps.
    • People who can’t control their movement and therefore need something to keep them from repeatedly rubbing against the condensations on the shelter walls. This is often a problem with kids.
    • People that can’t be gentle with gear, or who are extremely accident prone… e.g. will fall on top of their shelter several times due to coordination issues or carelessness.

    Managing Condensation

    People are often concerned about condensation in single walled shelters which most ultralight shelters are. My experience is condensation is not a big issue in well designed ultra light shelters which have adequate ventilation and reasonably steep sidewalls. Those made from Dyneema (formally called cuben) seem to have less issues with condensation.

    Pretty much any night that the temperature drops significantly you will get some condensation (in the worse cases a fair bit), but so long as you don’t repeatedly brush against the walls the water won’t be a significant issue. In heavy winds or rains some water will shake off, but most will stay on the walls, or roll down to the edge without falling on you. The worse condensation will be nights were you have cold rain which cools your shelter, but the ground under the shelter is warm so ground moisture condenses on the shelters walls/roof. In the morning you wipe the inside of the shelter down with a bandana or pack towel and you are fine.

    Some people perspire significantly more than others and might find that they will have more condensation that others using the same shelter, in the same conditions. Obviously two people will generate more moisture than one person.

    SMD has a nice article about Getting the Most from your Ultralight tent. BPL’s single wall shelters and condensation has useful information.

    Floors

    Floors in ultra light shelters can be convenient, specially for people new to ultra light shelters or when you really need your shelter to be sealed against bugs or other crawling creatures, but they are rarely adequate if you are facing standing water which can’t be avoid in some locations (like the flat midwest during a thunderstorm). There was a nice posting by Ron Moak about the limitations of ultralight bathtub floors.

    Tarp Systems

    A close relative of the ultralight shelter / tarp tent are flat tarps combined with “netting” tents, and  shaped tarps combined with optional bug netting and/or floors. While these shelters weight more than an similarly size ultralight shelter, they have a couple of advantages. The first is that the bug netting can be pitched separating from the tarp which is great when there are bugs and good weather. Secondly with the floor separate from the canopy it’s easy to replace a damaged floor, you can pack your “dirty floor” separately, and most importantly, it’s easily to manage wet unless there is standing water. When it’s raining hard you can go strait into your shelter and close the door. Sort of like a vestibule, but larger. The excess water can typically be absorbed by the the ground. Finally, most shaped tarps are more storm worthy than most tarp-tents, especially when facing heavy winds.

    Ultralight Solo for the Sierras

    I used the original Zpacks Hexamid for many years. I found it nearly ideal for three season trips in the Sierras. It provide adequate protection from weather, a bug free, for just over 8oz. The only downside for me was the entry was lower than ideal (28″). When I decided to purchase new solo shelter, the Hexamid was no longer made and began to look something like the hexamid. I like the design and taut pitch of the Meadow Physics Abode but the entry was even lower. If I was better at sewing I would made a montmolar shelter. In the end, I purchased a Gossamer Gear Whisper shelter. It’s light, easy access, plenty of room, with protection from flying insects. I like that it has no floor which makes managing in the rain easier than an integrated floor. Other good options are the Zpacks Plex Solo, Durston X-Mid Pro1, and HMG Mid-1. If I didn’t need bug protections I would have go with the OG MLD SoloMid or consider the minimalist Ounce Designs.

    Other Options

    I don’t track the market these days. I would recommend look at BPL Editor’s Recommendations, The Trek’s Best Shelters, or Adventure Allan‘s shelter gear guides.

    Some ultralight shelters I have used, are still made and worth a look:

    • Gossamer Gear The One: 21oz, $299. A single person shelter with plenty of  room for me that’s fairly easy to use. I used the first version for a couple of years. I had troubles getting a really taut pitch. The current model has been updated and I understand pitches better.
    • LightHeart Gear shelters. I wrote up my experiences with a Solo+Awning.   A diamond shaped floor that makes use of two hiking poles. This shelter provides a double walled solo shelter with a lot of room, good views when the fly is pulled back, good insect protection, and decent weather protection.There are some good discussions at lightheart@whiteblaze and lightheart@bpl.  I wouldn’t trust this shelter in high winds, but in places that have some wind protection it would be very nice. This shelter is very similar to the Wanderlust Nomad.
    • Tarptent Double Rainbow (DR): ~32sq ft + 20 sq ft vestibules, 40oz, $299. Very usable shelter for two that weighs less than 2.5lbs. The design keeps netting between you and the sil-nylon which might accumulate condensation virtually eliminated the danger of getting condensation on your sleeping bag. Adequate living space for two 6ft people, though the top is narrower than the floor so you have to be a bit careful not to bump the sides near the top of the shelter. Typically purchased with a bathtub style floor which can be relaxed for better ventilation. There are a pair of high vents which are slightly helpful with the vestibules are closed. The DR can be pitched free starting if you have a pair of long hiking poles or it can be staked down (what I did most of the time). Double vestibules have a fabric extender which lets you turn them into rain porches. If you expect to face strong winds get wind stabilizer anchors added. Can be pitched in under 4 minutes.  The DR, especially if you add extra guy points can survive surprised harsh conditions as described in this thread about Tarptent Double Rainbow in strong winds. I am comfortable using the DR in anything but a real snowfall.
    • Tarptents has a number of other shelters which are attractive and well designed shelters.
    • Six Moon Designs makes a number of ultralight tarp-tents. My favorite is the Skyscape which stands up to wind better than the Lightheart Solo. I found it fairly easy to set up and provides a comfortable living space. On paper Six Moon Designs shelters are nice, but for whatever reason I never used one of their shelters for more than a few trips.  If they bring back the 16oz Dyneema version of the Skyscape, I would be very tempted.
    • Warmlite was the first tunnel tent (1958? – history link) made of light weight Sil-Nylon. IMHO it was decades before there were commercial tents that matched the weight / performance. I haven’t used one of these tents since then early 2000s. They are pricy compared to the above shelters, but some people might fine them useful.

    Historical

    BPL’s Single Wall Tents: State of the Market gives a nice summary of the options in 2008. They also did a Floorless Shelter Review and  Single Wall Tents & Shelters Review in 2004. There are some shelters I thought worth noting which are no longer made.

    • Tarptent Squall: One of the lightest 2-person shelter of it’s day: 23oz for a floorless shelter with flying bug protection, 30oz with a sewn in floor. I found the Squall Classic to be one of the fastest shelters to set up. It had simple but elegant design with beautiful lines. Plenty of room for two people sleeping, but only one can sit up at a time. Later, Gossamer Gear Squall Classic made a spinnaker cloth version. This saved weight, but didn’t pitch as well due to the lack of stretch of the spinnaker material.
    • MSR Missing Link : lots of room for two people in this 37sq ft shelter + a huge overhang. But this weights more than 3lbs (1lb more than most of the other ultra-light shelters). There are some people who have a fondness for this shelter, but I was disappointed in it’s performance in any sort of storm. I never owned this shelter, but have been on several outings where the people with me were using a Missing Link and had problems.
    • Six Moon Designs Europa: A light weight, single walled tent for two people (36oz). This hybrid shelter has most of the advantages of a double walled shelter at the weight of a single walled tent. It is natural for me to compare this shelter to my favorite, the Squall2. Advantages for the Europa are slightly better ventilation, it’s a bit easier to keep dry during a rain storm and it is less likely for you to brush against condensation on the body of the shelter. I found that the Europa is a bit harder to get a good pitch, doesn’t pitch as taut, and therefore isn’t as good in high winds. The Europa has more square footage, but doesn’t have sidewalls that are as steep or as much headroom of the Squall2. There was a nice review comparing the squall2 and six moon designs europa.
    • Wanderlust made a number of light weight shelters that were loved by their owners. Alas, this cottage business got overwhelmed seemed to stop doing business in 2003. If you want a Wanderlust shelter, check out Lightheart Gear which has a very similar design.

    Budget Options

    There are several Chinese companies which makes clones of US based cottage designs such as 3fulgear which are often very affordable through aliexpress. I have no personal experience but see them referenced on /r/ultralight with generally favorable comments.