The post was corrupted and I haven’t been able to find a good archive of it. I pulled some text in from another page in May 2025 as a starting point, but this really needs a complete rewrite, updated references, and some corrections. I have run many tests, several of them better constructed since first posting this. I need to find that data and include it here. Maybe this will happen sometime before the end of 2025 🙂
Managing moisture is critical to comfort and safety. Heat loss when immerse water is 24 times more effective than if you are standing in still air. While a soaked garment isn’t as effective, it can chill you more than standing naked. Ideally, you want clothing to stay dry. It’s not always possible to keep clothing dry, so the best mitigation is to select clothing which minimizes water retention and dries quickly.
Polyester absorbs the least water, followed by nylon (which is a bit more durable) and then wool which has the bonus of resisting odor. There are a variety of wools including sheep (merino particularly nice, icelandic warm), goat (cashmere – luxury but very fragile), alpaca (warmest/weight), and possum (found in AU and NZ). Cotton is an inappropriate material for highly variable conditions. Cotton can absorb more than four times of its weight in water and can take five times as long to dry as some synthetics! Silk, Rayon, and a host of other fabrics are better than cotton but not great. The article why cotton kills explores this topic in more detail. There are several treatments that can be applied to these materials which make them even better at resisting water absorption such as Schoeller’s nanospheres.
A nice side effect of quick drying clothing is that on extended trips in the back country or when you are adventure traveling you can wash your clothing in the sink or river and be able to wear them almost immediately. This reduces the amount of clothing you need to carry without being grubby or smelly. All of my clothing normally dry overnight if spun dry or squeezed with a towel after washing. The exception is when it’s >90% humidity and <65F… some items are slightly damp after 7 hours, most most are completely dry (e.g. not even 1gram of extra weight from the water).
My experience is that water retention (called regain in the industry) is driven by three inter-related issues. The base material, the fiber (how the material is assembled into fabric), and the thickness of the fabric. For example, even though nylon absorbs 2x more water than polyester, a thin nylon woven shirt (like light weight supplex) can have the same water retention / drying properties as a knit polyster base. See the BPL thread about water absorption in textiles and look for posts by Stephen Seeber, especially is “By the Numbers” posts.
Over the years I have read people talk about how much water various materials absorb. Most of the time the numbers seemed low, so I ran some simple tests to determine how much water was absorbed by various garments that I use (which is a combination of material, fiber, and weight/thickness). Alas, I have misplaced the spreadsheet with all the results. So the following data is (1) possibly wrong because I don’t have a great memory (2) wasn’t super rigorous (3) wasn’t a pure apples to apples test. I didn’t use the same weight for each material. Rather I used the shirts I owned. The specific shirts I remember included:
Polyester: light weight powerdry Polypro: light weight base layer (20 years old or so) Cotton: Haines beefy-tee with a logo from my work supplex nylon: RailRider Eco Mesh wool: smartwool light weight tee rayon: aloha button up shirt bluesmith hydrophobic shirt (polyester+nanospheres)
First Test: Weight the garment, submerged it under water and kneaded it, pull it out dripping wet, weight it, squeeze everything out I could get out, weight again, wear for 30 minutes, weight again. Something that was pretty surprising is that when I did this test, the dripping weight was much higher than I expected. with the exception of the bluesmith shirt which was only 1.2x, nearly everything was at least 2x, wool being 3x, cotton 4x, and rayon 5x. After 30 minutes of wear, the figure were something like bluesmith 1.05x, polypro 1.2x, supplex 1.3x, polyester 1.3x, wool 2x, cotton was 2.5x. Not as large a difference as I would have expected.
Second Test: I concluded that the kneading the item fully submerged wasn’t a good test. It was most likely measuring void space in the garment and how easy a super saturated garment would release moisture rather than what it would absorb so I tried what I though was a more “reasonable” simulation. The real life situation I was wondering about was what would happen to my base layer after my windshirt fully wet out… how much water would be absorbed and how quickly would it dry out. The second experiment’s steps were:
Weight the garment
Placed it on top of a sink filled with water
Briefly pressed it into the water repeatably for 30 minutes
Shake item. Weight
Squeeze. Wear 30 minutes. Weight
When I did this the number were significantly different. Polypro and polyester were less than 1.1x gain after the shake, and more or less completely dry after 30 minutes. Nylon was 2x gain after the shake, and about 1.1x weight after 30 minutes. Wool and acrylic were something like 2.5x after shake, and around 2x after 30 minutes. Cotton was 4x after the shake, 2.5x after the squeeze, and 2.4x after 30 minutes of wear. I am pretty hazy on the acrylic and rayon. My memory was the acrylic was around wool, and the rayon was worse than cotton after the squeeze, but had already surpassed cotton after 30 minutes of wearing. After one hour of wearing I hung the clothing in a location that the temp ranged between 45-50F with a relative humidity of approx 70%. Eight hours later then cotton shirt still felt wet. The wool was still damp, but reasonably comfortable.Everythng else was comfortably dry.
My personal conclusions were the that polyster / polypro didn’t absorb a lot of water. Supplex absorbed more, but was sufficiently thin without voids so it dried quickly. I was unimpressed with wool. Cotton really sucks because not only does it suck up the water, but it didn’t want to let go. This more or less matched my experience in the field.
The backpackinglight.com folks did a more rigorous field test: comfort moisture transport in wool and synthetic clothing. They found that wool took 50% longer to dry than polyester. My personal experience was that it takes longer than that, but we were using different fabrics and fabric weights than what I was using, and I believe invested more effort into having a true apples to apples comparision,
The hike from Big Sur Station to Hot Springs is a 20 mile in and back trip. Sykes Hot Springs is one of my favorite places to take first time backpackers who are reasonably fit. The destination has a natural hot springs and a trout filled stream. The hike is pretty. The trip is long enough that people have a sense they have accomplished something, but short enough that it’s not overwhelming for many. The trail is easy enough to follow that no maps are needed and there is little to no risk of getting lost. There are a number of clear milestones, so people can easily see that they are making progress. The conditions tend to be moderate year round so there is never a bad time to go. Sykes is only a two hour drive from the bay area, so it can easily be done in a 24 hour period, though some people like to take several days by the hot springs and/or the river. For people who are fit, It’s also doable as a day hike. The only down side is that you aren’t going to find solitude, except maybe Tue-Thu in the middle of the winter.
Current Conditions
In Aug 2022 the trail from both Big Sur Station and China Camp were open and easy to navigation with minimal deadfall. Kudos to the the trail workers who repairs the trails which have been closed for several years due to fire and flood damage. As always, check current conditions before planning a trip via Pine Crest Trail Conditions. If you have an a satellite communication device like Garmin’s InReach you can send Sykes coordinates “36.25,-121.69” to 765-553-4737 (aka trailinfo.org) and get status of any fires within 50 miles.
Hike Description
This trip is into the Ventana Wilderness near Big Sur. The hike is ten mile each way. The hike starts at 400 ft elevation and hits a maximum of 1500 ft, but over the course of the hike you will climb approximately 3000 ft and descended 2000 ft. Craig suggested this should be called the elevator trail since it kept going up and down. The destination campsite has hot springs and a stream. There are a number of other campsites along the way. The Pine Ridge Trail mostly weaves through a cover of redwoods, pine and oak. The trail is typically well maintained and extremely easy to follow. In the winter months, especially after a storm, you might find dead fall, or short sections of trail washed out… but these tend to be repaired reasonably quickly. April – October the trail is typically clear.
Someone in decent shape should be able to hike in in around five hours, and come out in around four.. this is an enjoyable pace for me. Even out of shape, middle aged men can do this hike in less than seven hours, unless they have bad blisters, in which case it might take something like eight or nine hours. I am not the fastest hiker, and I have done the hike 4 hour in, 3 hour out. If you want to witness people going quickly, stop by the day before The Big Sur International Marathon and get passed by people “warming up” on their way up and down.
Part 1: Getting past the campsites
The trail head is at the far end of the parking lot of the Big Sur Forest Service Station. There is a small kiosk and a drinking fountain. Today you walk around 1000 ft and then the trail drops to the campground below. You will walk through the camp area until just after spot #31 at which point the Pine Ridge Trail leaves the campground and rejoins the original trail. The trail used to run on the ridge.
Part 2: Up and into the Hills
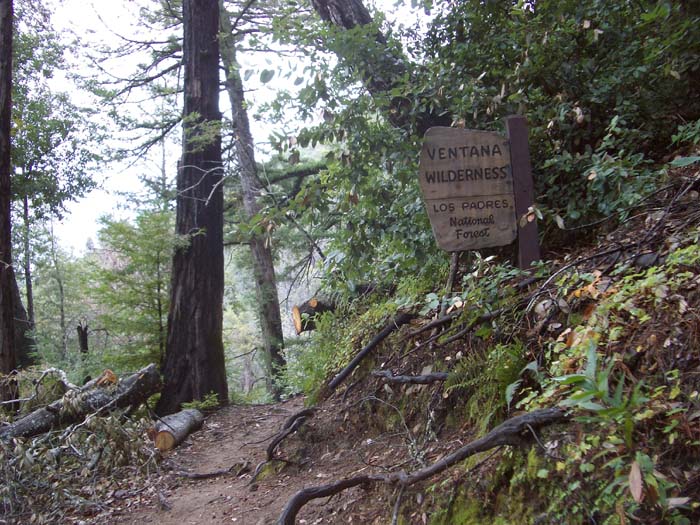
The next 2.5 miles of the trail are up hill, taking you away from the ocean. Around 40% of this section is on exposed hills which can heat up in the spring and summer sun, but you will can get a nice view of the ocean in some of the clearings. You will start up a series of small switch backs as the trails gets increasingly steep. Around 1 miles in, you will break out of the trees and start the uphill in earnest. For the next mile the trail will be ascending almost continuously, with some short sections being quite steep. This is one of the hardest up hill sections of the trail. The sign indicating you have entered Ventana Wilderness is at the 2 mile marker.
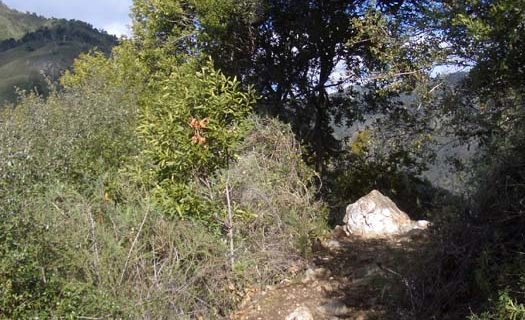
The next mile will trend upward, but there will be sections which are flat or downhill as you cut across the hillside. Around 2.8 miles in you will find yourself on a sort of outcropping with a large rock on your left. It’s time to celebrate because this is the end of the up hill climb you have been doing for the last 1-2 hours. This is a very popular place to stop and enjoy the last view you will have of the coast. Some people like to have a snack or lunch at this spot. I like to take a very short break here to drink a bit of water and then continue on to Terrance Camp.
Part 3: Cruising Down to the Streams
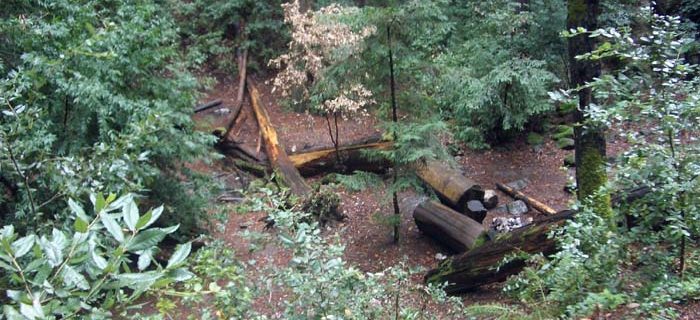
The next four miles are much easier than the first three with only a few hills to climb. The trail is mostly a gentle drop. Most of this section of the trail weaves in and out pretty micro canyons. At the three mile mark is a trail on the left which goes down hill to Ventana camp. [Sometimes the sign is missing.] At the five mile mark you will come to Terrace camp, a lovely place to stop. The area is nicely shaded with a stream for water.
The stream can be easily crossed using stepping stones. Just passed the creek you can go left or right. Left is continuation of the Pine Ridge Trail which will take you to Sykes camp. To the right the trail takes you Outlaw camp. There is a a pit toilet just up the trail toward Outlaw camp. The trail has a slight climb as you exit Terrance camp. Around 6.5 miles in you will start down a series of moderate switch backs which take you to the next creek you need to cross. Much of the year it is possible to cross this creek without getting your feet wet if you are careful. The best place to cross is typically slightly upstream where there is a large fallen log. When the water is really running high you can cross the stream on the large tree that fell over the stream which is maybe 200 yards upstream.
Part 4a: Down to Barlow Up and Back Up to the Trail
Once you have passed the creek you are beginning the next up-hill section of this trip. At the seven mile mark you will see a turn-off on the left side of the trail for Barlow Flats campsite. Historically you would continue passed Barlow Flats, but the former trail is washed out. Now The Pine Ridge Trail descends to Barlow, crosses the the river.
proceeds upstream several hundred feet, and then crosses the river, and climbs up the hill back to the old Pine Crest trail.
Part 4b: Over the Last Hill and Down to the Springs
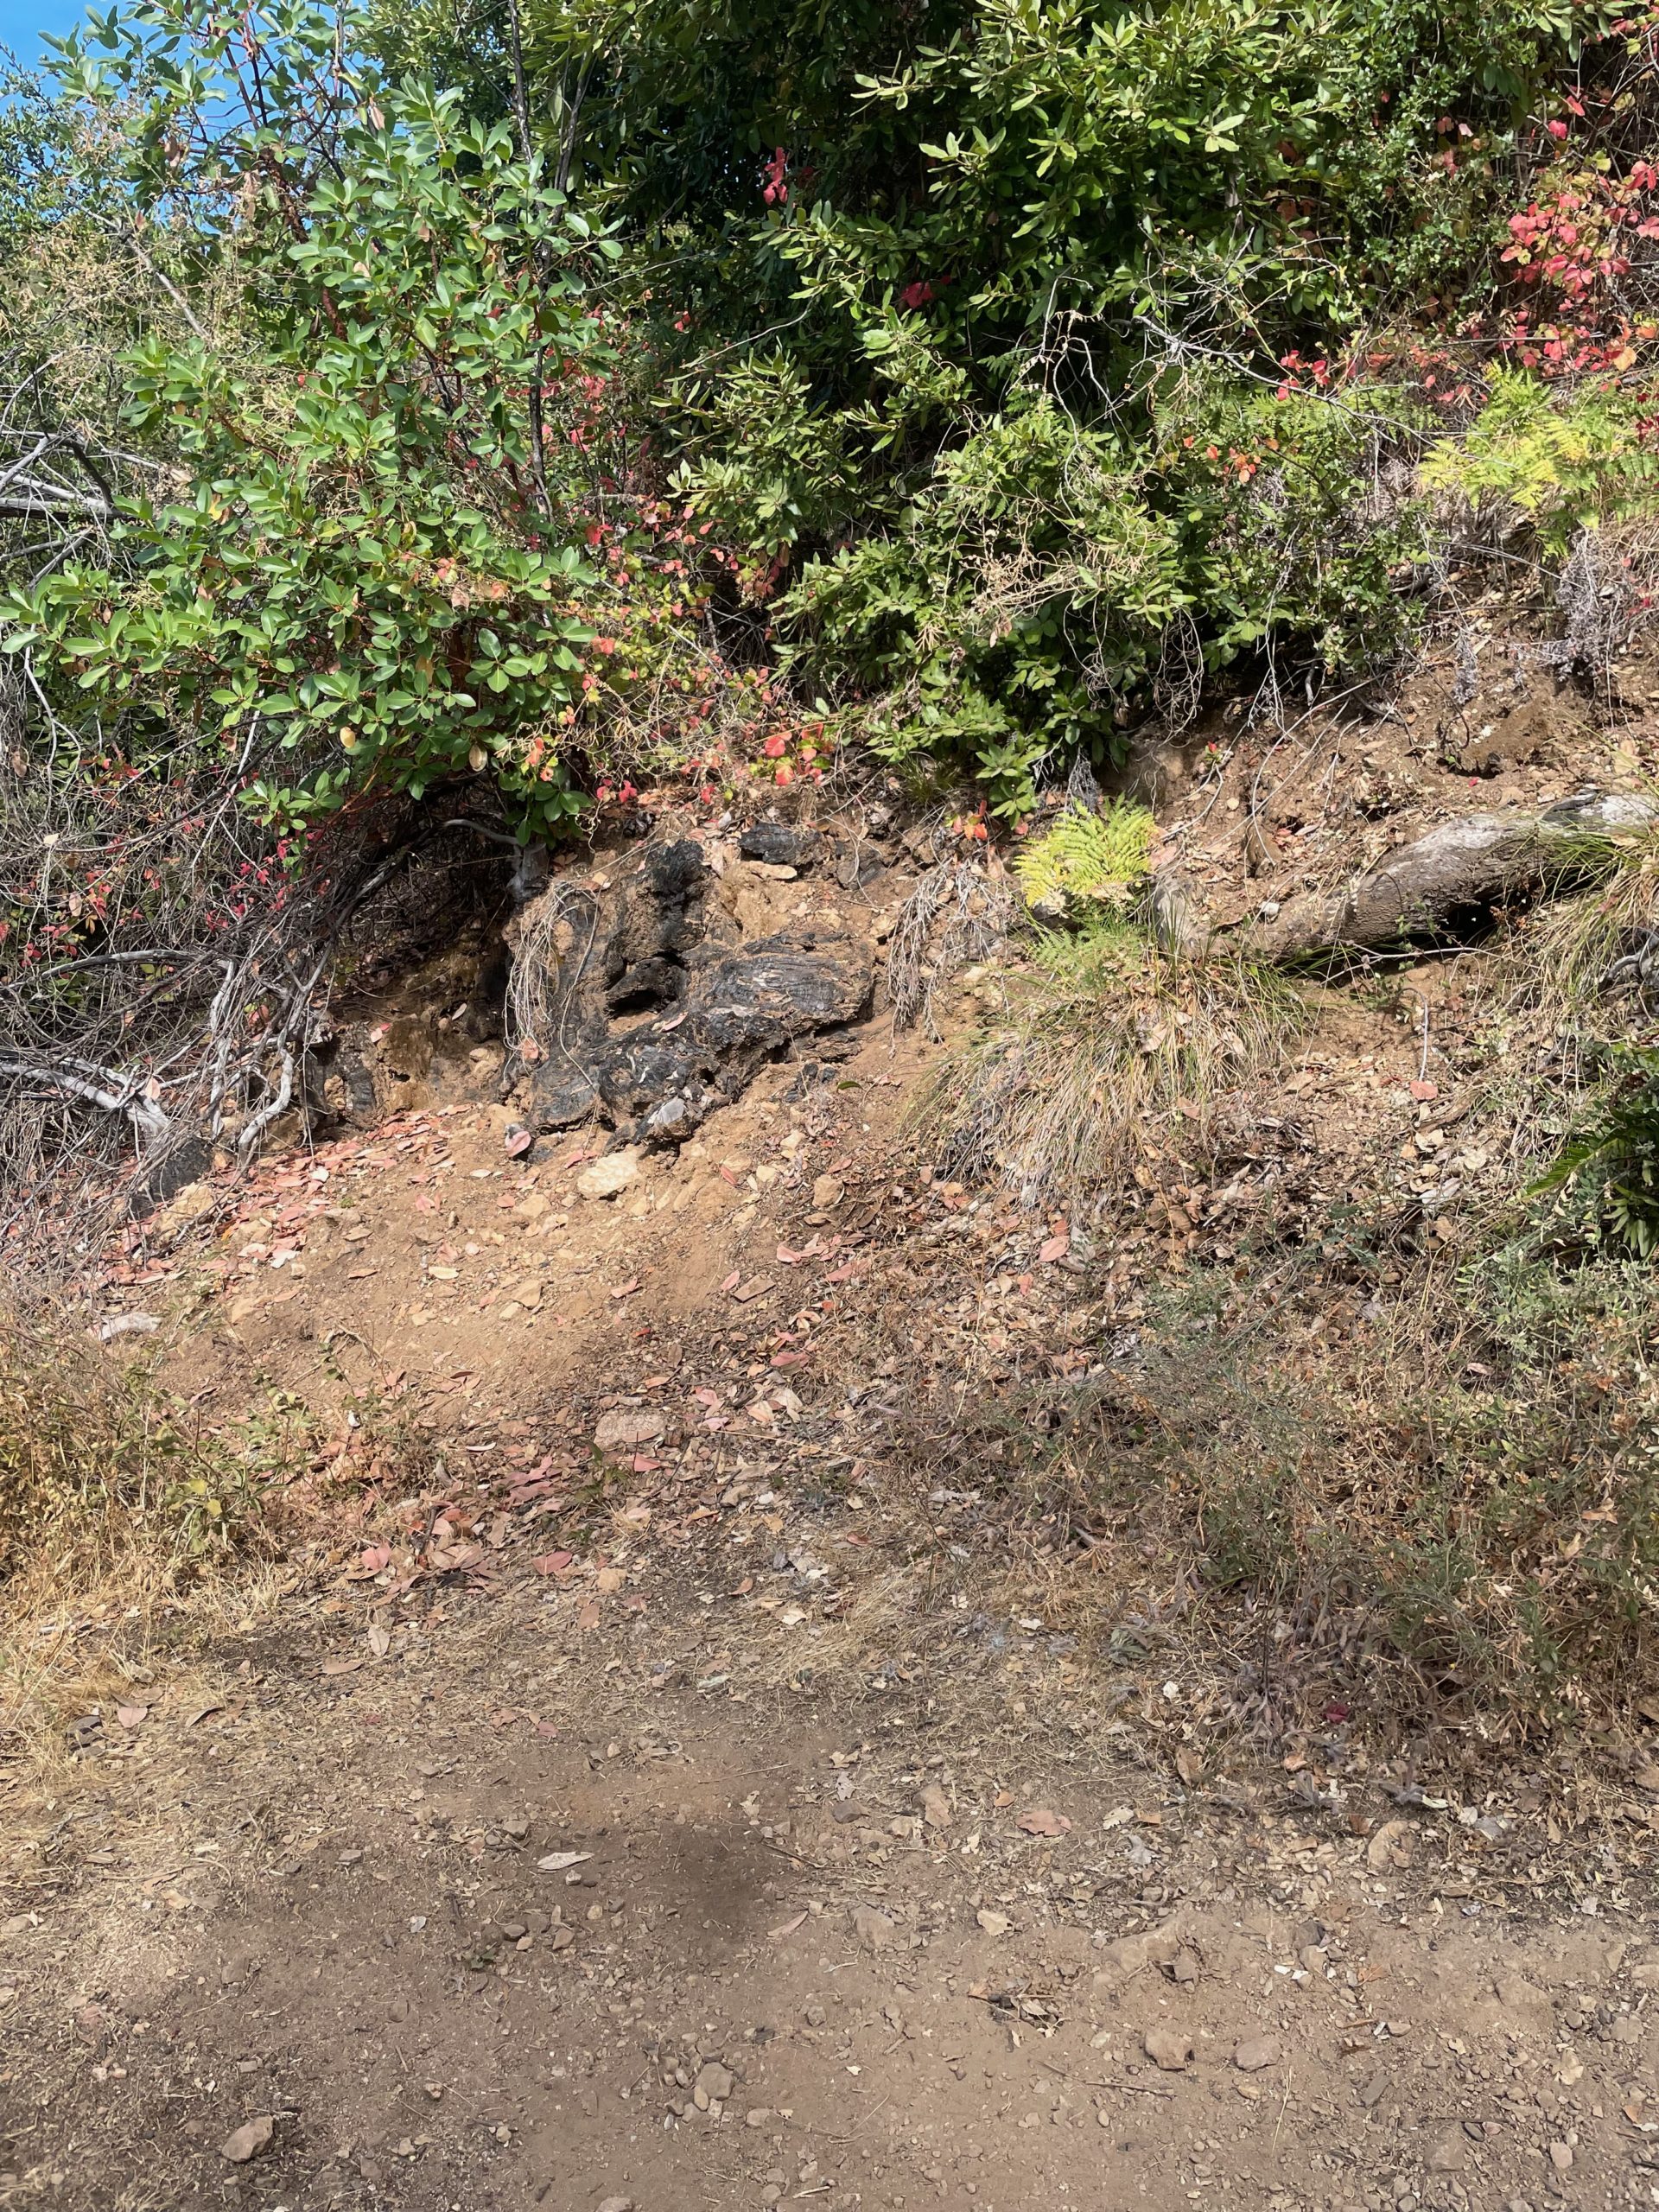
In the next mile or so the hike will get progressively steeper, but is still very pleasant. You know you are near the end of this section when you reach the tree burnt out trunk. This used to be a nice place to stop and have a brief snack before climbing up the last steep climb on this hike
Once you reach the top of the switch back you will have a pleasant mile or two as the trail slowly drifts down toward the river below. Shortly before you get to Sykes the trail will descend a set of steep switchbacks to the river below.
Part 5: Campsites
Now it’s time to decide where to camp. Both sides of the river have a pit toilets. The hot springs are on same side of the river as the trail from Big Sur. If you want a bit of privacy, I would recommend camping on the far side of the river. There are more campsites on the far side, and you don’t have a constraint stream of people walking past your camp on the way to the hot springs.
Part 6: Hot Springs
To get to the hot springs, walk down stream. You will eventually come to a rock face sticking out from the side of the hill. If you are careful, it it possible to climb around the rocks and continue down to the hot springs. Most people, take the safer route, and wade across part of the stream to a jetty (sometimes island when the water is really high).
Continue from the jetty along the left side of the river. You will pass below a pit toilet which is on a step above the river. Follow the river until you see a trail heading up the hill. It will look like you could go a bit further by the river, but I don’t recommend staying by the river unless you want to wade / swim down the river to the hot springs. Follow the trail up the hill. Twice the trail will take you up the hillside and away from the river to get around small cliffs. After the second up-and-over you will be just short of the hot springs. You will know you are close when you smell a slight sulfur odor.
Historically there have been 2-3 soaking pools. One it typically up the hill, while two are down near the river. The pools have been formed using a combination of plastic piping to direct the hot springs output, and sandbags to hold the water in a pool. As of August 2022 the forest service has been actively working to keep this area more natural, having removed the sandbags and piping. The pools are now just rocks and dirt. It’s not quite as comfortable as the previous incarnation but still a joy to use.
Current Top PoolPrevious Top Pool
Keep in mind that some people (maybe 20-30%?) treat the hot springs as clothing optional. A little bit of etiquette can prevent embarrassment and conflicts. Since there are multiple pools it is unlikely that all will be filled with people clothed or unclothed. If naked soakers make you uncomfortable, go to an empty pool or one where people are wearing suits. If you like soaking without clothing and all the pools are filled with people in swim suits, ask if they would mind if you soak without clothing. I am sure that all the people in at least one of the pools would say they don’t care.
Getting There:
Big Sur is a two hour drive from Mountain View if you don’t get hung up in traffic. Take 85 south to 101 south. Take 101 passed Gilroy to the exit for 156 west (Monterey Peninsula). From 156 you will want to take Highway 1 South. Take Route 1 past Monterey and Carmel. Big Sur is 30 minutes beyond Carmel. The entry to Big Sur Forest Service Station will be on the left, is approximately half a mile passed the main entry for Pfeiffer Big Sur State Park. The trail head for the Pine Ridge Trail is at the far end of the parking lot.
Permit Info:
You can pick up a free fire permit at the Big Sur Forest Service Station (8am-4pm) or online after watching a 4 minute video and taking a quiz.
Parking is self serve $10/night… bring exact change and a pen to fill out the form. You have to pay for partial days, not 24 hour periods of time. I got the impress the day “ends” at 3pm. So if you arrive Friday, and come out Saturday in the early evening you might need $30. Read the instruction at the kiosk more carefully than I have.
Wilderness permit is self issued at the trail kiosk.
Weather
You can see current conditions at weather.com – Big Sur. The conditions tend to be pretty mild. Late Spring through Early Fall the days tend to get into the 70s or 80s during the day, and down to the 50-60s at night. Note: It will typically be warmer in the summer at Sykes then by the coast: my last visit it was 68F in Big Sur and 90F at Sykes. The weather in Soledad, CA might be a better indication of the temperatures at the hot spring. It almost never rains with modest bug pressure. It’s possible to ignore the bugs, but I would generally recommend bring some sort of protection. Late Fall through Early Spring I would be prepared for some rain, with days to be in the mid 50s to low 60s, and the nights to get down into the lower 40s.
Personal Supplies
We have a Basic Gear Check List if you aren’t sure what you need to bring as well as a few notes about Getting Starting Backpacking. There are numerous gear lists on the web which might give you other perspectives / ideas. You should bring a towel for the hot springs. I sometime hike in River Shorts which I also use when swimming the river and soaking in the hot springs. In the colder month I save weight by leaving my swim suit behind and soak in a pair of dark colored capiline boxer shorts with the fly sewn shut which provides adequate coverage for modest.
The bathroom by the trailhead doesn’t have heating or cooling, and only has cold water. The bathroom on the site of the ranger station has hot water and is heated / cooled as is the station.
On your way out, eat at the Big Sur Bakery. About 1 mile south of the park on the west side of Route 1. Excellent wood fired oven pizza, many other tasty items. Their chocolate pudding is really good. If the Bakery is closed try the Rio Grill in small shopping center on your right just as you get into Carmel.
Review Item: BalloonBed Original Sleeping Pad Manufacturer URL: http://www.balloonbed.com/ Manufacture Year: 2005 Listed weight: 100g (3.5 oz) Weight as delivered: 85 g (3oz) + .7g (.2 oz) for a night of balloons MSRP: £18.95 GBP (~US$38 depending on exchange rate)
Description
Brownish green fabric holster to hold balloons, small sack made from the same light material to hold all the items, balloons, and a small hand pump. While the fabric might be 60cm x 120cm (24″ x 48″) when laid flat, with the balloons inserted the pad is 40 cm x 120 cm (16″ x 48″) which is significantly narrower than most other pads. Hand pump has a cute picture of a clown.
Field Conditions
40-11K ft. Sleeping under a Nunatak Ghost down blanket. Night time low temp between 45-55F using just the balloonbed, and between 30-50F with a combination of the balloonbed and the Gossamer Gear Thinlight Pad 1/8″ foam pad.
Performance
Ten minutes to assemble. The hand pump is surprisingly effective, though when I finished pumping the seventh balloon I was glad to be done. Inserting the balloons into the pad was strait forward
I found that the balloonbed was more cushioning than a therm-a-rest ultralight pad or closed cell foam pad, but less cushioning than insulated air mattresses such as the Big Anges Insulated AirCore. If I stayed in a single position I found the pad wide enough, but I found when I switched sleeping positions (from say on my back to on my side) I often rolled off the pad and then need to reposition the pad and myself.
Plenty warm for 55F sleeping with a quilt. Below 55F the lack of insulation is evident and I started to get chilled. I found that I had a very hard time sleeping when using just the balloonbed when the temperature got down to 45F. When combined with a 1/8″ foam pad I found that I was comfortable down to around 35F before I noticed a chill reaching me through the two pads.
My experience with the balloonbed staying inflated has been very mixed. I have had a number of trips when the balloonbed made it through the whole night or when just one of the balloons popped. I found that a 20F drop in temp didn’t cause the balloons to shrink noticeably. On the nights that one of the balloons popped, I had a raging debate with myself: live with the missing tube and just go back to sleep, or climb out of bed, dig out another balloon, blow it up, and then go back to bed now that I was fully awake. The first time this happened I pulled out my max-thermo (this was a test trip) when the temperature dropped to 50F and I was starting to get cold in addition to having a missing tube. On later trips I tried sleeping with a popped balloon. I found that if I pushed the pad together the missing space I could go back to sleep and the pad worked moderately well. I found that is was easy to replace the popped balloon, and would recommend that options. Alas, I have had a few nights when nearly all the balloons popped or leaked so much air that the balloonbed was pretty useless for padding or insulation. Why the near total failures on those trips? I can’t identify any root causes. At the present time I would say that using a balloonbed is a risky proposition.
Durability
Only used it for a 21 of nights so far. 12 of the nights I made it all the way through the night. On 5 on the nights, 1 balloon popped. 4 of the nights I lost nearly all the balloons. I don’t reuse ballons between nights.
Summary
If you are trying to go super-ultra-light, and can’t hack sleeping on a foam pad, the balloonbed might be just the ticket to drop a pound or so from your kit weight.
Things that I liked:
Super-light weight
Extremely compact
More comfortable than a therm-a-rest ultralight or closed cell foam pad
Things I don’t like:
Unreliable
Too narrow
Not as comfortable as the Pacific Outdoors Insul thermo-max inflatable pad.
The disposable nature of the balloons
Kind of expensive for what you get. You could make this yourself for less than $10 such as Bill’s CheerStic Air Pad.
The following was Patagonia’s response to some questions about materials and testing which was posted in 2005 to a public forum. Most of this article matches my personal experience and still seems valid today.
Mark Verber
Innovation, that steamroller of change, has, over the past five years completely redefined the way people dress for the mountains – to the benefit of alpinists, anglers, snowsliders and endurance athletes who can stay out more comfortably and for longer stretches.
But innovation has also brought confusion to the retail floor: claims and counterclaims abound. How does one make sense of the multitude of marketing messages?
The goal of this document is to help clear the fog, to go back to first and basic principles, to concentrate on the customer’s essential question: For the activities I pursue in the conditions I encounter, how do I stay warm and dry?
That’s Patagonia’s focus when we design. What’s the need? Then, how do we create a product that will meet it?
Technology and Change: What’s It Good For?
At Patagonia, technology is secondary: it’s backstory. A means to an end. Only when we come to a full understanding of the performance requirements for a garment do we dive into the details: choosing the elements of the fabric package, but also – and this can get lost in the current discussion – construction, features, fit.
When technology comes second and performance goals first, “off-the-shelf” fabrics rarely fit the bill. An existing fabric more often than not has some of the performance characteristics we require but lacks others. So we’ll work with the supplier to tweak it: change some element of the construction, or use a different lining or finish.
Our more successful concoctions get adopted by the industry as a whole. The shelves and racks of outdoor stores bulge with non-Patagonia products made of fabrics we helped develop over the years: among others, Malden’s Polartec 100, 200, 300, Power Stretch, Thermal Pro, and Recycled Polartec fleece; Dyersburg’s Eco Fleece; Gore’s Activent and Windstopper fabrics; Nextec’s Epic water-repellent finish.
In any given year, we work as closely as we can with over 80 mills and suppliers. These relationships, built up over 30 years, are important to us. But the customer’s need comes first: Patagonia will always employ the best, most appropriate fabrics (and construction, features, fit) for an intended use. When a better technology comes along, or when we can help create something better, we do.
Sometimes – as is the case now with shells – the rate of change is dizzying. Our Dimension Jacket, for instance, at the time of its 2001 introduction, was more breathable, more wind- and water-resistant and quicker drying than any competing soft shell on the market. It won industry and customer accolades and sold well. Only two years later, we changed both the fabric and surface treatment – to achieve an 80% increase in breathability and a 20% reduction in weight.
On the other hand: Capilene®. For the past 18 years we have worked with one supplier to continually improve the performance of our Midweight base layer. And although the 2004 Midweight Crew is in every way better than its 1986 original, the DNA match still looks pretty close.
Have we looked at alternatives? Of course. Have we tested all the new underwear fabrics from all suppliers as they’ve come on the market? Yes. Some have great stories behind them, but none pan out to our satisfaction. After 18 years, the only garment that outperforms Midweight Capilene, for some conditions and some uses, is an appropriate Regulator® base layer.
Capilene technology is not complex, which brings us to a related point. Although we work hard to develop the best possible fabric package for each product, why overbuild? The ice climber, for instance, needs the stretch, high compressibility, low weight, extended DWR performance and breathability that H2No® Stretch HB fabric lends the Stretch Element Jacket. But many of those characteristics are overkill for even the most committed alpine skier or patroller, for whom the Primo Jacket offers more sport-specific features and an excellent, more downhill-appropriate fabric: in this case, Gore® XCR®.
The Patagonia Lab: What Goes On Behind the Swinging Doors?
We test ALL emerging fabrics and technologies, whether we’re involved in their development or not. Last year, we conducted 3,796 tests on 836 fabrics in development. Of those, only 56 performed well enough to be adopted. The lab also conducted nearly 15,000 tests on production lots to ensure that adopted fabrics perform to expectations.
The qualities we test for include breaking strength, abrasion and tear resistance, bonding strength, breathability, zipper strength, compressibility, water repellency, wind resistance, wicking speed, colorfastness and garment durability in wet conditions.
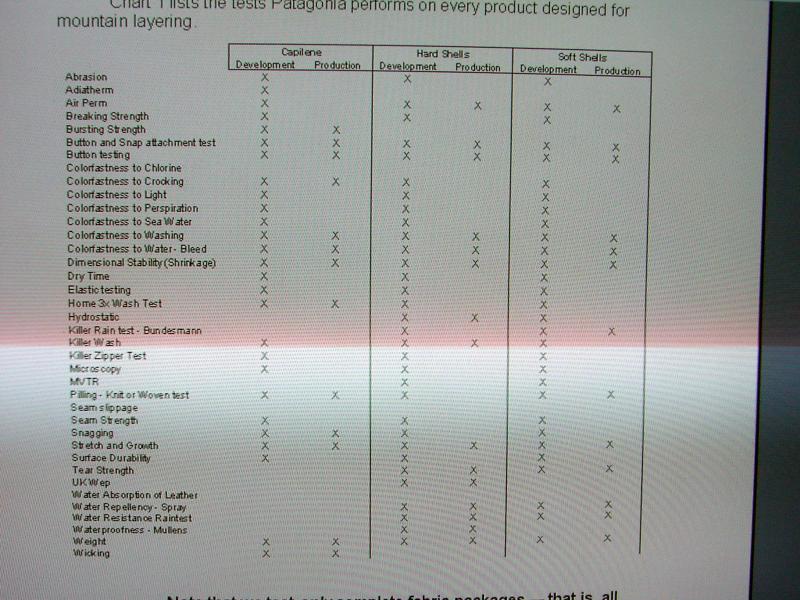
Chart 1 lists the tests Patagonia performs on every product designed for mountain layering.
Note that we test only complete fabric packages – that is, all the fabric components used together in a final garment. It’s useless to test, for instance, a waterproof/breathable barrier without its substrate. The barrier will never be used alone.
And we test to predict performance in the field, not to generate winning numbers. The tests derive initial, preliminary answers to the important questions: How does one component of a fabric package affect the garment’s overall performance? How will this overall package perform in a range of conditions, and after a full season of use?
Testing for long-term performance is especially important because many fabrics that ace their exams when new, and would perform beautifully on the sales floor should the roof leak, but deteriorate rapidly in mountain conditions. What are some of the most important tests? What do they signify for end use? We’ll take you through a few of them and, along the way, point out what they can’t tell you.
What is the PSI Test for waterproofness?
PSI (pressure expressed in pounds per square inch) is a measure of the strength of a waterproof barrier before water penetrates. A person weighing 165 pounds, for instance, exerts about 16 PSI on the knees, when kneeling. The military standard for waterproofness is 25-PSI, the industry standard – and practice – much higher.
Patagonia actually performs two tests to check a barrier’s waterproofness: the traditional Mullens Test and, more importantly, the Hydro Test that yields PSI after extended performance. All barrier technologies used by the outdoor industry are better than waterproof when new. And they all degrade with time, and at greatly variable rates. We want long-term performance, not a superhigh off-the-shelf rating that plunges under a bit of rain.
We have rejected, for precisely this reason, the newer lower-priced 2.5-layer hard shell packages, including those adopted by other manufacturers, in favor of an H2No package that maintains its waterproofness long after others have noticeably deteriorated.
The H2No 2.5 layer package has a superior surface water repellent; a barrier less prone to contamination from dirt and oil, which can “draw” moisture through a fabric or membrane via capillary action (as well as reduce breathability). In place of standard coating or dots, a slightly raised, internal 3-D matrix provides durable service (as well as better wicking and compressibility).
How does MVTR indicate breathability?
Moisture Vapor Transport Rate (MVTR) measures the ability of a fabric to pass moisture from the inside to the outside of breathability in grams per square meter per day. Unfortunately, dozens of test methods are used to measure this: beware of direct comparisons of fabrics tested by different methods.
Patagonia uses an ASTM protocol known as E96 that allows us to create a pressure differential between the inside and outside of the fabric, one that is reasonably identical to conditions you encounter in the real world (i.e., E96 test results correlate consistently with those of our field testers). It’s the only test that does not introduce artificial factors like excess heat and pressure. E96 also allows us to measure MVTR without regard to air permeability (which we measure separately): this gives us a true measure of a fabric’s inherent ability to move moisture. And we can test two levels of exertion, low and high.
We’ve developed our own MVTR chamber, one recognized by independent research facilities for its excellence. Our tests are highly repeatable and produce consistent results.
How does CFM measure wind resistance?
Cubic feet per minute per square meter (CFM) is a measure of the wind resistance or air permeability of a fabric. The higher the CFM, the greater the volume of air passing through.
When hard shells dominated the landscape, discussions about CFM didn’t come up. Traditional barriers like H2NO, Gore, Triple Point, Entrant, and other respectable waterproof breathable technologies all have a 0 CFM rating. They are absolutely windproof.
With the advent of soft shells and more breathable fabrics, the air permeability argument becomes complicated, sometimes heated.
Traditional layering has always taught the “vapor barrier warmth” concept. That is, maintain a (windproof) stable dead air space next to skin and you will stay warmer. That’s true, if you’re watching football game from the stands in November.
But what happens when you’re pounding uphill to the ridge before someone else sneaks into that untracked line of new powder? You can use a bit of convective heat loss; and you need more breathability to move the extra moisture you create through exertion.
And a fabric with 0 CFM doesn’t provide it. We’ve found that fabrics that measure as much as 5 CFM are still functionally windproof: that is, you don’t feel the breeze come through. And they afford much greater comfort on the uphill. So we use 1-5 CFM as our standard for weather-protective soft shells (Mixmaster, Dimension, Dragonfly, etc.)
Shells for higher exertion activities (e.g. Slingshot, Super Guide Pants, Talus Pants) must be even more breathable. For these products we hold to a comfortably wind-resistant, but not windproof, standard of 10-15 CFM.
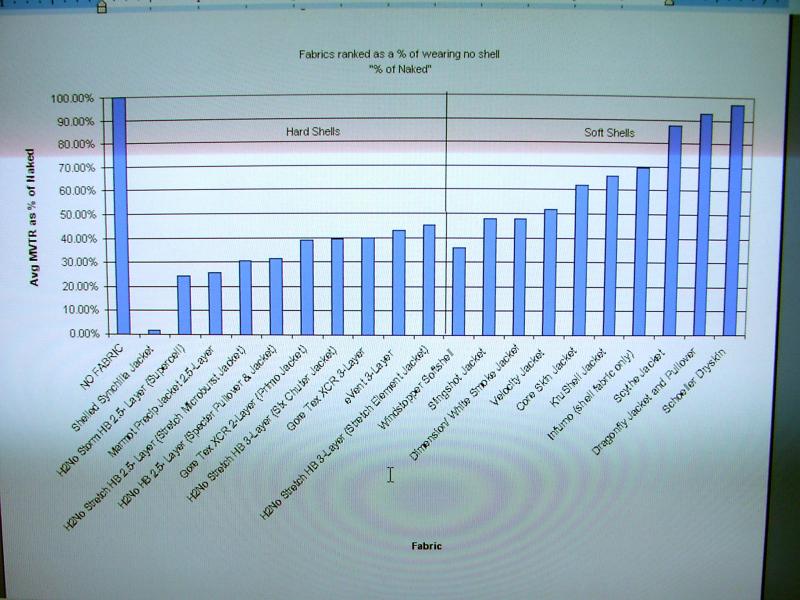
Beyond this, we don’t go. We don’t produce shell fabrics with a higher CFM (say, 15-20) because our field test shows that further gains in breathability don’t offset the heat loss from wind penetration. (See Schoeller Dryskin on the chart on the next page- offering high breathability, but not enough wind protection) The goal is: both warm and dry.
At the other end of the scale, as mentioned, we don’t make 0 CFM soft shells. What’s the point of a soft shell that doesn’t breathe better than a hard shell?
What is Percent of Naked?
Patagonia has developed an intuitive way of evaluating overall breathability called “Percent of Naked,” in which we directly compare the combined MVTR and CFM data of a fabric to data produced by the same equipment, but without fabric. [Love of the idea of this, but just how do we use equipment with no fabric: sounds more than naked, positively immaterial] This gives us a base line to compare individual fabric performance to the holy grail, the 100% of comfort and breathability: how you feel naked in your living room with the thermostat at 72 degrees.
How does the Bundesmann Test measure water absorption?
We use the Bundesmann principally to test the performance of DWR finishes. It’s a more demanding, and accurately predictive, test of water absorption than simple spray tests that uses a shower head to wet a rotating piece of fabric for ten minutes or more. Samples are then tested for dry times (and results compared to those we get from the field.)
What does the Killer Wash really do?
A low-tech wonder, our Killer Wash is simply a Maytag modified to churn, churn, churn until we kill the switch. Twenty-four hours is our usual minimum, the equivalent of 160 wash cycles in a home machine. The Killer Wash is more than an excellent test of the durability of laminates and DWR finishes; it gives good clues to a fabric’s overall ability to stand up to punishment in alpine conditions. It also tells us what components of a garment are prone to wear out before others (and thus need beefing up).
Does Patagonia measure dry times?
Absolutely. Wet and cold outdoors spells misery. Fast dry times are critical. Patagonia rejects many otherwise promising undershell fabrics for their slow dry time. Our test apparatus: a fairly sophisticated moisture analyzer that measures how many minutes a fabric takes to dry over 90-degree (body) heat.
What is a “Soft Shell”?
Simply put, Soft Shell is a concept, not a category. A soft shell, constructed of either a static or stretch fabric, will contain no waterproof barrier – breathable or otherwise. If internal moisture must turn to vapor to exit the shell, it is not soft. A soft shell is, by construction, highly water and wind-resistant and extremely breathable. Secondly, stretch woven garments that afford no effective wind resistance in mountain weather may be soft, but they ain’t shells: they’re gym clothes. Or we can think of it this way, choose your soft shell based on the level of exertion you will output for your intended activity. Consider the spectrum of highly aerobic (skate skiing, trail running) to stop and go (Alpine routes, fly fishing) and then make your purchase choice.
If you remember nothing more of this document, remember this one statement: A soft shell will, more often than not, allow you to stay drier longer, in a wider range of conditions, than its conventional hardshell counterparts. If you are still thinking, “ok, but for how many minutes will my softshell keep me dry?” then the point has been missed. So, before continuing, go back to the top of this paragraph and read it again.
As we said at the outset, technology is only a means.
Performance comes first.
That’s why we don’t use slow-drying elastic fibers in soft shell jackets (though we do in pants, which lie closer to the body as a heat source). That’s why our shell tops employ mechanical stretch weaves to achieve freedom of movement without slowing dry time – and thus diminishing breathability. Why we use directional linings to speed moisture transfer. Why we use exceptional – and long lasting – finishes to keep the surface dry in our proprietary Deluge™ DWR. And why we always use the best of the technologies available (and often have a hand developing them).
Patagonia & Gore-Tex- Where’s the love?
There is no question that Gore-Tex monolithic fabrics, especially XCR, are strong waterproof/breathables. In the history of waterproof/breathables they certainly set the standard for years – and that is precisely why we used them when they were at the top of the food chain. That said, from a development and testing perspective, today Gore-Tex fabrics are dated in terms of performance and price. To put this in perspective, consider our current H2No HB Stretch Element jacket and pants for comparison. The Stretch Element is not only noticeably more breathable than XCR in field trials, it is also very soft and has remarkable, stretch as compared to stretch fabrics which have what boils down to ‘cosmetic’ or ‘marketing’ stretch. Gore’s current technology, PTFE doesn’t stretch so we don’t expect to see dynamic stretch fabrics in Gore’s near future. Additionally we have found our own Deluge DWR to offer significant performance benefits over the DWR offered (and required by license to be used) by Gore.
Additionally, consider the changes that brought about XCR’s level of breathability: a serious reduction in the urethane topcoat applied to Gore-Tex. In fact, this is what changed early Gore from a highly breathable first generation to a not so breathable second generation. So can you guess what the remedy was? Correct, introducing XCR.
Add to this the wide variety of face fabrics and interior treatments (think 2.5 layer patterns and scrims, etc) that we have at our disposal with non-Gore product, coupled with the higher price on Gore, especially XCR and it starts to make sense.
So what it boils down to is better performance and value in our own technologies. We have no doubt that Gore will respond to the softening of their market with research and development which is why we keep ourselves open and not tied to single technologies. We insist on state of the art product – period. Things change too quickly to ride only one horse.
Why don’t we use Gore Windstopper?
Pretty much the same story here…we did use Gore Windstopper when windproof fleece was first developed in the late 80’s, early 90’s. In fact, in field trials it was noticeably better in terms of breathability. Today however, in our R4 jackets and vests, we have windproof fleece that is not only more breathable, but has remarkable stretch and softness. Remember, Windstopper is not Soft Shell and cannot be, given its current PTFE barrier technology. We have the capacity to control our barrier technology for different applications whether it be monolithic Hard Shell or Soft Shell – this is really important to us as this allows us to address the limitation that windproof fleeces manifest.
And Gore “Soft Shell”?
This is really simple…. it is not Soft Shell, its simply Gore-Tex with a brushed scrim that makes it softer on the inside. It’s just marketing. So Gore Soft Shell has little to offer the Soft Shell market. Gore can only throw marketing dollars at a game of semantics and hope to confuse the issue enough to become a viable player in Soft Shell. Again, hopefully they will throw their energies into some true Soft Shell product.
The limitations of the Lab
There are two inherent problems with all lab testing. First, good numbers can become ends in themselves (0 this, 100 that) and deflect from the central goal of making a great product, period. Lab data can become numerologically based mysticism.
Second, numbers can be manipulated, easily. Not only do specific numeric performance standards vary from fabric supplier-to-supplier and manufacturer-to-manufacturer, companies use a variety of equipment – and protocols – to test fabric attributes. In fact, most outdoor manufacturers don’t have their own serious testing facilities and have to rely on the word of others. “Spinning” the data, in a self-interested way, is not an unknown phenomenon. Other companies practice earnest science but go clueless when they try to correlate lab and field data. The upshot: you simply can’t usefully compare data from different companies. Always beware of numbers used for marketing, how they were derived – and what they mean.
Field Testing: What Happens When We Take the Product Outside
Many of our lab tests turn out to be keen predictors of performance. Comparing the specific criteria of one fabric against another in a controlled environment is a critical first step. But the true test – of how all these individual characteristics work in one garment – must follow in the natural world, and from a human being pursuing a real experience in actual conditions.
In-the-field testing of prototypes is critically important. You just can’t know how a fabric or garment performs until you try it out as it is intended to be used. Last year, we had 30 field testers put 203 prototypes and samples through the paces, all over the globe. Our testers are paid, trained and extremely skilled.
In the words of Duncan Ferguson, our long-time field-testing chief: “Our job is to endure some misery in the field so our customers don’t have to.”
On a bivouac in below-0 weather and howling wind, no one cares any longer about acronyms or numbers or charts or graphs, but whether a zipper works, a collar protects the chin, the body stays warm, the skin stays dry.
Only a handful of the prototypes we test make it into the line. Technology’s fine. But nature bats last. And she only reveals her power in the wild.
Endgame
And so we’ve come full circle. Technology and testing, the lab and field, checks and balances, yin and yang. We’ve left the marketing, the spin and the spray out. Instead you hopefully understand by now that we are absolutely committed to the pursuit of better and better products, achieving optimal benefits for their intended uses.
Yet, by this point, you may envision us as lab technicians in white coats. You may imagine mustached scientists in pleated trousers clutching electronic daytimers. Perhaps you are thinking of Church Ladies in long dresses and soft shoes. Well, truth be told, we’re still just phunhogs – climbers, anglers, paddlers and surfers, activists and athletes who through serendipity or otherwise, became fabric connoisseurs obsessed with building the best product and doing the least harm.
So, we’ll leave you with this: Patagonia is a product driven company, run by folks who, you may be surprised to find are just like you. We are never market driven. We are not corporate giants, owned by other corporate giants who have only initials for names. And, while we have no place on Wall Street, we do have shareholders: our resource base. Our shareholders have been celebrated by John Muir, photographed by Ansel Adams and described in the prose of Edward Abbey. Our shareholders have roots, rock and rhythms. Without them, we have no business, no future. And, here at Patagonia, we’re do business like we plan to be here for the next 100 years. Thanks for reading.
Addendum:
Test & Protocol descriptions:
Mullens Test- Mullens is a high-pressure test used to measure waterproofness up to 200 lbs. Per square inch
Hydrostatic Test- This is widely used worldwide for seam tape testing and low-level waterproofness. It applies 3 lbs. of pressure for two minutes.
Bundesmann Test- This is a very rough spray test. The normal spray test sprays a gentle stream of water from 4 inches above the fabric that has been angled at 45 degrees for approximately 10 seconds. The Bundesmann drops a heavy shower of large water droplets on a flat surface of fabric from 60 inches for a period of 10 minutes. We’ve adopted this test because our DWR’s passed the normal spray test too easily and we needed a tougher test that correlated better to actual field use. Our standard for Deluge DWR is a 90% rating (10% wetting) after 24 hours killer wash- a very, very tough test.
What is ASTM protocol? ASTM is the “American Society for Testing and Materials.” Almost every test method out there is written into an ASTM standard, most but not all have comparable EU and JIS (Japan) standards.
Backpackers have to protect their food against animals while they sleep. In most parts of the country correctly hanging food in a bear bags can be effective. Unfortunately bags won’t protect your food in locations with habituated bears whose response to backpackers is “Great, I get another treat filled piñata tonight”. In Yosemite I have watched bear tracking backpackers while they were hiking resulting in an after dark visit. I hate the weight of a bear can, but always use one in locations that have a high frequency of human / bear interaction. Please do the same. Below was a great post by Don, the creator of the Photon Alcohol Stove:
From: Don Johnston [djohnstonREPLACEWITHATSIGNcomcast.net] Sent: Thursday, July 04, 2002 4:48 PM To: BackpackingLight@yahoogroups.com Subject: Bear bagging thoughts
Anyone who hasn’t been to Yosemite really should visit just for the eye opening education (and the scenery). Go to Yosemite. Camp in little Yosemite valley where there are lots of trees that meet the Ideal hanging criteria. Place most of your food in a Garcia Bear can. Hang the rest of your food by what ever method satisfies you. If a bear visits the area my money says you will be be eating breakfast out of the Garcia bear can while you clean up the mess around your formerly hung food bag. Pay your ticket and go home. The Yosemite bears know tricks that would amaze and astound folks attending the Greatest show on earth. Just to mention a few of the most well known techniques: Kamikaze bear (various variations on branch breaking or leap from another branch), Totem pole bear (The tower of bear cub on bear gymnastics would make a Cheerleader or Pom Pom squad proud), Chain saw bear (sharp teeth, strong jaws, soft wood, lots of time). Send up the bear cub to walk out branch. (Many results possible including the branch breaks and both cub and food come to moma below) There isn’t a more motivated and patient bear in the US.
They don’t give up and will frequently work the problem all night and sometimes keep working the problem in daylight. They have learned that they are more motivated to get your food than you are to defend it. You sleep they don’t. They are often seen hovering around horse pack camps just out of stone toss range for days at a time. If one doesn’t loose food that is properly counter balanced in Yosemite the bear didn’t visit or the bear was not motivated to work the problem due to known easier pickings.
Outside certain areas of the Sierra, counter balance hanging when done right works over most of the rest of the USA but not everywhere. Even in the Sierra your food is safe if it is in an area bears have not learned provide good piqata hunting. If there is no bear visit to your site your food is safe sitting on the ground. I have kept my food in the Sierra by a combination of stealth camping where no one else camps and luck. On my first Muir trail hike I stayed at Hamilton lakes in Sequoia. The other folks camped in the area hung their food well but theirs fed the bear so my hang wasn’t challenged. I was lucky. Perhaps the softball size stone I had caused to descend crashing down through the branches of a small tree next to the bear in the early evening had caused him to look at the other folks site first. Just because I didn’t loose my food doesn’t mean the bear could not have gotten it.
Bear cans are required in some areas because they work at any campsite and more people can operate them properly than are will to put forth the time and effort to hang their food properly. Bear cans are usually required because of a history of bears wrecking trips by regularly getting backpacker food. The bear also becomes more dangerous to human life and property and eventually has to be destroyed. Posts on this list show that there are varying levels of willingness to meet height over the ground criteria. People think if they can’t reach it the bear can’t either. That depends on the bear. Many can reach much higher than we can and two bears can reach higher still. All the bear needs to do is touch it in a swipe with extended claws to rip most bags. Few people will spend the time searching for a branch that meets the size, length, drop, and distance from other branch requirements that make it difficult for a bear get your food down by working the problem from up in the the tree.
Campsites often don’t have trees that have much chance of giving a bear a hard time. Bears have defeated both hang from cable systems and pole systems. It doesn’t help when Backpacker Magazine publishes methods that are nifty and stupid. They may work in non problem areas but not in popular areas like Sierra, smokies and Adirondaks.
When we visit each new campsite it is new to us. We may think the site has a very good hanging tree but the bear lives there and knows his way around the pantry of his house. Food hung from trees the bear is already well practiced at defeating may look good to us but if the bear has already learned the combination he is going to defeat what we view as a well locked pantry because he already knows the combination.
Bottom line is the Garcia Bear can is proven to work better than anything else. Especially with inexperienced people and that is where we all start. Proper hanging of food takes experience, time and willingness to learn. Properly done counter balance hanging works very well in areas where the bears do not have a history of defeating it. Especially if they are not motivated to try due to plentiful food sources.
This is not a Garcia can advertisement. I have no connection with the company and don’t own one. Personally I would look for lighter alternatives that are accepted in the area I would travel in.


